You want a color printout but every time when you take a print is it printed in black and white? You may be wondering why is it so and how to fix it. This could be due to various reasons, firstly check whether your page is set up to print in ‘grayscale’. This grayscale option always prints black and white. If not might be the print driver needs an update etc. In this article let us see the different methods to fix the color issue.
Method 1: Verify If The Print Settings Is Set To GrayScale
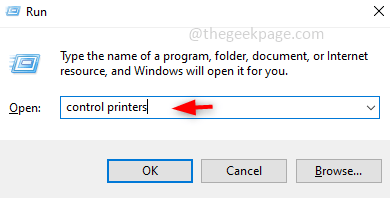
Step 1: Open the Run prompt using Windows + R keys together.
Step 2: Type control printers in the run prompt and hit enter.
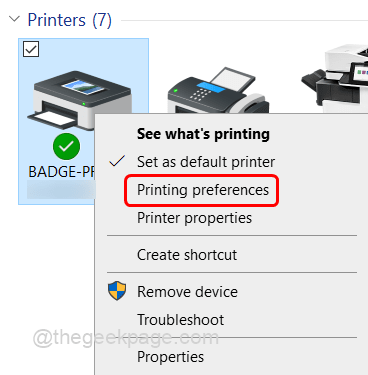
Step 3: Under the printer section, right-click on your printer and click on printing preferences.
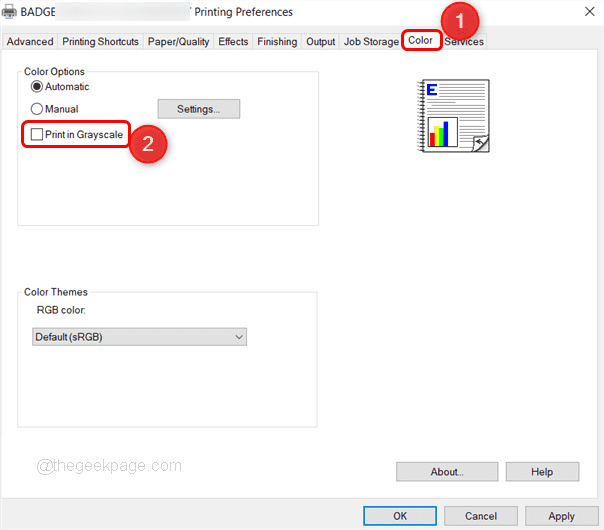
Step 4: Click on the Color tab and make sure that the Print in Grayscale option is disabled that is it should be unchecked. If it is enabled click on the checkbox to disable it.
Step 5: To save the changes click on Apply and Ok.
Method 2: Run Windows Print Troubleshooter
Step 1: Open Windows Settings using Windows + I keys together. Click on Update & Security.
Step 2: Click on Troubleshoot from the left pane and then on the right side click on Additional troubleshooters.
Step 3: Click on the Printer and there appears Run the troubleshooter button, click on it.
Step 4: It takes a few minutes to detect the problem, then follow the onscreen instructions to complete the troubleshoot process.
Step 5: Restart the computer and check if the problem is solved.
Method 3: Set The Device Type To Color
Step 1: Open Settings using Windows + I keys together. Click on Devices.
Step 2: On the left side click on Printers & scanners and on the right side select your printer name and click on the Manage button.
Step 3: Click on Print properties from the left side.
Step 4: In the appeared window click on the Change Properties button. Select the Device Settings tab.
Step 5: Scroll down and click on device type, there appears a dropdown select color from the dropdown.
Step 7: Click on Apply and then click on OK. Now print and check if you can get a color printout.
Method 4: Update The Print Driver
Step 1: Open the run prompt so press Windows + R keys together. Type devmgmt.msc in the prompt and hit enter.
Step 2: This will open the device manager. Scroll down and find Print queues.
Step 3: Click on the dropdown at its left to expand it. Right-click on your printer and select Update driver.
Step 4: There will be options saying the search for drivers automatically or manually. Choose automatically unless you have already downloaded the latest drivers.
Step 5: Follow the on-screen instructions to finish the update process.
Step 6: Restart your computer.
Method 5: Remove And Re-Add The Printer
Step 1: Open the run prompt, to do so press Windows + R keys together. Type control panel in the prompt and hit enter.
Step 2: In the view by dropdown which is on the right side, select Large icons.
Step 3: Then click on Devices and Printers.
Step 4: Right-click on the printer device that you are using and click on Remove device.
Step 5: Make sure your printer is ON. Then at the top click on Add a printer.
Step 6. In the appeared Window select your printer to be added and click on Next.
Step 7: It will connect to your printer. Meanwhile, a confirmation message will appear on your printer device, click on ok.
Step 8: Now the printer will be installed.
Step 9: Take a printout and check if you are getting a color print.
Method 6: Uninstall And Re-install The Print Driver
Step 1: Open Settings by pressing Windows + I keys together. Click on Devices.
Step 2: On the left, click on Printers & scanners.
Step 3: Select your printer and click on the Remove device button.
Step 4: Open the control panel for that press the Windows + R keys together and type control panel in the run prompt. Hit enter.
Step 5: In the View button dropdown, select Large icons
Step 6: Click on Device and Printers.
Step 7: Right-click on your printer and click on Remove device.
Step 8: Open the Run prompt using Windows + R keys together and type printui.exe /s
Step 9: In the appeared window click on the Drivers tab and look for your printer, if present select it and click on Remove.
Step 10: To save the changes click Apply and OK.
Step 11: Restart the computer.
Step 12: Re-install your printer driver from the manufacturer’s website.
Example – I want to download the HP Universal Print Driver PCL 6, so I visit the manufacturer’s website i.e HP and click on Softwares, Drivers, and Firmwares.
There appears a list of related drivers and options to download. Select the one which is the best fit and click on download.
Once the download is completed, double-click on that file and follow the on-screen instructions to install it.
Restart your system and take a printout to check if the issue is solved.
That’s it! Hope this article was helpful. In the below comments let us know which of the above methods solved your problem. Thank you!!


