Are you seeing the “BlueStacks can’t start when Hyper-V is enabled” while trying to initiate the BlueStacks app on the system? Actually, the older version of the BlueStacks does come directly in conflict with Hypervisor or Hyper-V. But, there are versions of Bluestacks that officially supports the Hyper-V. So, there are two easy ways to sort this problem out.
Way 1 – Disable the Hyper-V feature
Way 2 – Install a new Bluestacks that support Hyper-V
We have described both the process in detail so that you can choose the correct solutions that suites your condition the best.
Way 1 – Disable the Hyper-V feature
Hyper-V is an optional feature on your system and may contradict some of the Bluestacks clients. So, you can just disable the Hyper-V future. But, it can affect other virtual machines. There are two methods that you can use to disable the Hyper-V feature.
Fix 1 – Using the Windows Features
You can easily disable this feature following these easy steps.
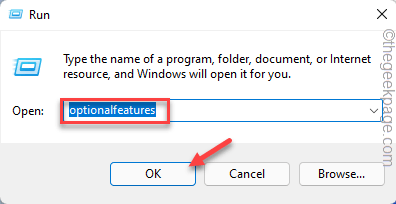
1. Just press the Windows key and R key combination to open the Run terminal.
2. Then, click “OK“.
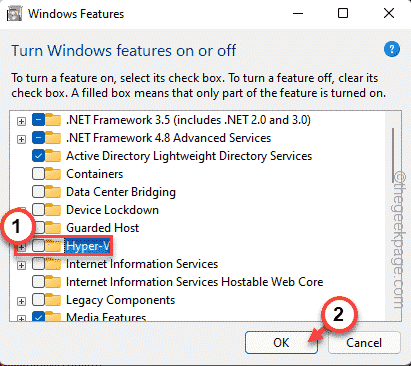
The Windows Features panel will open up in a few seconds.
3. Slowly scroll down to find the “Hyper-V” feature.
4. Simply, uncheck the box beside “Hyper-V“. Now, just click on the “OK” on the bottom to disable these Hyper-V features.
Windows will remove all the components of the Hyper-V feature. So, wait patiently until it does so.
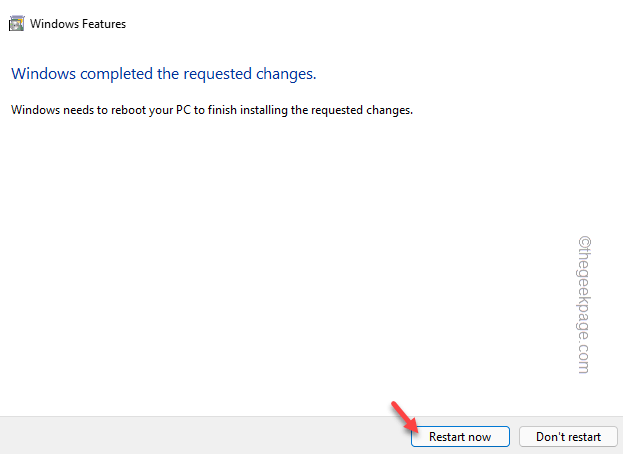
6. Once you are done, tap on “Restart” to restart the system.
It is crucial as Windows completes the process while the system restarts.
Now, once the system starts up, try to launch Bluestacks again. Test if this works out.
Fix 2 – Stop Hyper-V-related services
You can try to solve this issue by force-halting the Hyper-V-related services.
1. You have to open the Services. So, press the Win key+R keys together.
2. Type “services.msc” and hit Enter.
3. When the Services window appears in front of you, scroll down to find the Hyper-V-related services. You can find the “Hyper-V Data Exchange Service” service.
4. Once you have found the service, right-tap it and “Stop” to stop the service.
5. Once you have stopped that service, stop all these services also.
Hyper-V Guest Service Interface
Hyper-V PowerShell Direct Service
Hyper-V Time Synchronization Service
In addition to these four services, if you can find any other Hyper-V-related services, stop those as well.
Now, retry launching the Bluestacks app and test if this is working.
Fix 4 – Using the registry file
If the regular method doesn’t work, feel free to download this registry script and run it on your system.
1. Just download this hyper_v file.
2. Now, extract the registry file directly from the zip file.
3. Once you have extracted the file, go to the location.
4. Just, right-tap the “hyper_v” file and tap “Open” to merge the registry file with your system registry.
5. You may see a warning message. Tap “Yes” to merge the registry file.
After this, close every window one by one and restart your system. Once you have, further try to open the Hyper-v once more. Test if this works out or not.
Way 2 – Uninstall the BlueStacks
You can uninstall the BlueStacks that are interfering with the Hyper-V and reinstall the version that natively supports Hyper-v.
Step 1 – Uninstall the Bluestacks
Just uninstall the Bluestacks from your system.
1. It’s quite easy to uninstall the BlueStacks from your system. To do that, just press the Win key+R keys together.
2. Then, type “appwiz.cpl” and click “OK“.
3. Once it opens up, look for the “Bluestacks” app among all the other apps that are installed.
4. Just, right-tap the app and click “Uninstall” to uninstall the app from your system.
4. In the Uninstaller window, make sure to check the “Delete Bluestacks user data” box.
5. Then, tap “Uninstall” to uninstall BlueStacks from your system.
Once you have uninstalled the app, restart your system.
Step 2 – Download & install Hyper-V supported Bluestacks
You can download and install the Hyper-v supported Bluestacks.
1. Open the Bluestacks.
2. When you reach the website, click on the “See all versions” under the Download section.
3. Now, scroll down through the list of downloadable, and click on the “Download” beside ‘Nougat 64 bit’ to download it.
This will download the Bluestacks that are fully compatible with the Hyper-V feature.
4. Now, go to the download location and double-click on the bluestacks installer that you downloaded just now.
Now, just follow the on-screen instructions to complete the installation process.
This version of Bluestacks that you are installing won’t conflict with the Hyper-V. So, feel free to use the emulator once it is installed.


