If your computer is slowing down or the battery is running out faster, then your Microsoft Edge browser could be one of the reasons. The Edge browser allows its apps, extensions and other services to run in the background, even after you have closed it, thus, allowing the browser to continue using your computer’s resources. This is when you may see Microsoft Edge still running in the background processes in the Task Manager. In such a case it would be better to block Microsoft Edge from running in the background on your Windows 10 PC. Let’s see how.
Method 1: Through Microsoft Edge Settings
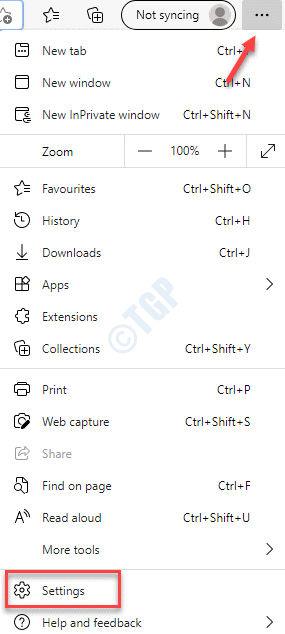
Step 1: Launch Microsoft Edge and click on the three horizontal dots (Settings and more) on the upper right side of the browser.
Now, select Settings from the context menu.

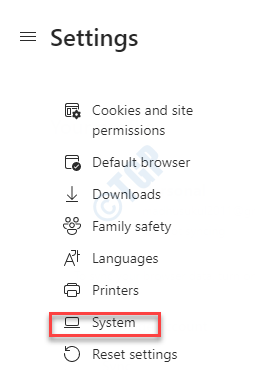
Step 2: In the Settings window, go to the left side of the pane and click on System.

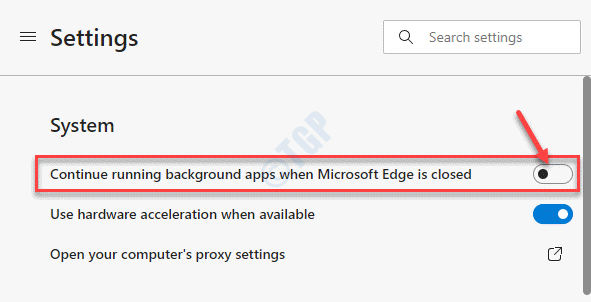
Step 3: In the next window, under the System section, turn off the Continue running background apps when Microsoft Edge is closed option.

Now whenever you close the Edge browser, any of the related apps and extensions will be closed along with it. This will free up the resources and save battery life.
Method 2: By Making Changes to the Registry Editor
Step 1: Right-click on the Start menu and select Run to launch the Run command window.

Step 2: In the Run command window, type regedit in the search field and hit Enter to open the Registry Editor window.

Step 3: In the Registry Editor window, navigate to the below path:
HKEY_LOCAL_MACHINE\SOFTWARE\Policies\Microsoft\MicrosoftEdge\Main
*Note – Before you proceed to make any changes to the Registry Editor, make sure that you create a backup of the registry data, so that, in case of any data loss, it can be recovered.
Step 4: Now, go to the right side of the Registry Editor window and right-click on the empty area. Select New and then DWORD (32-bit) Value.

*Note – If the Main key is missing, then add the key under the Microsoft Edge folder. Follow the below process:
1: Right-click on the Microsoft Edge key, select New and then select Key.

2: Now, rename the new key as Main.

Now, move to Step 4.
Step 4: Now, rename the new DWORD Value as AllowPrelaunch.
Double-click on it to open the Edit DWORD (32-bit) Value window.

Step 5: In the Edit DWORD (32-bit) Value window, go to the Value data field and set it 0.
Press OK to save changes and exit.

Step 6: Now, copy and paste the below path in the Registry Editor address and hit Enter:
HKEY_LOCAL_MACHINE\SOFTWARE\Policies\Microsoft\MicrosoftEdge\TabPreloader
Now, go to the right side of the Registry Editor window and right-click on the empty area. Select New and then DWORD (32-bit) Value.

Step 7: Rename the new DWORD Value as PreventTabPreloading.
Double-click to open its Edit DWORD (32-bit) Value window.

Step 8: In the Edit DWORD (32-bit) Value window, navigate to the Value data field and set the value to 1.
Press OK to save the changes and exit.

*Note – If the TabPreloader key is missing, then add the key under the Microsoft Edge folder. Follow the below process:
1: Right-click on the Microsoft Edge key, select New and then select Key.

2: Now, rename the new key as TabPreloader.

Step 9: Go back in the Registry Editor, again right-click on the empty area on the right side of the pane.
Now, select New and then, DWORD (32-bit) Value from the context menu.

Step 10: Now, rename the new DWORD Value as AllowTabPreloading.
Double-click to open its Edit DWORD (32-bit) Value dialogue box.

Step 11: In the Edit DWORD (32-bit) Value dialogue box, go to the Value data field and change the value to 0.
Press OK to save changes and exit.

Now, restart your PC and the Microsoft Edge should not be running in the background anymore.
Method 3: Through Background Apps Settings
Step 1: Press the Win + I keys together on your keyboard to open the Settings window.
Step 2: In the Settings window, click on Privacy.

Step 3: In the next window, go to the left side of the pane, scroll down and under the App permissions section, click on Background apps.

Step 4: Now, navigate to the right side of the window, scroll down and under Select which apps can run in the background section, go to Microsoft Edge.
Now, turn the slider to the left to disable it.
Now, reboot your PC and check if the Microsoft Edge is still running in the background.