Network Discovery is a feature in Windows 11 as well as Windows 10 that allows our system to find all the other systems( computers , printers, etc.) that are present in the same network. When network discovery is enabled , our system communicates with other systems in the network by sending out broadcast messages. This feature is especially useful when the systems have to share some resources over the network like files, printers ,etc. Having said that , it would be very easy for the attackers to get to the resources as well. Hence , this feature is generally enabled for private networks(at home, organizations) and disabled for public networks(at cafes,airports).
You can operate Network Discovery in three states.
- ON : Within the network, your system can find all the other devices and all the other devices and find your system.
- OFF : In this sate , your system cannot find any other devices. Also, other systems cannot find your device.
- Custom : In this state , only some of the settings with respect to Network Discovery is enabled.
In this article let us see how to enable and disable Network Discovery using different Methods.
Method 1 : From Control Panel
Step 1: In your keyboard , hold the Windows+r keys at the same to open the run window
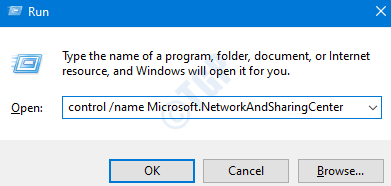
Step 2: Once the run window appears , type control /name Microsoft.NetworkAndSharingCenter in the Open section and Press OK

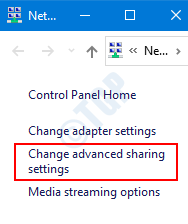
Step 3: From the Network and Sharing Center window , Select Change advanced sharing settings from the left-hand side

Step 4 : Here we can setup Network Discovery for different network profiles(Private, Public)
Enable Network Discovery
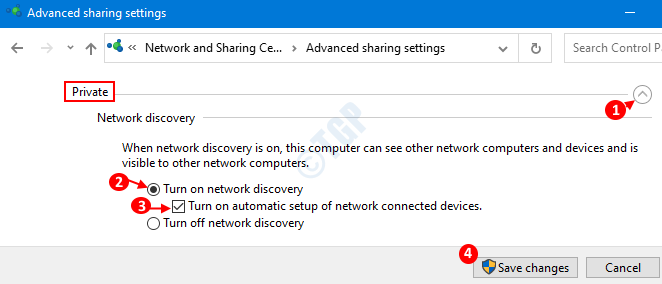
- The page which Opens will have your current Network profile (Private or Public based on your setting) expanded.
- Under the Network Discovery option, Tick on the Turn on network discovery
- Tick the option Turn on automatic setup of network connected devices.
- Press Save Changes

For Windows 11 users
Just Turn On the network discovery by simply toggling the button for Network discovery On.

Method 2: From Command Prompt
Network Discovery can be controlled from the Command Prompt as well. However, network discovery will be enabled/disabled on both the network profiles(Private , Public).
Step 1 : When you press Windows+r at the same time , Run window appears.
Step 2: Type cmd and Press Ctrl+Shift+Enter together. This opens the command prompt with admin rights.

Enable Network Discovery
To Enable Network Discovery , enter the following command
netsh advfirewall firewall set rule group="Network Discovery" new enable=Yes

We can see that the Network Discovery has turned ON for all network profiles.
Disable Network Discovery
To Disable Network Discovery , enter the following command
netsh advfirewall firewall set rule group="Network Discovery" new enable=No

We can see that the Network Discovery has turned OFF for all network profiles..
Method 3 : Enable Network Discovery Via Settings
Step 1: Press Windows+r at the same time , Run window opens.
Step 2: In the Run window , type ms-settings:network and press Enter.

Step 3: Settings –> Network & Internet –> Status window opens, it shows the means of connection to the internet(Example, Ethernet ,Wi-Fi, Dial-Up). Let’s say we are connected using Ethernet, we click on Properties button that is below Ethernet.

Enable Network Discovery
In the appearing Settings window , Choose Private as the Network Profile.

With this simple change , Network Discovery will be enabled in the system.
Disable Network Discovery
In the appearing Settings window , Choose Public as the Network Profile.

That’s All and the Network Discovery will be disabled from the system.
For Windows 11 users
1 – Hit Windows key and I key jointly to Open settings panel.
2 – Select Network & Internet from left side and choose Advance network settings from right side

3 – Scroll down in the right side and Locate and click on Advanced sharing settings

4 – Now, Turn On the Network Discovery by toggling the option ON.

Thats it. You have just Enabled Network discovery in Windows 11 .
Method 4: From PowerShell
Step 1: Open the run window with the shortcut Windows+r
Step 2: In the window , type powershell and press Ctrl+Shift+Enter together to open the PowerShell with Admin rights

Enable Network Discovery
In the elevated PowerShell window , type the following command
Get-NetFirewallRule -DisplayGroup 'Network Discovery'|Set-NetFirewallRule -Profile 'Private, Domain' -Enabled true
Refer to the snapshot below:

NOTE:
- The above command would Enable Network discovery on Private and Public network profiles.
- If you want to enable network discovery only on the Private Network , use the following command:
Get-NetFirewallRule -DisplayGroup 'Network Discovery'|Set-NetFirewallRule -Profile 'Private' -Enabled true
- If you want to enable network discovery only on the Public Network , use the following command:
Get-NetFirewallRule -DisplayGroup 'Network Discovery'|Set-NetFirewallRule -Profile 'Public' -Enabled true
Disable Network Discovery
In the elevated powershell window , type the following command
Get-NetFirewallRule -DisplayGroup 'Network Discovery'|Set-NetFirewallRule -Profile 'Private, Domain' -Enabled false
Refer to the snapshot below:

NOTE:
- The above command would Disable Network discovery on Private and Public network profiles.
- If you want to disable network discovery only on the Private Network , use the following command:
Get-NetFirewallRule -DisplayGroup 'Network Discovery'|Set-NetFirewallRule -Profile 'Private' -Enabled false
- If you want to disable network discovery only on the Public Network , use the following command:
Get-NetFirewallRule -DisplayGroup 'Network Discovery'|Set-NetFirewallRule -Profile 'Public' -Enabled false
What if you can’t turn on Network Discovery
- In order to make the changes you must have Administrator privileges
- For the Network Discovery to be enabled following services should have Status as Running and Startup Type as Automatic
- DNS Client
- SSDP Discovery
- UPnP Device Host
- Function Discovery Resource Publication
- Function Discovery Provider Host
In order to verify the same , do the following
Step 1: Press Windows+r key together , this opens a run window.
Step 2: Type services.msc and hit Enter

Step 3: In the Service window, Under the Name column, search for the above mentioned Services and check their Status and Startup Type.
For example, in the below screenshot, DNS Client service is in Running status and has Startup Type Automatic

If it is not running , Just Double click on DNS Client and Click on Start to start the service and also set Startup Type to Automatic.
Similarly do this and check for services given below
- DNS Client
- SSDP Discovery
- UPnP Device Host
- Function Discovery Resource Publication
- Function Discovery Provider Host

Now, try to turn it On again.
That’s All. Thankyou for reading. Hope this has been informative. Let us know in comments the method you liked the most.