The Battery icon tells us about the amount of power remaining in the system. For the convenience of the user, this icon is located at the right-hand side corner of the Taskbar. Sometimes, we notice that the battery icon is missing from the Taskbar. This could be annoying as we have to open the settings to know the amount of power remaining in the system.
This article lets us discover possible reasons and different ways to get the battery icon back in the taskbar in Windows 10.
Method 1: Check if the Battery Icon is hidden
At times, we might accidentally move the battery icon from the taskbar and the battery icon might just be hidden from the view. In this case, one might choose to unhide it and get it back in view using the below steps:
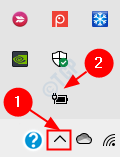
Step 1: Click on the Upward arrow present in the right corner of the taskbar

Step 2: If you see that the battery icon is present here, proceed to the next step to move it to the taskbar. If not, please check the next method to fix this issue.
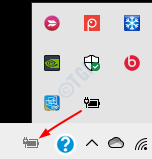
Step 3: Click on the Battery icon from the pop-up menu that opens when the upward arrow is pressed, drag and drop this icon to the taskbar as shown below.

Step 4: Now, you can see the battery icon back in the taskbar. Refer to the below image.
![]()
Method 2: Unhide the Battery icon from the Settings
In certain cases, the battery icon is not showing because it is not selected or turned on to be present in the taskbar settings. In this case, follow the below steps to turn it ON and to display the icon in the taskbar.
Step 1: Right-click anywhere in the blank area on the taskbar. From the context menu that pops-up, click on Taskbar Settings

Step 2: In the Taskbar Settings Window that opens, scroll down to locate the section named Notifications area. Under this section, click on Select which icons appear on the taskbar

Step 3: In the window that appears, Scroll down and look for the Power and toggle the button next to turn it ON(the button will now be shown in blue color)

Step 4: Go back to the previous menu and choose the Turn system icons on or off option this time.

Step 5: From the appearing window, scroll down to see the Power icon and turn it ON by toggling the button

Now, check the taskbar again, see if you can find the battery icon. If not, check the next fix.
Method 3: Disable and Enable the Battery Driver in Device Manager
Sometimes, if the Battery driver has some issues, the battery icon is not shown in the taskbar. In such cases, Disabling and re-enabling the driver might fix the issue. Steps to be followed:
Step 1: From your keyboard, hold the keys Windows+r together, to open the Run Dialog
Step 2: In the appearing dialog, type devmgmt.msc and hit Enter

Step 3: In the Device Manager window, double click on the Batteries option to expand and look at the options available. Usually, there are two batteries listed as shown below

Step 4: Now repeat the below steps for all the batteries listed below.
1. Right-Click on a Battery (For Example, Microsoft AC Adapter)
2. From the context menu, Choose Disable device

3. In the Confirmation Dialog that appears, click on Yes

4. Once, the battery is disabled, you can see a Downward arrow on its icon as shown below. Right-click on that battery again
5. Choose on Enable device from the context menu

Make sure the process is repeated for all the batteries listed.
Now, check if the battery icon appears in the taskbar. If not, try restarting your PC and check if the battery icon appears.
Step 5: If the battery icon has not yet shown up in the taskbar, consider uninstalling the battery driver and reinstalling it. Note that the below steps should be repeated for all the battery adapters listed. Below steps are to be followed:
1. Right-Click on a Battery (For Example, Microsoft AC Adapter)
2. From the context menu, Choose Uninstall device

3. In the Confirmation Dialog that appears, click on Uninstall

4. Now, click on Scan for hardware changes
5. Restart the System. The System would automatically install the missing battery adapter drivers back. Now, check if the battery icon appears in the taskbar.
Step 6: If the Battery is still not present in the taskbar, try updating the Battery Adapters. Note that the below steps should be repeated for all the battery adapters
1. Right-click on the Battery Adapter
2. Choose Update Driver from the context menu

Now, restart the system, and check if the battery icon is back on the taskbar. If not. Try the next method that is listed below.
Method 4: Run the Windows Troubleshooter of Power
If there are any issues related to Power System within the Operating system, running the Troubleshooter for Power might help. The steps to be followed are listed below:
Step 1: Open the Run Dialog in your System, holding the Shortcut keys Windows+r
Step 2: In the appearing window, type the command ms-settings:troubleshoot and just click on OK

Step 3: In the Settings–> Update & Security –> Troubleshoot window that appears , Click on Additional troubleshooters

Step 4: In the Additional Troubleshooters window that opens, Under the Find and fix other problems section, Choose Power

Step 5: Now click on Run the troubleshooter button

Windows will run the troubleshooter program and indicate if any changes or updates are required to the system. Do the needful and check if the Battery icon has reappeared on the taskbar.
Method 5: Restart the Windows Explorer
This is a part of basic troubleshooting and will work if the Windows Explorer is causing any issues. When there is a lot of load on the Explorer, at times the taskbar icons may not show up as expected. In such cases, restarting the explorer might case.
Step 1: Right-click anywhere in the blank area on the taskbar. From the context menu that pops-up, click on Task Manager

Step 2: In the window that opens,
- Make sure you are in the Processes tab
- Click on the Windows Explorer
- Click on the Restart button at the bottom right corner.

Now, check if the battery icon has appeared back on the taskbar.
Method 6: Repair the Corrupted Files from Command prompt
If none of the above methods worked, there are high chances that the System Files in your system have been corrupted. In this case, you can consider repairing the corrupted System Files using the below steps.
Step 1: Pressing the shortcut buttons Windows+r from the keyboard together open the Run window.
Step 2: Type cmd and press Ctrl+Shift+Enter to open the Command Prompt with Administrator privileges

Step 5: In the UAC prompt that opens, just click on Yes
Step 4: In the command prompt window that opens, just type the below command and hit Enter
sfc /scannow

After the scan completes, the corrupted files will be repaired and the Battery icon might be shown in the taskbar.
That’s All. We hope this article has been informative and helps you to fix the issue. Kindly comment and let us know if you are facing any issues. Thank you for Reading.