A very common issue in Windows 10 is the Windows Shell Common DLL Has Stopped Working error. There could be several reasons this issue could come up on your PC, but it is usually associated with audio and touchpad drivers. In some instances, this error might show up temporarily and a simple restart could solve the problem for you, but in case it is has been bugging you a lot, here are a few solutions for you to look at.
Let us first look at a few workarounds that you should try first to help you fix the issue in simple steps.
#1 – Restart Your PC: See if restarting your PC helps you with getting rid of the error.
#2 – Update Windows: If your Windows is not updated to the latest version, you may get this error message. Follow the steps here to Update Windows 10 manually
#3 – Update Your Device Drivers: You want to make sure that all the device drivers in your PC are up to date. At times, an outdated driver might cause big issues. Follow this link to know How to Update Windows 10 drivers. You can alternatively also make use of any of these Driver Update Software for Windows.
#4 – By Reinstalling Problematic Software: Are you getting the Windows Shell Common DLL Has Stopped Working error while running a specific program or application? Uninstall the software from your PC and install it again on your PC by downloading a fresh installation file of the software.
#5 – Clean Boot PC: Try to do a Clean Boot on your PC once. Here’s how to Restart PC in Clean Boot Mode in Windows 10.
Now, let us check out various methods to get rid of the Windows Shell Common DLL Has Stopped Working issue.
Fix 1: Reinstall Audio Driver in Compatibility Mode
This error may show up because of issues with the Audio Driver installed on your PC. At times the latest drivers might cause issues, thus we use this method to install a compatible version of the driver.
Step 1: Press Win + X keys simultaneously on your keyboard, then from the menu that opens, select the Device Manager option.

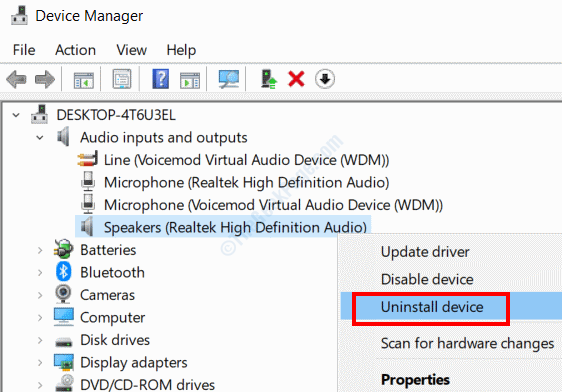
Step 2: In the Device Manager window, click on the Audio inputs and outputs option to expand. You will see a list of audio drivers on your PC. Right-click on the driver with the name Speakers (Realtek High Definition Audio) and select the Uninstall Device option.

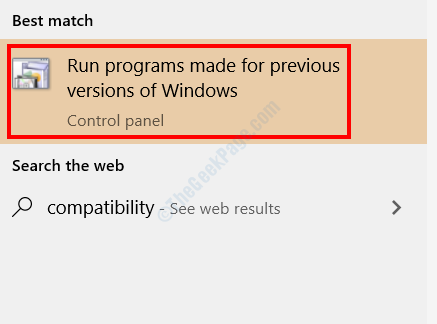
Step 3: Hit the Start button, then type Compatibility in the search bar. Select Run programs made for previous versions of Windows from the search results.

Step 4: A new window will open. Here, click on Next. Then, follow the on-screen instructions and when asked, go ahead with installing the older version of the Audio Driver in the PC.
Try the next method if this did not fix the issue.
Fix 2: Disable Sound Effects
You can get the Windows Shell Common DLL Has Stopped Working Error in Windows 10 if you have applied any sort of audio effect manually on your PC. Your audio driver might not be compatible with various sound equalizer modes or effects. You might want to check if you have enabled any Enhanced Audio settings; you will need to disable that as well.
Fix 3: Set Windows to Accept Certificates
In case your PC is configured not to accept certificates, you make get this error message. You can set your PC to accept certificates using the Windows PowerShell tool.
Step 1: Press Win + X together, and from the menu that opens, select the Windows PowerShell (Admin) option.

Step 2: Type the following command in PowerShell window, then hit the Enter key:
Set-ExecutionPolicy -ExecutionPolicy Unrestricted -Scope CurrentUser
Once the command has run successfully, restart your PC. Check if the issue is still there.
Fix 4: Run an SFC Scan
If some of the system files are corrupted or faulty, you may get the Windows Shell Common DLL Has Stopped Working error in Windows 10. One of the ways to fix the issue is by running an SFC scan on your PC.
Step 1: Open Command Prompt in Admin mode. For this, press the Start button, then in the search bar type cmd. From the results, right-click on Command Prompt and select the Run as Administrator option.

Step 2: Type the following command and press the Enter button:
sfc/ scannow
When the scan is complete, close out the Command Prompt window and restart your PC. Was the issue fixed?
Fix 5: Reinstall Synaptic Touchpad Driver
The Windows Shell Common DLL issue could also be troubling you due to the Synaptic Touchpad Driver installed on your PC. You can try to reinstall the driver on your PC in Compatibility mode.
For this, follow the steps provided in Fix 1, but instead of reinstalling the Audio driver, you will have to look for Synaptics driver under the Mice and other pointing devices menu in the Device Manager.
Fix 6: Check if Windows Time Service is Running
Step 1: Press Win + R keys, then type services.msc in the Run box and click on Ok.

Step 2: In the Services window, look for Windows Time service. Right-click on it and select the Start button if it is not running on your PC.
Once done, restart your PC and check if the Windows Shell Common DLL Has Stopped Working error shows up.
Fix 7: Set Security Permission to UserChoice key
If you are getting the Windows Shell Common DLL Has Stopped Working error while opening a .txt file, this method is for you. Here, we deal with the Registry Editor, so be very careful with the steps and only proceed if you know what you are doing.
Step 1: Press Win + R, type regedit in the Run box and press the Enter key.

Step 2: In the Registry Editor that opens, go to the following path in the left pane:
HKEY_CURRENT_USER > Software > Microsoft > Windows > CurrentVersion > Explorer > FileExts> .txt > UserChoice
Step 3: Right-click on UserChoice and select the Permissions option.

Step 4: In the Permissions window, see if there are options under the Group or user names section. If yes, skip this method and try the next one; if not, click on the Add button.

Step 5: A new window will open. Here, go to the Enter the object names to select section, type Administrator and click on the Check Names option. If it is successfully processed, click on Ok.

Step 6: Now the new user will be added in the list of the previous screen. Select it, then from the Permission for Administrators section, select the Full Control option. Click on Apply and then Ok.

Now, exit the Regedit window, restart your PC and see if you are still getting the error while opening .txt files.
Fix 8: Connect Stereo Receiver to USB 3.0
If you have a Stereo Receiver connected to your PC via USB port, it might be possible you are getting the Windows Shell Common DLL Has Stopped Working error. This could be because you have connected the receiver to USB 2.0 port. Check for USB 3.0 port and connect the STereo Receiver to that port. A USB 3.0 port is usually marked with SS or 3.0 letters and the port colour is blue.
Fix 9: Replace joy.cpl in System32 Directory
This error can trouble you while configuring gamepad settings on your PC. If that is the case with you, follow these steps:
Step 1: Open This PC, then go to C: > Windows > System 32. There, look for joy.cpl file. Copy the file and paste it on the Desktop. Now, right-click on the joy.cpl file and click on the Delete option.

Step 2: Now, go to C: > Windows > SysWOW64 folder. Locate the joy.cpl file there, copy it, and paste it in the C: > Windows > System 32 directory.

Reboot your PC after following the steps. Check if the issue persists.
Fix 9: By Disabling Hardware Graphics Accelerator in MS Office / Outlook
Are you getting the Windows Shell Common DLL Has Stopped Working error while running any Microsoft Office or Outlook application? Turning off the Hardware Graphics Accelerator could be helpful.
Open any Microsoft Office application or Microsoft Outlook, go to File > Options > Advanced. There, you will find the Hardware Graphics Accelerator; simply disable it.
Fix 10: Remove Antivirus Software
Do you have an Antivirus software installed on your PC? It might be the reason you are getting the above error message on your PC. Try to disable the Antivirus on your PC. If that does not work, go ahead and uninstall the Antivirus. Simply uninstalling the Antivirus may not work, as Antiviruses leave back files and Registry entries. In that case, you will need an antivirus remover software.
Fix 11: Remove Unused Audio Devices
There might be device drivers installed on your PC that are unnecessary and could be causing issues. To make sure, go to Device Manager and remove all unnecessary and unused audio drivers.
Step 1: Go to Device Manager by following the steps provided in the Fix 1 > Step 1.
Step 2: There, click on Views, then from the options, select Show hidden devices. Under Audio devices, you will find many devices that are unused. To recognize the unused drivers, look for greyed out icons as highlighted in the image below. Right-click on them and select the Remove device option.

Restart your computer after this and see for the error.
Fix 12: Run System Maintenance
In order to fix the issue, you can also run the System Maintenance tool.
Step 1: Press Win + R, then in the Run box, copy and paste the following command and hit the Enter key:
msdt.exe -id MaintenanceDiagnostic
Step 2: This will open the System Maintenance tool. Select the Next option to run the diagnostics.

Wait till the process is complete, restart the computer and check if the Windows Shell Common DLL Has Stopped Working error stopped troubling you.
Fix 13: Reregister shell32.dll
One of the ways that helped users get rid of the Windows Shell Common DLL error was reregistering the shell32.dll file in Command Prompt.
Step 1: Open Command Prompt in Admin Mode as specified in Fix 4 > Step 1.
Step 2: Type the following command and press the Enter key:
regsvr32 /i shell32.dll
Close Command Prompt, restart PC, then check if the issue was fixed.