You want to play your favorite game, or a steam game, and you discover that the audio is not working in your Windows PC. That can be frustrating, as audio is a crucial part of any audio-based or audio-visual based program. Whether a YouTube video, movies or a game, the audio offers a complete multi-media experience.
However, users have been complaining of game audio not working in Windows 10 lately. We don’t know if it’s an issue with your system driver or the Steam game app. So, we will try a few fixes here to resolve the game audio issue. Let’s how to fix the issue.
Also Read: Fix No Sound on Windows Laptop Problem
Method 1: Through Sound control panel
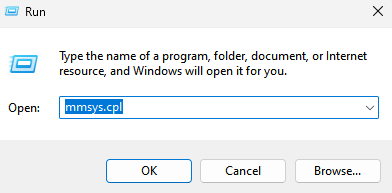
Step 1 – Press Windows key + R to open run.
Now, copy and paste mmsys.cpl in the run command box

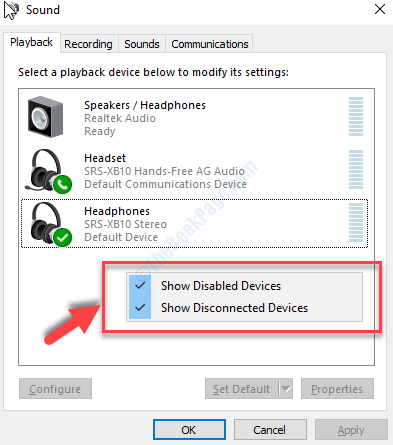
Step 2: In the Sound dialogue box, click on the Playback tab. Now, right-click on an empty area and check if both Show Disabled Devices and Show Connected Devices are checked.
If they are not check marked, then check mark both the options to show the all the disabled and the connected devices.

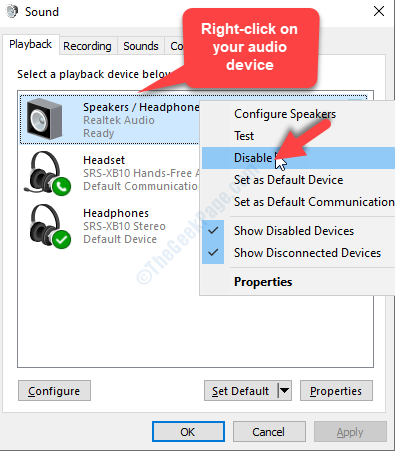
Step 3: Now, select your audio device, right-click on it and click on Disable in the menu.

Step 4: This will grey out the audio device. Now, right-click on it again and select Enable from the right-click menu to re-activate it.
Press OK to save the changes and exit.

Now, your system audio should be working fine for your games and even videos. If the problem persists, try the 2nd method.
Method 2: Check audio settings in games
There may be audio setting in games, which you may have to unmute. Just try to find and locate audio setting in games and tweak the settings there. It definitely works.
Method 3: Check Microphone Privacy settings
1 -Search Microphone Privacy settings in Windows taskbar search and click on it.

2 -Now, Turn On Microphone access and also check that for that particular game , Microphone access is turned ON as well.

Method 4: Check audio output
Click on Volume icon in the taskbar and make sure Audio output is correct.

Also, click on Volume mixer if there is any and make sure Game Audio is not muted.
Method 5: By Uninstalling and Re-installing the Audio Driver
Step 1: Press the Windows + X keys together on your keyboard to and select Device Manager from the context menu.

Step 2: In the Device Manager window that opens, scroll down to Sound, video and game controllers, and expand it. Now, select your audio device (in our case, it’s the Realtek Audio, You may have High definition audio device), right-click on it and select Uninstall device from the right-click menu.

Once the uninstalltion is complete, reboot your PC and then visit the manufacturer website for the audio device.
If there’s a new audio device available, download it. This should resolve the game audio not working issue in your Windows 10 PC. If the issue persists, try the 3rd method.
Method 6: By Enabling Audio Service Using Services
Step 1: Go to the Start button on your Desktop and type Services in the search field. Left click on the result to open the Services window.

Step 2: In the Services window, on the right side of the pane, under the Name column, scroll down and find Windows Audio.
Right-click on Windows Audio and click on Properties.

Step 3: In the Windows Audio Properties dialogue box, under the General tab, go to Startup type and set it to Automatic.
Now, go to the Service status section and click on the Start button to start the service.

Then, click on Apply and then OK at the bottom of the dialogue box to save the changes and exit.
Step 4: But, if you see that the Windows Audio service is already running, right-click on the service and select Restart from the context menu.

This should fix the game audio sound issue, but if you are still facing the issue, especially with your Steam game app, follow the 4th method.
Method 7: Using Compatibility Mode in Steam
Step 1: Go to the Start button on your Desktop and type Steam. Right-click on the app and click on Open file location in the menu.

Step 2: In the file location, right-click on Steam and select Properties from the right-click menu.

Step 3: In the Steam Properties dialogue box, go to the Shortcut tab and click on Open file location at the bottom.

Step 4: Now, right-click on the Steam.exe file and select Properties from the right-click menu.

Step 5: In the Steam Properties window, select the Compatibility tab and go down till the Settings section. Here, check mark the box next to Run this program as an administrator.
Press Apply and then OK to save the changes and exit.

Step 6: Launch the Steam game app and go to Library at the top. Now, right-click on the game which is not playing any sound, and select Properties from the right-click menu.

Step 6: In the game dedicated server window, select the Local Files tab and click on Browse Local Files.

Step 7: In the File Explorer location that opens, find the game file and right-click on it. Then select Properties from the right-click menu.

Step 8: In the game’s Properties dialogue box, select the Compatibility tab. Now, go to the Settings section and check if the Run this program as an administrator option is already marked. If yes, leave it as it is.
If not, then check mark the box, then press Apply and then OK to save the changes and exit.

Step 9: Now, go back to the game’s Dedicated Server window, select the Local Files tab, and click on the Verify Integrity of Tool Files option.

Wait for Steam to complete verifying the game’s dedicated server files. Once completed, you can now play the game with the audio working properly.