Is your computer crashing into the Blue Screen of Death while showing up the “ATTEMPTED_WRITE_TO_READONLY_MEMORY” as the error code on the screen? This error occurs when a corrupted/ misconfigured driver tries to write on a read-only memory. Don’t worry. There are several solutions and your problem will be solved within the first few. So, carefully work through the solutions.
NOTE –
Restart your computer. If the computer correctly reboots, then you can perform all these fixes regularly. But, if the system doesn’t boot at all, you have to boot the system into Recovery Mode to enact these fixes.
Steps to boot your computer into Recovery Mode –
There are multiple ways you can get your system into Recovery Mode. The easiest one is this –
1. Shut down the system.
2. Then, power it ON. When the screen starts to show the manufacturer’s logo, force-shutdown the system by pressing down the power key.
3. Next, start up the machine once more.
Repeat this start-force shutdown-start operation or two-three times more and let the system restart it will go to the Recovery Environment.
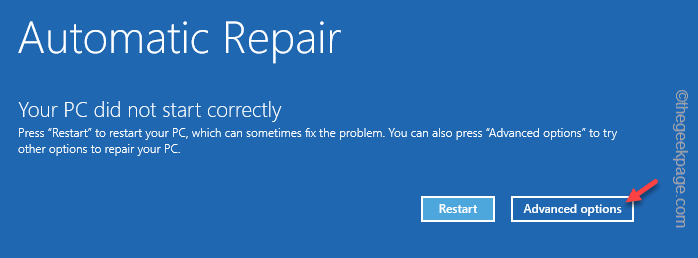
4. Once it boots up in RE mode, tap “Advanced options“.
Now, follow the solutions, to fix the problem.
Fix 1 – Detach all the external devices
Maybe some old external devices you are not using are causing this problem. So, just follow the steps to detach all the external devices.
1. At first, shut down your system and remove the computer from the power source.
2. Now, one-by-one start to detach all the external USB devices (like external HDDs, Bluetooth adapters, and WiFi dongles) connected to your computer.
3. Check the CD/DVD drive slot for any old DVDs left in the system.
4. Once you have detached all the external peripherals, plug the system into the power source.
5. Start the computer and let it boot up normally.
You won’t see the READONLY MEMORY error again.
Fix 2 – Run memory diagnostics
You can run the memory diagnostics and fix any memory-related issues. But, you have to do it in Safe Mode.
Step 1 – Boot in Safe Mode
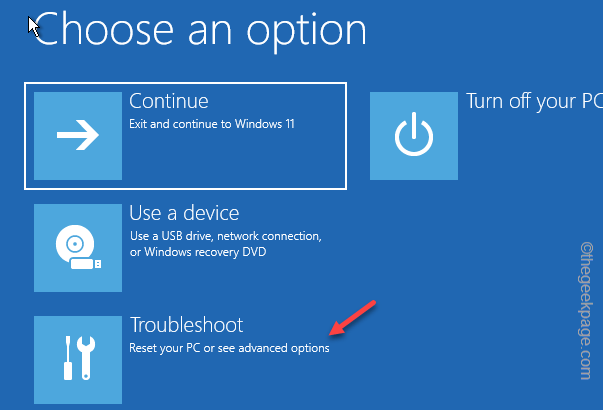
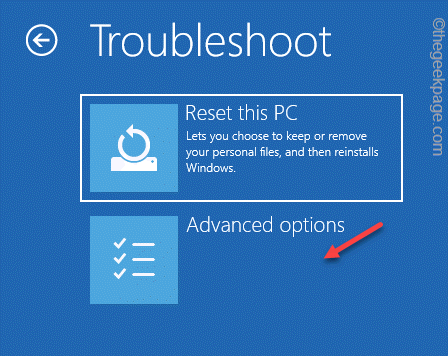
1. Open the Advanced options settings following the force-restart method we have shown before.
2. Now, click on the “Troubleshoot” menu.
4. You will several options here. Then, tap “Startup Settings” to access it.
5. Now, just click “Restart” to restart the system.
6. Your system restarts after this. You may see various startup settings on the next screen.
7. You have to just hit the F4 key to choose the “Enable Safe Mode” option.
Wait for your computer to restart in Safe Mode. The entire desktop will appear to be black when the system boots up in Safe Mode.
Step 2 – Run the memory test
Now, once you have booted into Safe Mode, run this memory test on your computer.
1. At first, press the Win key and the R keys together.
2. Then, write this there and hit Enter.
mdsched.exe
3. Then, tap “Restart now and check for problems (recommended)” to start the scanning operation.
This tool just restarts your computer and the memory scanning process starts.
Check if this works.
Fix 3 – Uninstall/ Rollback drivers
Does a system driver have recently received an update? You can uninstall or roll back the recently updated driver.
1. At first, press the Win key+X keys together.
2. Then, tap “Device Manager” on the context menu to open that.
3. When the Device Manager opens up on your screen, look for the driver that was recently updated.
4. Then, right-tap that driver and tap “Properties“.
5. On the Properties page, there are several actions that you may perform here. Go to the “Driver” area.
You may click on “Update driver” to update the driver.
If you want to uninstall the driver, tap “Uninstall device“.
To rollback, the driver to a previous version, tap “Rollback driver“.
This way, you can uninstall/roll back the driver and fix the problem.
Fix 4 – Uninstall the recently installed app
Recently installed apps can cause this problem. So, uninstall the installed app from your computer.
1. Use the Windows key +X key to pull up the context menu.
2. Then, tap “Installed apps” to access it.
3. When the list of apps appears, look for any app that you have installed recently.
4. Just, click on the three-dot menu and tap “Uninstall“.
5. When the warning message appears, tap “Uninstall” to uninstall the app.
You won’t face the problem after uninstalling the app. Check if this works.
Your problem will be solved.


