Did you know, you can adjust not only the display orientation, but also the scaling of the text, icons and other graphics that are displayed on your system screen? This scaling is called Dots Per Inch (DPI) which allows users to set the DPI adjustments apart from the recommended value as per their requirement. This can be very useful if any developer is testing some software with different type of icons, texts, etc. Generally, DPI scaling is set automatically by the Windows for you, which ranges between 96-125 dpi. Making changes in the DPI scaling level will either increase or decrease the size of texts, icons, etc. from the recommended normal scaling level. There is an option to customize the DPI scaling level in windows operating system. In this article, let us see how you can adjust the DPI scaling level on your windows 11 system.
Method 1: Adjust the DPI Scaling level Through Settings App
Step 1: Open Settings app
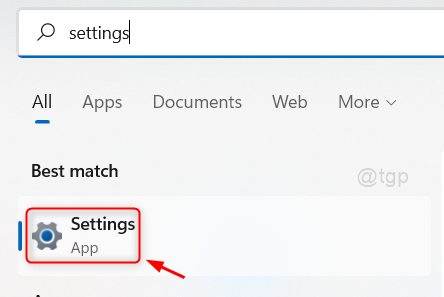
Press Windows key on your keyboard.
Then, type settings and select Settings app from the search results as shown below.

Step 2: In the Settings app
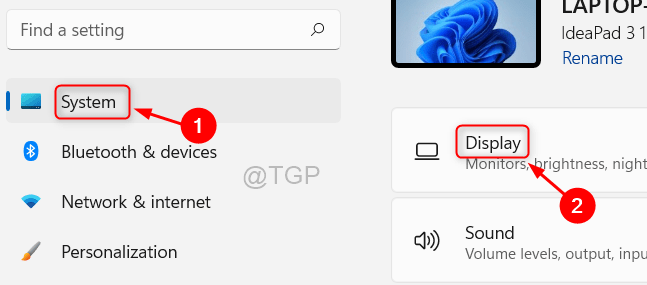
Click System in the left pane of the window.
Then, Click Display on the right side as shown in the below screenshot.

Step 3: In the Display page
Scroll down the page and go to Scale & Layout section.
Click on dropdown button that says 125% (Recommended) under Scale option, which is by default set by Windows.

Step 4: Then, select any of the scaling level from the dropdown list as shown below.
If you select more or less than 125%, then all the texts, icons will increase or decrease in size than normal respectively.

Then, Close the settings window.
This is how you can change the DPI scaling level on your windows 11 system.
Method 2: Adjust the Custom DPI Scaling level From Desktop
Step 1: Go to Desktop
Press Win + D keys together on your keyboard.
Then, Right click on the Desktop.
Select Display settings from the context menu as shown in the image below.

Step 2: In the Display settings page
Click on Scale option under Scale & Layout section.

Step 3: In the Custom scaling page
Click on the Custom scaling field and enter the value between 100 and 500 (not recommended).
Then, Click on Tick button to set it as shown below.

Once done, you need to sign-out and again sign-in to your laptop to see the changes.
NOTE:- We highly recommend not to try above 200% value which might make the texts, icons unreadable and makes it difficult to go back to the original settings.
That’s all guys!
Hope you liked this article and found it informative.
Please leave us comments below to let us know.
Thank you for reading!