Windows 11 operating system provides a feature which enables users to add their regional language on their system. They can add not only the language, but also the keyboard layout that can be very convenient to the users to type anything effortlessly. Windows 11 by default comes with English (United States) but you can add or remove any other language and its keyboard layout anytime. In this article, we are going to show you how you can change or add or remove the keyboard layout in Windows 11.
How to Add Language and Keyboard Layout in Windows 11
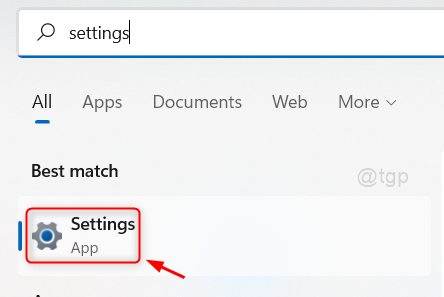
Step 1: Press Win key on your keyboard and type settings.
Step 2: Click on Settings app from the search results as shown below.

Step 3: First, Go to Time & language on the left side of the window.
Step 4: After clicking Time & Language, Click on Language & region on the right side as shown in the below.

Step 5: Click on Add a language button in the Preferred languages option.

Step 6: Click on the search bar and type language name(eg: Hindi) of your choice to choose a language to install.
Then, select that language which appears in the search results under it as shown in the below image.
To continue, Click Next.

Step 7: Then, Click Install button to start installing the new language as shown below.

Then you will see that the new language is installed on your system and listed under the existing languages on the system.
Step 8: Click on show more button( . . . ) as shown in the given screenshot.

Step 9: Click on Language options from the list as shown below.

Step 10: Click on Add a keyboard button as shown.

Step 11: Select any one from the layout options as shown below.
NOTE:- One layout among them, will be by default selected and you can change it by selecting some other option from the list.

This way you can add a new language and also select the keyboard layout pattern for that language of your choice on your system.
How to Remove the Keyboard Layout on Windows 11 PC
Step 1: Press Win + I keys together on your keyboard.
Step 2: Click on Time & language on the left side of the window.
Step 3: Then, click Language & region on the right side as shown below.

Step 4: Click on show more options ( . . . ) in the language whose keyboard layout you wish to remove.

Step 5: Then, Click Language options on the list.

Step 6: Click on show more options (. . .) and then, click on Remove from the dropdown.

Now you can see that the selected keyboard layout has been removed from your system and it won’t be displayed anymore in the Language & region page.
Hope this was helpful.
How to Change the language & keyboard layout in Windows 11
Step 1: Click on language icon displayed on the taskbar as shown below.

Step 2: Click any other from the list of languages installed on your system from the list that pops up.

This way you can choose any other language that is installed on your system.
NOTE:- You can hold Windows key and press Spacebar key on your keyboard till you select the language from the list.
That’s it guys.
Hope you found this article informative and please let us know by commenting below.
Thanks for reading!