If you are a Mozilla Firefox user, you may have noticed that after the latest update, the browser shows an error message “A Webpage is Slowing Down Your Browser” and then slows down considerably. What’s interesting is, you may also come across this error with YouTube sometimes. This issue is not restricted to just Windows users, but for all Firefox users across all OS platforms. So, whether you encounter the error on Firefox or YouTube, we have a possible fixes for you.
Method 1: Restart Firefox in Private Mode
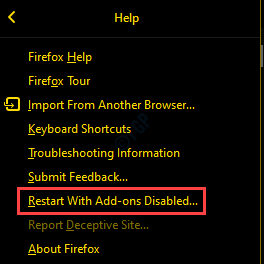
If none of the above method works, you can try this method as a temporary workaround. This includes opening the Firefox in safe mode with the add-ons disabled. Let’s see how..
Step 1: Open Firefox, go to the upper right side of the browser, click on Open menu (three parallel lines) and select Help.

Step 2: Next, click on Restart With Add-ons Disabled.

Step 3: You will now see a prompt asking you Are you sure you want to disable all add-ons and restart?
Click Restart to confirm the action.

Step 4: In the Firefox Safe Mode prompt that you see now, press the Start in Safe Mode button.

Firefox will now restart in safe mode with the add-ons turned off. You should now be able to surf the web on Firefox in the normal speed.
Method 2: Refresh Firefox (create account and sync with it bcoz it will delete all add-ons after refresh)
Step 1: Open Mozilla Firefox browser, go to the three lines (Open menu) on the upper right corner of the browser and select Help.

Step 2: Next, click on Troubleshooting Information.

Step 3: In the Troubleshooting Information window that opens, go to the right side of the pane and press the Refresh Firefox button.

*Note – Before you proceed with the above steps, make sure you create a Firefox account to back up your data, because refreshing your Firefox will delete all the add-ons.
Now, restart your Firefox browser and start searching on Google without any error.
Method 3: Change Privacy settings
Step 1: Launch Firefox and go to the Menu (three horizontal lines).
Select Options from the menu.

Step 2: In the next window, click on the Privacy & Security on the left.

Step 3: Now, go to the right side, scroll down and select the radio button next to Strict.

*Note – If any tabs are open, you will see another button Reload All Tabs.
Now, restart your Firefox browser and try browsing websites. You should not see the error anymore.
Method 4: Change Hidden Firefox Settings
Step 1: Open Mozilla Firefox and type about:config in the address bar and hit Enter.
You will now see a message – Proceed with Caution.
Click on the Accept the Risk and Continue button below it.

Step 2: Next, type ipc.processHangMonitor in the search bar.
You will see the result as dom.ipc.processHangMonitor.
Click on the toggle bar on the right to change the value to false.

Step 5: Now, type dom.ipc.reportProcessHangs in the search bar and click the toggle bar to change it to false.

Now, re-launch the Mozilla Firefox browser and try browsing, You should now be able to browse through websites normally.
Method 5: Clear Firefox Browsing Data
Step 1: Open Mozilla Firefox and click on the Library (books) icon next to the address bar.
Select History from the list.

Step 2: Next, click on Clear Recent History.

Step 3: In the Clear recent history dialogue box, select Everything from the drop-down next to Time range to clear.

Now, under the History section, you can select Cookies and Cache.
You can also select anything else that you may want to delete.
Press OK to confirm the process and exit.
*Note – All selected will e removed permanently and cannot be recovered, so make sure you make your choice carefully.
Now, reboot the browser and the browsing issue should be gone now.
Method 6: Update your Graphics Card Driver
Sometimes, the error can show up due to an outdated graphics driver as you go to Firefox and browse through websites that consume graphics power. In such a case, updating the video graphics card can help fix the issue. Let’s see how.
Step 1: Right-click on Start menu and select Run to launch Run command.

Step 2: In the Run command window, type devmgmt.msc in the search field and hit Enter to open the Device Manager window.

Step 3: In the Device Manager window, go to Display adaptors and expand the section.
Right-click on the graphics driver and select Update driver.

Step 4: In the Update Drivers window, click on the Search automatically for drivers options.

Step 5: Windows will now start detecting any latest drivers available. If found, Windows will automatically update it to the latest update.
Exit the Device Manager window and restart your computer. Now, open Firefox and try browsing through website and the error should not come up again.
Method 7: Check if Firefox Video Settings are fine
Step 1: Open Firefox and type the below address in the browser’s address bar:
about:preferences#privacy
In the Privacy & Security section, on the right, scroll down and under the Permissions section check if the Prevent accessibility services from accessing your browser option is selected. If it’s not selected, select it to enable the option.
Step 2: Now, select the General option on the left and then navigate to the right side of the pane.
Scroll down and under the Performance section, uncheck all the options.

Step 4: Increase or decrease the Content process limit till you reach the correct settings.

Now, try opening websites and see if the issue is resolved.
If none of the above method works, try using a different browser to browse through websites.