Is your system crashing throwing a BSOD error in Windows stating Stop code DRIVER IRQL NOT LESS OR EQUAL What Failed: ipeaklwf.sys? If yes, then read this article as we will be discussing different ways to resolve this issue from your system. This error might be annoying as it forces the System to reboot again and again without any notice.
ipeaklwf.sys is a system file that resides in C:\Windows\System32\DRIVERS location. When there is a conflict between this system file and some of the DRIVERS(mostly, the HP Velocity Driver) in the system, the error DRIVER_IRQL_NOT_LESS_OR_EQUAL ipeaklwf.sys failed is seen. Although this is the primary reason for this error, users have reported seeing this issue in the following cases as well:
- When some system resources get deleted accidentally and create conflicts in programs
- When malicious Hardware is used like Hard disk, USBs, etc
- Missing or Outdated or Corrupted Driver File
- Issues with the hardware itself.
Prerequisites
The most frustrating part of this BSOD error is that the system would be restarted again and again without any notice. So we don’t really have enough time to apply any fix as we don’t know when the system would reboot again. So before trying the fixes, let us stop Windows from Restarting Automatically.
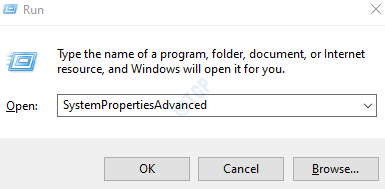
Step 1: Open the run dialog in your system by holding the shortcut buttons Windows logo key + r
Step 2: In the appearing dialog, type SystemPropertiesAdvanced , and Press OK

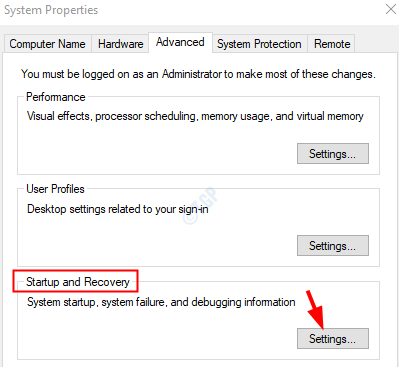
Step 3: In the System Properties window that opens, under the Startup and Recovery section, click on the Settings button

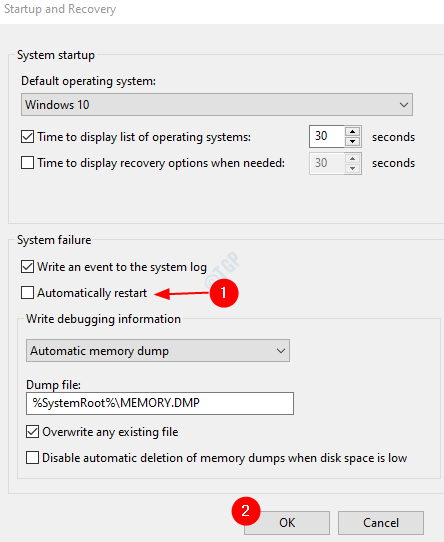
Step 4: In the Startup and Recovery window that opens, Under the System failure section,
- Untick the Automatically restart option
- Click on OK

With the above settings in place, we would have enough time to try other fixes. Following are the different methods that can be used to fix this error. Please make sure you are trying out the fixes in the same order.
Fix 1: Enter Safe Mode and Uninstall HP Velocity and Skype for business
In Safe Mode, the Windows runs with the basic drivers. Thus, we will be able to diagnose the problem. There is no need to worry as none of the software will be uninstalled from the system. When the system boots up in the Safe Mode, one can uninstall the drivers and programs that one thinks have caused the issue.
Step 1: Open the System in the Safe Mode. Refer to this post 3 ways to Boot into Safe Mode to see how to get into the Safe mode.
Step 2: Open the Run dialog holding the keyboard shortcut Windows+R
Step 3: In the dialog, simply type appwiz.cpl, and Press OK

Step 4: In the appearing window,
- Locate and click on the application (Say, HP Velocity Driver)
- Click on Uninstall button as shown in the screenshot
Repeat this step to Uninstall the applications Skype for business and HP Velocity Driver

Note that the screenshot shows a sample application.
NOTE: HP Velocity is no longer needed in Windows. Refer to this link by HP that confirms the same. So uninstalling it should not be an issue.
Step 5: Restart the system normally.
Check if the issue has resolved. If not, try the next fix.
Fix 2: Repair the Corrupted System File from Command prompt
Sometimes, the System Files in your system might be corrupted. In such cases, one can consider repairing the corrupted System Files using the below steps.
Step 1: Pressing the shortcut buttons Windows+r from the keyboard together open the Run Dialog.
Step 2: Type cmd and press Ctrl+Shift+Enter to open the Command Prompt with Elevated Status

Step 3: In the UAC prompt that opens, click on Yes
Step 4: In the command prompt window that opens, just type the below command and hit Enter
sfc /scannow

Step 5: After the scan completes, the corrupted files will be repaired. Restart the system.
Check if the error is fixed. If not, try the below fix.
Fix 3: Run a Full Scan in Windows Defender
If the the error is show decause of some some virus or malware in the system, this fix should help to get rid of it.
Step 1: Open the Run Dalog in your PC by holding the Windows logo key and the r key Simulataneously from the keyboard
Step 2: In the text area of the Run Dialog, type ms-settings:windowsdefender, and Press OK

Step 3: In Settings –> Update & Security –> Window Security widow that opens, click on Virus & threat protection

Step 4: From the appearin window, click on Scan options

Step 5: In the appearing window,
- Click on Full scan
- Press the Scan now button

Step 6: Once the scan finishes, check if there are any threats and remove them from the system.
Step 7: Restart your System and check if the error has fixed.
That’s All. Thank you Reading.
We hope this article has been informative and helped you resolve your issue. Kindly comment and let us know which of the above fixes helped you resolve the error.