Some Windows users have complained in the forum about an error message they are witnessing while trying to access a variety of applications on their computers. If you are also seeing “A problem caused the program to stop working correctly” message trying to launch an application, go for these easy fixes.
Fix 1 – Run in compatibility mode
Running the application with correct compatibility settings should solve this issue.
1. Go to the location of the application.
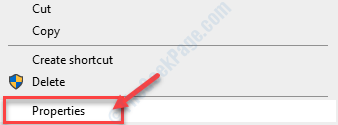
2. Then, you need to right-click on the application and then click on “Properties“.

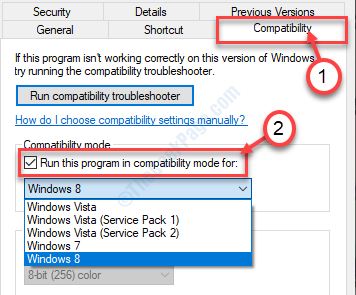
3. Once the Properties window appears on the screen, click on the “Compatibility” tab.
4. After that, you have to check the option “Run this program in compatibility mode for:”

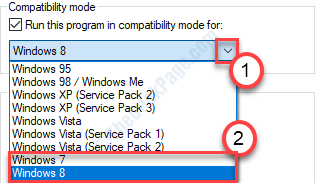
5. Next, click on the drop-down.
6. Choose “Windows 8” or “Windows 7” from the drop-down list.

7. Check the option “Run this program as an administrator“.
8. Finally, click on “Apply” and click on “OK“.

Try to open the application again.
Fix – 2 Update the graphics driver
Updating graphics and monitor driver may solve this issue on your computer.
1. Press Windows key+R.
2. Write “devmgmt.msc” and then click on “OK“.

3. Once the Device Manager appears you have to click on the “Display adapters“.
4. After that, right-click on your graphics driver and then click on “Update driver“.

5. Then, click on “Search automatically for drivers“.

Windows will now search for the latest driver and install it on your computer.
Fix – 3 Disable DEP
Data Execution Prevention (DEP) protects your computer from potential malware and rootkits. Sometimes DEP can prohibit some applications to run.
1. Press Windows key+S. Start to type “cmd” in the search box.
2. After that, right-click on “Command Prompt“. Then, click on “Run as administrator“.

3. Once the CMD terminal appears, type this code and hit Enter to switch the Data Execution Prevention off.
bcdedit.exe /set {current} nx AlwaysOff

Close the terminal once you see ‘The operation completed successfully.’ message emerged in the terminal.
Restart the system and after rebooting check if the application works or not.
[NOTE–
As we have detailed, DEP safeguards your system files from PUPs, viruses, etc. Disabling it not recommended at all.
Once you tested the fix on your computer you have to again set the DEP to ‘On‘.
1. Open the CMD terminal just following the earlier step.
2. After that, run this code in the terminal to switch the DEP to ON.
bcdedit.exe /set {current} nx AlwaysOn

Close the terminal and reboot your computer.