You are in the middle of a critical job and suddenly, you start noticing that your system has started responding quite slow. You went ahead and checked the Task Manager to find what was messing up with your system’s memory and CPU usage. And were you surprised to find the process, System and Compressed memory eating up almost 100% of your disk space? Well, this is an issue that is being reported frequently ever since the early start of this year.
System and Compressed Memory is an inbuilt memory process that takes care of compression of files and folders in your hard drive to create space for efficient functioning. This way, it manages the system RAM to create space for larger files and perform executions at a faster pace. Though , it is expected to take up only a little space of your disk and CPU, there are a few reasons that might lead it to spike the CPU usage. It could have been possible that you have set the paging file size of your virtual memory to a set value from a default Automatic value. Out-of-date drivers and third party programs may also be a cause behind it.
There are various ways to get out of it and the fixes are quite simple, which might actually save you from spending on installing or upgrading to an extended physical memory.
Fix 1 : Set The Page Size To Default.
By Default, the paging size of all the drives will be set to Allow Windows To Automatically Manage it. If you had changed it for any reason, then it is better to revert it back once your task is done. In order to achieve this, follow the below given steps
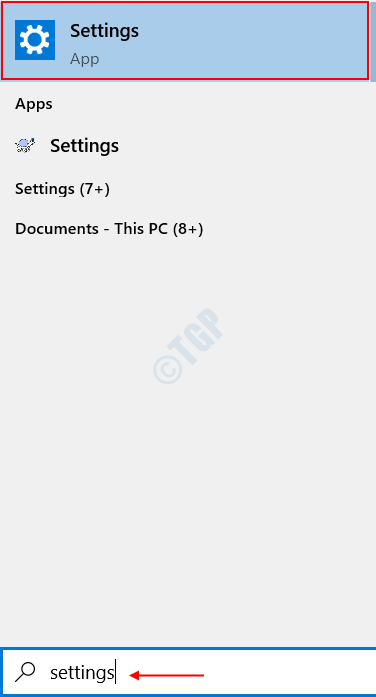
Step 1 : Open Start and search for Settings in the Windows Search Bar.

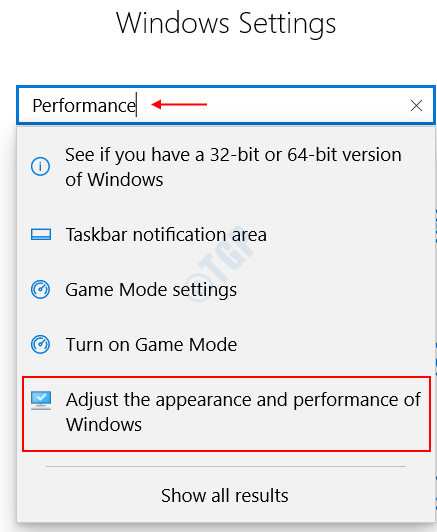
Step 2 : In the landing page, do a quick search for Performance. It will provide you a search result as Adjust the appearance and Performance of Windows. Click On it.

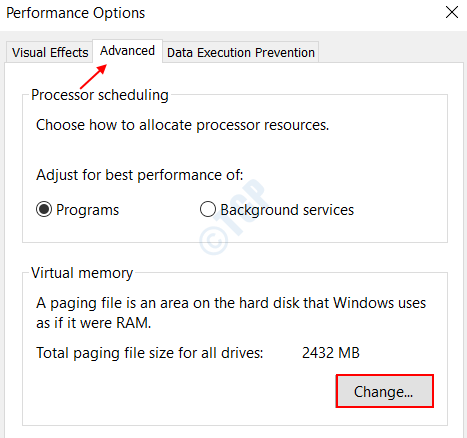
Step 3 : In the Performance Options dialog box, that popped up
Go to Advanced Tab > Select Change under the Virtual Memory box.

Step 4 : Virtual Memory dialog box gets opened up. Check the box Automatically manage Paging Size for All Drives and Select OK.

Step 5 : Click on Apply ,followed by OK in the Advanced Tab.

If you don’t see a decrease in the usage, then get on to the next fix.
Fix 2 : Disable the Superfetch service
Superfetch service, commonly referred as Sysmain is a Windows Operating system service that runs in the background, to improve the system performance and maintain the execution cycles at all times. It analyses the frequently used applications in your system and preloads them into RAM ahead of time. This service could sometimes be using up most of the disk space. If the Superfetch service calls upon the System and Compressed memory process for execution of a large job, then just disabling the service for a while can help you fix the issue.
To disable the Superfetch service, you can follow any of the two below given options.
Option 1 : Disable using Service Manager
Step 1 : Open the Run dialog by pressing the Windows Logo Key and R together.
Step 2 : Type in services.msc in the search bar as shown in the below image.

Step 3 : In the Services window that pops up, scroll down a little to find a service named SysMain. Stop the service in the left pane as shown in the image below.

Step 4 : Right click on SysMain again and click on Properties.

Step 5 : Change the Startup type to Disabled and click on Apply, followed by OK.

Step 6 : Exit the Services window and Restart your system
Option 2 : Disable with Registry Editor
Step 1 : Open the Registry Editor Application by opening up Start > Search for regedit.

Step 2 : In the dialog box that pops up, in the left pane, navigate to the below given path.
HKEY_LOCAL_MACHINE\SYSTEM\CurrentControlSet\Control\Session Manager\MemoryManagement\PrefetchParameters.
Step 3 : On clicking PrefetchParameters, you will be able to see a list of parameters on the right side. Right click on the Name EnableSuperFetch. You will find a list of options.

Step 4 : Choose the option Modify as shown in the image below.

Step 5 : In the dialog box that pops up, to disable the SuperFetch option, set the value in the Value Data to 0. Click on OK.

Step 6 : Restart your system to reflect the changes.
Get on to the next fix, if the above two options do not resolve your issue.
Fix 3 : Optimize The System’s Visual Effects
Visual effects like animations and aesthetic appeal to applications are a great consumer of processing power and RAM. Optimizing your system’s visual effect for offering best performance can help bring down the disk usage to about 25% from 100% drastically. To accomplish this, walk through the below given steps
Step 1 : Open the Run dialog box by pressing the Windows Key and R together.
Step 2 : Type sysdm.cpl in the text box as shown below. Tap OK.

Step 3 : In the System Properties window that opens up, open the Advanced Tab.

Step 4 : Click on the Settings option under Performance as shown in the image below.

Step 5 : Select the option Adjust for Best Performance, and check in all the boxes in the table below. Click on Apply followed by OK.

Step 6 : Click on Apply followed by OK in System Properties Main tab.
Step 7 : Restart your system and check if the disk usage has come down.
Fix 4 : Disable the System And Compressed Memory Process
If there isn’t any luck with the above given fixes, then a go-to option would be to disable the System and Compressed Memory Process altogether. To accomplish this,
Step 1 : Open the Control Panel from the Window’s Start Menu by searching for it in the Search bar.

Step 2 : Search for Administrative tools in the Search box provided in the right pane of the Control Panel. Click on it.

Step 3 : In the window that opens up, choose Task Scheduler from the list. Double click on it.

Step 4 : In the Task Scheduler (Local ) feature on the left pane, navigate the following path and expand its contents.
Task Scheduler Library \ Microsoft \Windows \Memory Diagnostic.

Step 5 : On clicking it, you will find a parameter named RunFullMemoryDiagnostic entry in the right pane. Right click on it.

Step 6 : Choose the option Disable. This will instantly cause the compressed memory to stop its job.

Step 7 : Close the Task Scheduler and Restart the system.
Fix 5 : Stop The Speech Runtime Executable Process
Speech Runtime Executable Process is responsible for handling speech oriented actions in your system like that of recording an audio through mic, speech recognition and converting into machine-understandable format. This process can, in turn, cause the System and Compressed memory process to procure large amount of computer resources to perform its execution. If this is the reason you are witnessing the 100% disk usage, then killing the Speech Runtime Executable process might do the job for you. To turn it off
Step 1 : Open up the Task Manager by pressing Ctrl+Shift+Esc keys together. Alternatively, you can even open it from the Start Menu as shown below.

Step 2 : Click on the Processes tab. Under it, search for Speech Runtime Executable process. Click on it.

Step 3 : Select the End Task in the bottom left as shown in Step 2.
Upon clicking End Task, the computational resources will be released. You should be able to see a considerable decrease, say to 1- 20% of disk usage by the System and Compressed Memory process.
Fix 6: Repair Corrupted Files.
To check for any corrupted files in your system, open up the Command prompt in elevated mode.
Step 1 : Open up the Start Menu > type cmd > Right click on the Command Prompt > Choose Run as Administrator.

Step 2 : Type in the command sfc /scannow and hit Enter. Wait till the scan is complete.

Step 3 : It scans the entire system for any file corruptions and replaces them properly, once you restart the system after the scan completes.
If none of the above fixes work, then a failing RAM could also be a root cause of this spike in resource usage. If your system has more than one RAM stick, try to replace them with brand new ones. Reboot your system every time you replace a RAM stick to check if the issue still persists. Consider yourselves lucky if the system no longer suffers from the huge resource consumption on the RAM stick replacement. Good luck.
Please feel free to send your inputs in the comment section, in case of any issues.