Zoom is a video conferencing app that earned it’s popularity off-late due to the rise in virtual meetings and the work from home scenario. However, many users report of encountering an error “Unable to connect: Error code 5003” as they try to connect to Zoom. Apparently, this error is only appearing in the desktop application of Zoom and works perfectly file on the mobile platform.
The error seems to arise due to an issue with network connectivity, thus, failing to connect your network with the Zoom servers. The error message says “Unable to connect || Make sure you are connected to the internet and your connection to Zoom is not blocked by a Firewall or proxy (Error code: 5003)“.
Few factors that may affect the network on your system are, if the third part anti-virus interfere with the programs on your system or if the network settings are preventing the connections. Thus, causing the error. While restarting your system/WiFi router/Zoom app, or disabling the 3rd party antivirus or the VPN connection, may sometimes solve the issue and connect you back to the Zoom servers, most of the times it does not. Hence, we found a few ways which may help you to fix the the Zoom unable to connect Error code 5003 error.
Method 1: Restart your Zoom Application
One of the first things to try would be to reboot your zoom application that helps clear any additional built-up memory. This not just help you fix the Unable to connect: Error code 5003 issue, but will also speed up the connection and make your online meets, lag-free.
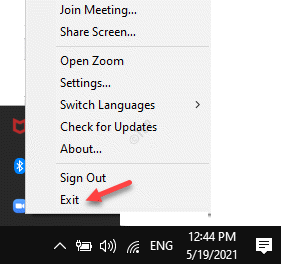
To achieve this, you have to close Zoom completely and then wait for a couple of seconds before you start the app. However, the app won’t be completely closed by simply clicking the close icon (X) on the window. To exit the app completely, follow the below instructions:
Step 1: Navigate to the Taskbar and click on the up arrow to open the system tray.
Step 2: In the system tray, right-click on the Zoom icon (blue camera) and select Exit.

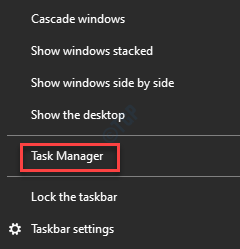
Alternatively, you can also shut it down completely using the Task Manager. Here’s how:
Step 1: Right-click on the Taskbar and select Task Manager.

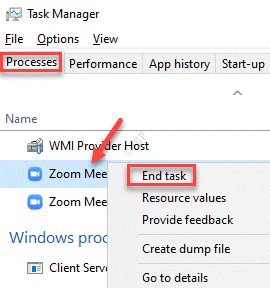
Step 2: In the Task Manager window, under the Processes tab, go to Windows processes and check if the Zoom app shows still running.
If it’s still running, right-click on the Zoom Meetings app and select End task.

This will shut down the app completely. You can then try reconnecting to the Zoom meeting and see if the issue is fixed.
Method 2: Change to a different DNS server
Changing to a different DNS server can help improve the network speed and thus, helping you to connect to Zoom meetings without any issue. Here’s how to change to a different DNS server.
Step 1: Press the Win + R keys together on your keyboard to pen the Run command window.
Step 2: In the search field, write ncpa.cpl and press Enter to open the Network Connections window.

Step 3: In the Network Connections window, right-click on the active WiFi connection and select Properties.

Step 4: In the WiFi Properties window, under the Networking tab, go to This connection uses the following items field.
Now, select Internet Protocol Version 4 (TCP/IP4) and click on the Properties button below.

Step 5: In the Properties dialogue box, under the General tab, select Use the following DNS Server addresses.
Now, type the below figures into the respective fields:
Preferred DNS Server: 1 . 1 . 1 . 1

Alternative DNS Server: 1 . 0 . 0 . 1
Press OK to save the changes and exit.

Now, try connecting to your Zoom meet and the error should be fixed.
Method 3 – Reinstall Zoom
One of the working method which many user pointed out is Reinstalling Zoom application on your Windows PC.
Method 4: Check the status of Zoom’s servers
A lot of times, you may see the “Unable to connect: Error code 5003” error if the Zoom servers are down. This could be due to unexpected rise in traffic or due to a technical glitch on their end. This is when you may encounter network issues that prevents you from attending the Zoom meets. In such a case, it’s recommended to check the status of the Zoom servers. Let’s see how:
Step 1: Launch your browser and visit the below link to check the status of the Zoom servers:
Here, you can check the current status of all the Zoom services individually.
Step 2: If it shows All Systems Operational, it means the sever status of Zoom is fine.
But, if any issue shown here, it’s suggested to wait till the servers are up and running.

Once the servers are back up, try connecting to your Zoom meet again.
Method 5: Reset your Network Adapter settings
Sometimes, simply resetting the network adapter may help fix the network connectivity issue, thus, fixing the Zoom’s unable to connect issue. Follow the below steps:
Step 1: Right-click on Start and select Run to launch the Run command window.

Step 2: In the Run command search box, type cmd and press the Ctrl + Shift + Enter hotkeys to open the Command Prompt window in elevated mode.

Step 3: In the Command Prompt (admin) window, run the below command and hit Enter:
ipconfig /flushdns

Step 3: Now, run the below command in the same Command Prompt window and hit Enter:
netsh winsock reset
Once it’s done, exit Command Prompt and restart your PC.
You can now try connecting to the Zoom meeting and you should not Error Code 5003 again.
Method 6: Add Zoom as Trusted Site
Just like many other websites, even Zoom can be blocked by Windows 10 considering it as insecure. The main objective is to improve the overall security of your Windows 10 system. Therefore, adding Zoom as the trusted site in Windows 10 may help fix the issue:
Step 1: Right-click on Start menu and select Run.

Step 2: This will open the Run command window.
Here, type inetcpl.cpl in the Run command search field and press Enter to open the Internet Properties window.

Step 3: In the Internet Properties dialogue box, select the Security tab and select the Trusted sites.
Click on the Sites button.

Step 4: In the Trusted sites window, in the Add this website to the zone field, enter the Zoom website url (Zoom.us) and press the Add button next to it.
Press Close to return to the Internet Properties window.

Step 5: In the Internet Properties window, press Apply and then OK to save the changes and exit.
Now, visit the Zoom website or app and try connecting to your meeting.
Method 7: Disable the Firewall
While a third-party antivirus software may block Zoom app or website considering it as a potential threat, a Firewall may also do the same. This may lead to issue with the network connectivity and thus, generating the Zoom error code 5003. This mostly occurs when the Firewall settings are not configured in the right way, thus, leading to disturbance in the network connection. In such cases, you can temporarily disable the Firewall and see if it resolves the issue:
Step 1: Go to Start and type Virus & threat protection in the Windows Search bar.

Step 2: Click on the result to open the Virus & threat protection page in the Settings app.

Step 3: Now, go to the right side of the pane and on the extreme right, click on Manage providers under Who’s protecting me? section.

Step 4: Next, to change the Firewall settings, go to the Firewall section, select Windows Firewall and click on the Open app button.

Step 5: In the next window, click on Public Network (since you are using a public Wifi).

Step 6: Now, under the Windows Firewall, turn off the switch.
Step 7: Click Yes in the prompt to confirm the change.
Now, since the Firewall is turned off successfully, you can try connecting to the Zoom meet and see if it helps.
Method 8: Check and Disable the Proxy Settings
Since, a problem in the network connectivity is the major reason behind the “Unable to connect: Error code 5003″, you can try disabling the Proxy settings. This is because, proxy servers may sometimes restrict the Zoom servers, causing the error. Therefore, disabling the Proxy settings may help fix the error. Let’s see how:
Step 1: Press the Win + R shortcut keys on your keyboard to launch the Run command window.
Step 2: In search box, type inetcpl.cpl and hit Enter to open the Internet Properties dialogue box.

Step 3: In the Internet Properties window, go to the Connections tab and click on the LAN settings button below.

Step 4: Now, in the LAN Settings window, uncheck all the boxes under the Automatic configuration and Proxy server sections.
Press OK to return to the Internet Properties window.

Step 5: In the Internet Properties window, press Apply and then OK to save changes and exit.
Now, go back to your Zoom app and try connecting to the meeting session.
Method 9: Try Joining the Zoom Room Manually
Most Zoom users prefer joining the room by clicking on the link. However, Zoom may not allow certain admins to use the room through the clickable access link for security reasons. In such cases, joining the Zoom room manually may help you continue with your virtual meet.
Step 1: Open the Zoom app and click on Join.

Step 2: In the Join Meeting window, enter the Meeting ID and click on Join.

Step 3: Next, enter the Meeting Passcode.

Now, you should be able to connect to your Zoom meeting.
Alternatively, you can wait for 5 minutes and join the Zoom room when there are lot of users trying to connect at the same time. Many people joining at the same time can cause network issues and thus, generate the error code 5003. Therefore, wait for sometime for the servers to unload and then try joining again. However, if none of the above method work, contact the Zoom Technical Support for further assistance.