Are you facing “Can’t connect to Camera” error message whenever you are opening the camera on your phone? This is usually a hardware issue, but if you are experiencing this only in a particular app, then you should check the app permissions as well. We have thoroughly discussed all possible solutions for the camera problem at hand. So, enact all the solutions one by one so you can get back clicking that awesome macro shot in no time!
Fix 1 – Permit Camera permission
Allowing the Camera permission for the specific app should fix the problem.
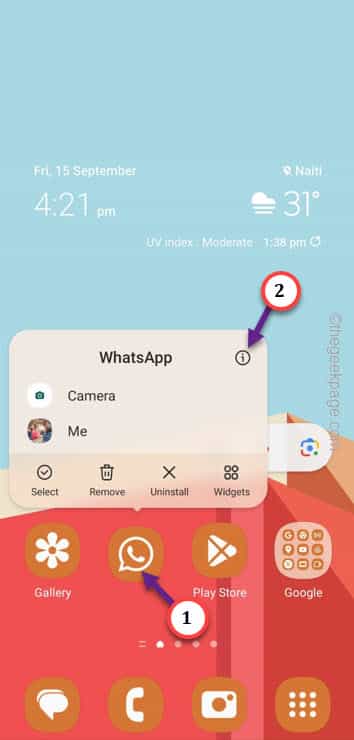
Step 1 – Find the problematic app icon.
Step 2 – Hold that app and use the “i” option to reach the Camera permissions.
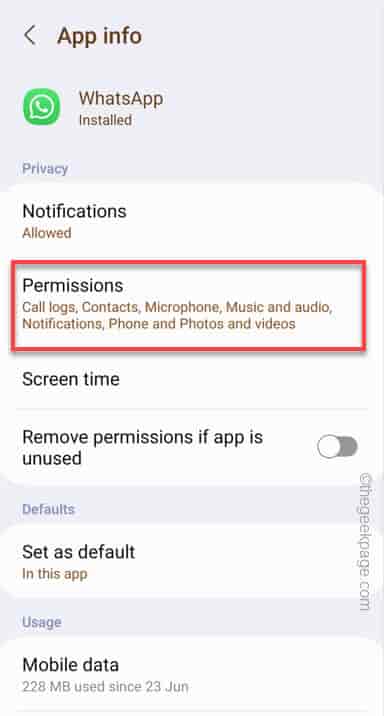
Step 3 – Open the “Permissions” section of the settings.
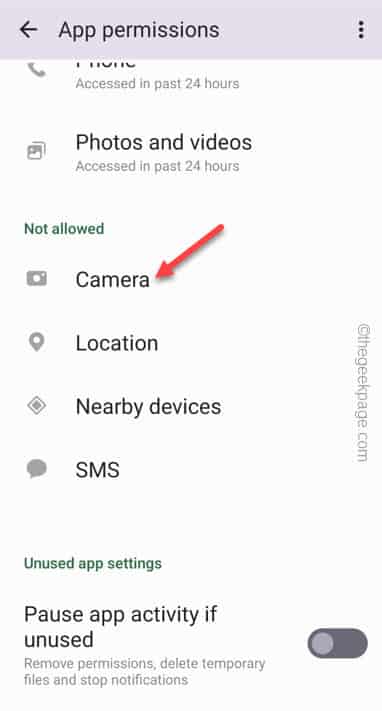
Step 4 – Look for “Camera” permission to tweak that.
Step 5 – Switch this permission to “Allow only while using the app“.
Relaunch the app and try to use the camera inside the app. Check if it is working or not.
Fix 2 – Restore the default Camera settings
If allowing the camera permissions isn’t enough, reset all the Camera app customizations to the default settings.
Step 1 – Open the native Camera app on your phone.
Step 2 – Then, hit the “⚙️” option in the top-left corner.
Step 3 – Tap “Reset settings” on that page.
Step 4 – On the confirmatory prompt, tap “Reset” to reset the camera settings.
After resetting the camera settings, close it.
Try to use the camera again in that app.
Fix 3 – Reset all the app permissions
Sometimes the preference settings of the apps on the phone can restrict the camera permission to a specific app.
Step 1 – Go to the Settings app on your phone.
Step 2 – There, if you go down, you will see the “Apps” section. Tap to open that.
Step 3 – Next, tap the “⋮” option and further tap “Reset apps preferences“.
Step 4 – Finally, tap the “Reset” option one more time to reset all the app settings.
Once you have reset all the apps preferences on your phone, proceed to launch that app once more and try to use the Camera.
If it still shows the ‘Can’t connect to camera’ message, jump on to the next solution.
Fix 4 – Clear that particular app cache
Clear the particular app cache you are facing this problem with. If the native camera app is showing up this error message, clear the app cache of that app as well.
Step 1 – Open the Phone Settings. You can easily find the gear-shaped “Settings” icon on your phone.
Step 2 – However, open the “Apps” in there.
Step 3 – Locate the app in the app list.
Step 4 – Open that particular app settings.
Step 5 – After opening that particular app settings, go to the “Storage” settings.
Step 6 – When the Storage panel opens up, you will find the cache clearing option. Touch the “Clear cache” menu to clear the cache.
Quit the Settings.
Try to access the camera settings within that app and test. If you can’t access the Camera from within the app, jump to the next solution.
Fix 5 – Wipe the cache partition
There is a cache partition on your phone. Corrupted cache partition can cause the damage on your device.
Step 1 – You have to boot the phone into the Recovery Mode.
Step 2 – At first, termianate all the apps that are currently running on the device.
Step 3 – Then, plug your phone into any of the following devices using an USB cable –
PC/Laptop
Set Top Box
TV
Type C earphones
Bluetooth Speaker
Step 4 – Just press&hold the Power button for a brief few seconds.
Step 5 – Finally, touch the “Power off” to switch off the mobile.
Usually, when the phone is switched off, the phone screen doesn’t show up anything.
But, this time, it will show you the signs of the charging on the phone screen.
Step 6 – When you see the charging sign on the phone screen, holder the Power button and the Volume UP button both at once for a few seconds to start the phone in the Recovery Mode.
This will put the phone into the Recovery Mode. Keep in mind that the touchscreen panel is disabled in this mode.
Step 7 – Get the down to the “Wipe cache partition” by pressing the Volume down button a few times.
Step 8 – Once you are there, use the Power button to open that.
Step 8 – On the following page, choose the “Yes” option again using the volume button.
Step 9 – Use the Power button to wipe the cache partition on the phone.
THis way, you can clear out the particular partition on your phone.
Step 10 – Within a few moments, you shall come back to the main Android Recovery page.
Step 11 – Finally, highlight the “Reboot system now” option. Then, tap the Power button to restart the phone.
Let the phone restart normally. Once you are back, launch the app and test the camera within the app.
Fix 6 – Interference of other apps
If there are too many apps running on the mobile with the Camera access, they can cause this trouble.
Before using that app where you are facing this trouble, ensure there aren’t any Camera-related apps are running in the background. One option is to Safe Boot the phone and retry.
Step 1 – Quickly press the Power Button for a few seconds.
Step 2 – When you see all the options to switch off, restart on the screen, press and hold the “Power Off” sign for 5-7 seconds.
Step 3 – When you do this, option to put the phone to Safe Mode loads up.
Step 4 – Tap it once to load the phone in Safe Mode.
Now, wait for the phone to restart. When it does, you will see that all the third-party apps are disabled on your phone.
Launch the Camera app. If it doesn’ report any Camera disconnect message, then there is a third-party app that is causing this problem. If you have sideloaded any third-party apps, uninstall it and that should fix the camera bug!
Fix 7 – Camera bug
Sometimes a bug can cause this problem as well. So, updating the phone may help fix the issue.
Step 1 – Navigate to the phone Settings.
Step 2 – Find the “Software Update” and open that up.
Step 3 – Tap “Download & install” to download the update package.
Step 4 – Wait till your phone downloads the package and then, tap “Install now” to install the updates immediately on your phone.
This does make the phone reboot and it completes the update process. Open the Camera app after this.
Fix 8 – Consult the authorized service center
If you still can’t take a picture using the camera at all, it is time that you consult with the authorized service center and get it looked at by technicians.
Though if the camera isn’t accessible in only one of the apps, uninstall-reinstall the app once and retest.
Hope these solutions have helped resolving your issue.


