Are you unable to connect to the WiFi hotspot from your Windows 10 computer? If you are facing this issue on your computer, don’t worry. This problem usually occurs due to misconfiguration of the internet profile your computer. To solve the issue easily, follow these steps on your computer minutely. But before going on ahead for the main solutions try out these easier workarounds-
Workarounds–
1. Reboot your computer and try to connect to the network again.
2. Switch the hotspot ‘Off’ and switch it ‘On’ again. Try to connect to it.
If rebooting your computer didn’t help you out, these fixes will surely fix the issue-
Fix-1 Uninstall and re-install the network adapter-
Uninstalling and re-installing the adapter driver will surely fix this issue.
1. Type “Network Connections” in the search box.
2. Then, press “Enter” to access the Network Connections.

Network Connections will be opened.
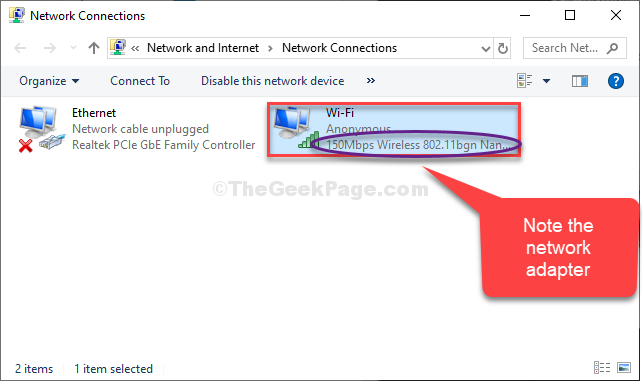
3. Now, note the network adapter your computer is using to connect to the internet.
(NOTE– For this computer, it is “150Mbps Wireless 802.11bgn Nano USB Adapter“, which can be noticed just below the network name ‘Anonymous’. )

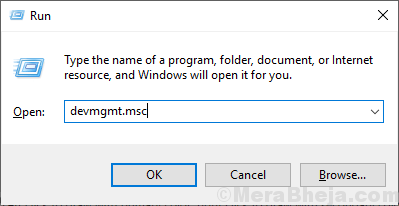
4. Press Windows key+ R to open Run.
5. Now, type “devmgmt.msc” and hit Enter.
Device Manager utility will open.

6. In the Device Manager utility window, look for the “Network adapters” option and click on it to see available drivers.
7. Now, right click on the network adapter you have noted before and then click on “Uninstall device“.

8. If an warning message appears, simply click on “Uninstall“.

The network adapter driver will be uninstalled from your computer.
In the next steps we will re-install the network adapter driver on your computer-
Method 1-
Just reboot your computer and Windows will install the uninstalled driver itself. You will have your network adapter working fine again.
Method 2–
If rebooting your computer didn’t install the driver then you have to install the driver yourself. Follow these steps to install the driver manually-
1. Press Windows key+X together and then click on “Device Manager“.

2. In the Device Manager window, click on “Action” and click on the “Scan for hardware changes“.

You will be able to see the removed driver again.
Try to connect to the hotspot on your computer.
Fix-2 Disable and Enable network adapter-
If the previous method didn’t work out, try disabling and enabling the device-
1. Press Windows key+X and then click on “Device Manager” on the admin menu which pops up at the bottom left corner.

2. Then, click on the “Network adapters” list.
3. Right-click on the network adapter and then click on “Disable device“.

3. Click on “Yes” to disable the adapter. After disabling the adapter, you will be able to see a down arrow sign beside it. The adapter will be disabled.

Wait for a while.
4. Right-click on the disabled adapter and then click on “Enable device” to enable the network adapter.

Wait for a while as the device will be enabled again.
Try to connect to the hot spot again. This time you will be able to do it.
Your problem will be solved.