Many times you may experience this error “Windows Can’t Communicate with the Device or Resource (Primary DNS Server)“, or “Windows can’t communicate with the device or resource (primary DNS server)“. You see this error when you are disconnected from the internet all of a sudden and you run the Troubleshooter which detects this error.
This error message may arise either due to the fact that IPv4 or IPv6 settings are not configured in the right way, an issue with the network settings, or because you may be running a proxy server. Whatever may be the reason, it can be frustrating especially if you are in the mid of an important project.
However, this error can be fixed with some effective solutions. Let’s see how.
Method 1: Using Command Prompt
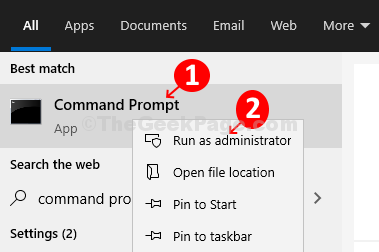
Step 1: Click on the Start button on your desktop and type Command Prompt in the search field. Right-click on the result and click on Run as administrator to open Command Prompt in admin mode.

Step 2: In the Command Prompt window, run the below command and hit Enter:
netsh int ip reset

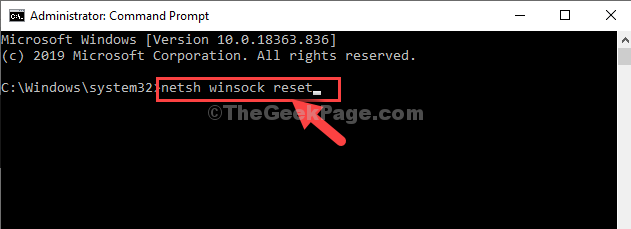
Step 3: Now, run the 2nd command as shown below and hit Enter:
netsh winsock reset

Now, exit the Command Prompt and restart your computer. The error should be gone now and you will be connected to the DNS server again. If the problem persists, try the 2nd method.
Method 2: Through Network and Sharing Center
Step 1: Right-click on the network icon your Taskbar on the bottom right and click on Open Network & Internet Settings.

Step 2: In the Settings window, click on Wi-Fi on the left. Now, on the right side of the pane, scroll down and under Related settings, click on Change adapter options.

Step 3: Select the network that you are using (here we are using Wi-Fi), right-click on it, and click on Properties.

Step 4: In the Wi-Fi Properties window, under the Networking tab, select Internet Protocol Version 4 (TCP/IPv4) and then click on the Properties button.

Step 5: In the next dialogue box, under the General tab, click on the radio button next to Obtain an IP address automatically.
Again, click the radio button next to Obtain DNS server address automatically. Click on OK to save the changes and return the Wi-Fi Properties window.

Step 6: Now, select Internet Protocol Version 6 (TCP/IPv6) and click on the Properties button.

Step 7: Follow the same steps as illustrated in Step 5, Click OK to save the changes and exit.

That’s about it. And, your network should now connect with the DNS server with no error message anymore.