If you plug and unplug a flash drive on your computer too many times without safely ejecting it first, you may see this error message “The last USB device you connected to this computer malfunctioned and windows do not recognize it“. Without safely ejecting the drive, if someone unplugs the usb too many times, it will corrupt the driver and cause this problem. To solve this problem follow these fixes.
Fix-1 Update Generic USB Hub
1. Press the Windows key along with the ‘X‘ key.
2. Then, click on the “Device Manager“.

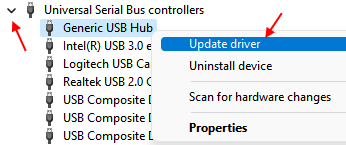
3 – Now, Click on Universal Serial Bus controllers to expand it.
4 – Now, right click on Generic USB Hub and click on Update driver

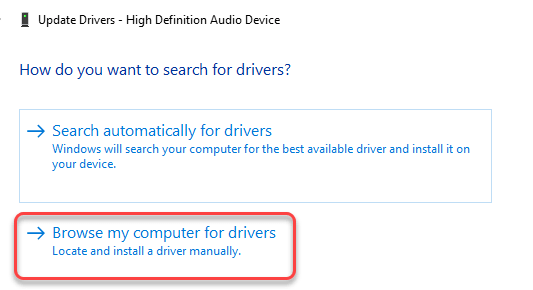
5 – Click on Browse my computer for drivers.

6 – Click on let me pick from a list …

7- Select Generic Usb Hub from the list and click on Next.

After it gets installed try again.
Fix-2 Troubleshoot
1 – Search Powershell in windows search.
2 – Now, right click and choose run as administrator.

3 – Now, copy and paste the command given below and hit enter key.
msdt.exe -id devicediagnostic
4 – Now, choose your device and follow on screen instructions to troubleshoot.

Fix 3 – Uninstall Unknown USB devices
1. Press the Windows key along with the ‘X‘ key.
2. Then, click on the “Device Manager“.

3 – Now, Click on Universal Serial Bus controllers to expand it.
4 – Now, if there are any Unknown USB devices with error signs , then do a right click and Uninstall them .

5 –Restart your computer.
Fix-4 Change USB selective settings-
1. Press Windows key+R.
2. To open up the Power Options utility copy-paste this command in Run window and hit Enter.
control.exe powercfg.cpl,,3

5. In Power Options window, scroll down to expand “USB settings“.
6. Again expand “USB selective suspend setting“.

7. Click on the drop-down beside ‘Setting:‘ and then select the “Disabled” settings from the drop-down.
[NOTE– If you are applying this fix on a laptop, you will see ‘On battery‘ and ‘Plugged in‘ settings. You need to “disable” both the options. ]

8. Finally, click on “Apply” and “OK” to save the changes on your computer.

Close Power Options.
Restart your computer to save the changes on your computer.
Plugin the usb device to your computer and all you will be able to access it.
Your problem will be solved.
Fix-5 Remove Power Supply and reconnect usb-
This is the simplest hack for this problem which has worked for many users.
1. Switch ‘Off’ your computer.
2. Remove the power supply plug from your computer.
3. Now, try to power up the computer using power button. This will drain out any residue electrons from the whole system. (If it is a laptop , first drain the battery and then try to power up using power button)
4. Now, connect your usb device to the usb port.
5. After the usb device is plugged into your system, plug in the power supply to your computer.
6. Start your computer.
That’s it! The usb device will work just fine.
Fix-6 Uninstall drivers-
Uninstalling problematic drivers from your computer may work out for you.
1. Press the Windows key along with the ‘X‘ key.
2. Then, click on the “Device Manager“.

3. In the Device Manager utility window, look for the “Universal Serial Bus controller” option and click on it to see available drivers.
4. In the list of drivers, you will see a driver carrying a yellow triangle ⚠ symbol.
5. Now, right-click on the affected driver and then click on “Uninstall device“.

6. If a warning message appears, simply click on “Uninstall“.

The corrupted driver will be uninstalled from your computer.
Method 1-
Simply restart your computer and Windows will install the uninstalled driver itself. You will have your network adapter working fine again.
Method 2–
If restarting your computer didn’t install the removed driver on your computer, you need to scan for changes to manually install it.
Follow these steps to install the driver manually-
1. Press Windows key+X and clicking on the “Device Manager” will open up the utility window.

2. At first, click on “Action“.
3. Again, click on “Scan for hardware changes“.

This will find the uninstalled driver and install the driver again.
4 .Also try to locate any other unknown devices under other devices section if you can locate in device manager. If any unknown device has yellow triangle ⚠ symbol, reinstall that also.

Just right click and uninstall them and then restart your PC.