Windows Terminal is the default terminal for Windows 11 that has some amazing new features. In this article, we are going to take an in-depth look at the excellent features that the Windows Terminal has to offer.
Multiple tabs feature in Windows Terminal
The most exciting new feature of the Windows Terminal is you can access multiple tabs in the Windows Terminal. Windows Terminal can open almost any number of different types of terminals all at one window.
Opening multiple tabs –
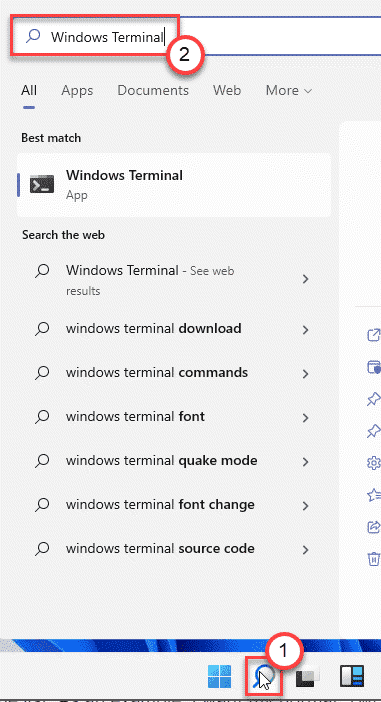
1. First of all, click on the search box. Then, type “Windows Terminal“.
2. Next, click on the “Windows Terminal” to access it.

3. When the Windows Terminal opens up, click on the “+” button beside to open another tab of the same type.
You can also open a new window simply by pressing the “Ctrl+Shift+T” keys together.

Opening various type of tabs –
No more screen splitting or minimizing and maximizing app windows! You can open multiple different types of tabs following these steps.
1. Open the Windows Terminal.
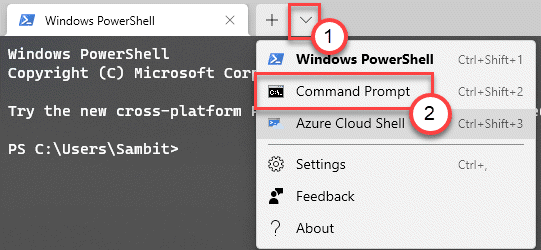
2. Then, click on the drop-down icon. You will see all the available list of terminals here (like – ‘Windows PowerShell’, ‘Command Prompt’, ‘Microsoft Azure cloud’, etc. ).
3. Tap on the terminal you want to open.

This will open up a new terminal just beside the already opened one.
Opening MULTIPLE tabs side by side –
You can even two tabs side by side in the new Windows Terminal. This allows the screen to split and can be used to open two distinct terminals.
1. At first, launch the Windows Terminal window.
2. Then, click on the drop-down icon to view the list of terminals.
3. Then press and hold the “Alt” key and click on the terminal you want to open sideways.
This will open up the new window sideways.

Though this feature has a slight backlog. If you are trying to close any individual terminal, you have to only exit the shell using the command line. You have to execute the “exit” command in the Command Prompt to close the terminal in simpler terms.

Customizing the appearance of different terminals
There are a ton of options to customize the appearance of the terminals in the Windows Terminal. You can set different wallpaper, color, background, and foreground settings for different terminals.
Altering the Windows Terminal Theme
1. Open the Windows Terminal.
2. When the Windows Terminal opens up, click on the drop-down and click on the “Settings“.

3. Then, on the left-hand side, scroll down and click on the “Appearance” tab.
4. On the right-hand side, you will notice the ‘Theme’ tab. There are three themes – ‘Light‘, ‘Dark‘ and ‘Use Windows Theme‘.
You can choose any of these themes.

Windows Terminal will be using the particular theme you have selected.
Profiling various terminals
You can use different profiles for various terminals you are using on the Windows Terminal. You can customize the fonts, background image, cursor type to even varying the exit behavior in these profiles!
1. Open the Windows Terminal on your computer.
2. Then, on the left-hand side, you will notice the list of terminals you have.
3. Select the terminal profile you want to alter from the left-hand pane.
4. Then, on the right-hand side, there are three main sections –
“General“, “Appearance” and “Advanced“.

General section –
1. In the General tab, you can alter the “Tab title” by adding any tab name you prefer.

2. Other than that, you can even hide the terminal from the drop-down menu of the title bar.
3. If you want to do that, just switch the “Hide profile from dropdown” settings to “On“.

Apart from these, you can even alter the icon of the terminal if you want.
Whatever changes you do, do not forget to tap on the “Save” icon to save it.
Appearance section –
As the name suggests, you can alter the appearance of the particular terminal on your computer. Starting from font size, font style to even a retro font effect from the 90’s computers.
1. Open the Windows Terminal window.
2. Next, go to the “Appearance” tab.
3. Here, you can change the ‘Font’ settings (such as font style and font size) cursor type as you prefer.

4. If you want to set your favorite image at the desktop background, you can do that too.
5. Just, scroll down to the “Background image“. Then, click on “Browse“.

6. Select the image you want to set up as the background and click on “Open“.

This will set up the background image as you have wanted it.
You can even make the scroll bar hidden by adjusting the settings, also.
Advanced section
This section comprises a few advanced settings like – Text antialiasing, AltGr aliasing, etc.
1. Set the “Scroll to input when typing” setting to “On“. This will scroll your window to the location on the terminal where you are typing.

2. If you are facing any trouble reading in the command line, you can toggle the ‘Text antialiasing’ feature to “Grayscale” or “ClearType” as you prefer.
3. Same way, you can toggle the ‘AltGr aliasing‘ feature “On” or “Off“.

This way you can customize the Windows Terminal.
Different types of shortcuts
There are different types of customizable shortcut keys in the Windows Terminal. Even you can create your own unique shortcut keys editing the JSON file.
1. Open Windows Terminal.
2. When the Windows Terminal opens up, click on the drop-down and click on the “Settings“.

3. Now, on the left-hand side, click on “Actions“.
4. You shall see the list of shortcut keys on the right-hand side.

5. If you want to create new keys or modify the existing shortcuts keys, click on “Open JSON file” on the left-hand side.

6. You can adjust the code according to your preferences.

Save the JSON file and reload the Windows Terminal app.
This way, you can use the Windows Terminal as you prefer.