The VS Code’s terminal works normally efficiently to run and execute several server-side applications and basic compilation operations. But, while doing even simple tasks like doing some dependency installation operations, you may have faced this “Terminal process failed to launch” message. It can get into your way of normal workflow. So, we have discussed all the solutions so that you can get back the terminal working once again.
Fix 1 – Modify the settings.json file in VS Code
The settings.json file takes care of the settings of the VS Code terminal. So, you should reset it to the normal settings.
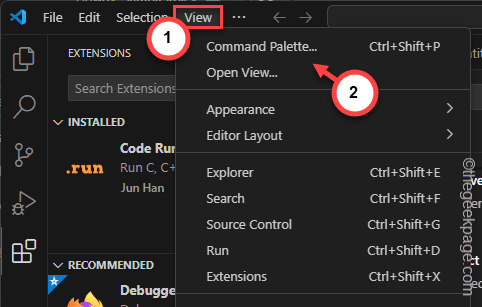
Step 1 – At first, click the “View” button and choose to open the “Command Pallete” to access that.
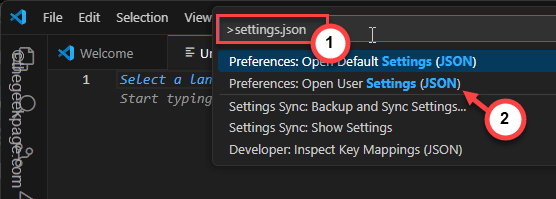
Step 2 – Next, search for “settings.json” in the search box.
Step 3 – Later, when you see the “settings.json” item in the search result, click to open it.
Settings.json will load up in a separate tab.
Step 4 – Select all the components in there at once. You can press the Win+A keys together.
Step 5 – After this, hit the Delete key to delete all the modifications in there.
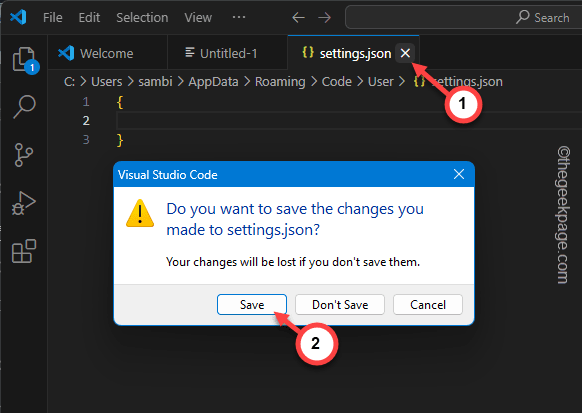
Step 6 – Click the cross button to attempt to close the settings.json file directly.
Step 7 – This should throw up this message prompt –
Do you want to save the changes you made to settings.json?
Step 8 – Click “Save” to save the changes.
This should reset the settings file for the VS Code. Now, you can compile and run the program once more.
Fix 2 – Use the proper plug-ins
You should be using proper plug-ins to execute the code in the terminal.
Step 1 – On the VS page, locate the plug-in in the left bar.
Step 2 – Tap that to open the list of plug-ins list.
Step 3 – Search for the “Code Runner” plug-in in there.
Step 4 – Tap the “Code Runner” in the list to open it up.
Step 5 – Tap “Install” to install the Code Runner plug-in in the Visual Studio.
Step 6 – Next, tap the ⚙ button on the left pane and click “Settings” to open the VS Code settings.
Step 7 – Search for the “Code Runner” using the search box.
Step 8 – Next, you must find the “Code-runner: Run in Terminal” option.
Step 9 – Then, check the “Whether to run code in Integrated Terminal” box.
Step 10 – Tap “Backup and Sync Settings” to save the changes.
Finally, after installing the plug-in, you may run the code in Visual Studio and test.
Next time when you compile or run the code, you won’t face any more VS Code errors.
Fix 3 – Check the Terminal integrated settings
Apart from the settings defined in the settings.json file, there are several integrated settings features that you must take a look at.
We have mentioned all the terminal-integrated operations that may help you resolve the issue.
- terminal.integrated.env.{platform} – Use this code to test the variables added to the shell.
- terminal.integrated.cwd – This one lets you know the current working directory.
- terminal.integrated.profiles.{platform} – This designates the shell profiles, path and argument.
- terminal.integrated.defaultProfile.{platform} – This identifies the real shell profile.
- terminal.integrated.splitCwd – You can use this to take control of the current working directory using a split terminal.
Alternatively, you may use the Modified filter in the VS Code to identify and troubleshoot any other modifications that you may have done.
You can modify the VS Code Settings (settings.json file for the user) and change the Integrated Terminal settings.
Fix 4 – Update the shell to the latest version
If you are using any other integrated shell on your machine, make sure that the shell is compatible with the latest version of Visual Studio.
Step 1 – On the Visual Studio page, go to the “Help” button.
Step 2 – Tap “Check for updates” from there.
Finish updating the Visual Studio.
NOTE – If you are on an older version of Windows 10, it may not be natively supported by the VS Code. So, you must be on the latest build of Windows.
Fix 5 – Enable the Trace logging
Still no fix for the issue? Enable the trace logging in the VS Code and test.
Step 1 – First, right-click the Windows icon.
Step 2 – Next, tap the “Task Manager” in there.
Step 3 – Right-click the “Visual Studio” in there and tap “End task“.
Step 4 – Terminate any running instances of the Visual Studio app from the Task Manager.
Step 5 – Later, tap the F1 button (or, tap the Fn+F1 keys together).
Step 6 – In the search bar, type “Developer: Open Log File…” and press the Enter key from your keyboard.
There will be a bunch of log files in the drop-down menu. The “Terminal” log file refers to the Frontend input logs and the “PTY Host” keeps track of the Backend log files.
These files will be helpful in the troubleshooting process.


