Windows Key plus the Spacebar key combination is a shortcut for toggling between different keyboard layouts that are available within the system. However, it is seen that this shortcut would stop working after updating windows. For some reason, if you notice that this shortcut is not working in your system and is annoying you, then there is nothing to worry about. In this article, let us discover various methods to fix the “Windows+Spacebar shortcut not working” issue in your system.
Fix 1: Push the keys hard and Clean the Keyboard
Try pushing all the keys in keyboard hardly once.
If it does not work, follow the steps shown
If there is some dirt stuck under the keys of the keyboard or if there is some corrosion the keys might not work.
- We suggest you Power Off the system.
- Unplug the keyboard( if you are using an external keyboard).
- Take a clean cotton ball, dip a bit of it in alcohol or the cleaning agent and gently clean the keys of the keyboard.
- Now, Restart the system and check if the shortcut is working
If the issue still exists, try the next fix.
Fix 2 : Turn off Sticky keys
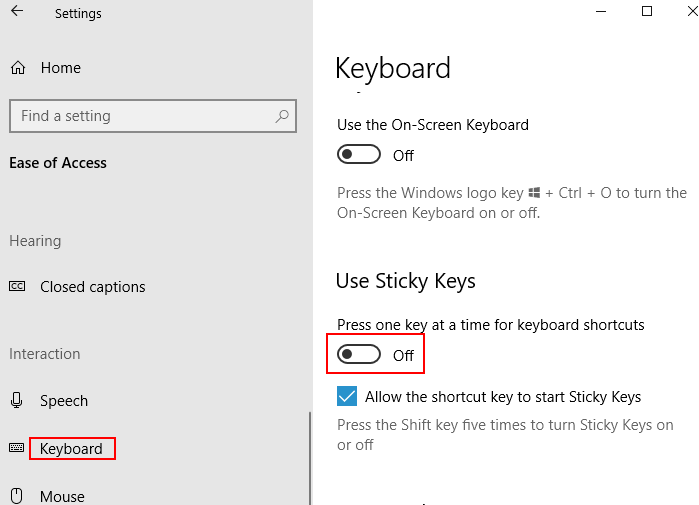
1. Press Winds key + I together to open settings
2. Now, Click on Ease of Access.
3. Now, click on keyboard from the left.
4. Now, Turn off Sticky keys.

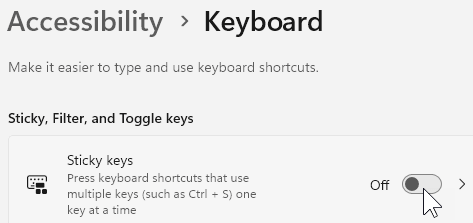
Windows 11 Users
For Windows 11 users , You should Go to Settings > Accessibility > Keyboard

Fix 3: Plug the Keyboard into the different USB port
If you are using an external keyboard, then unplug it from the USB port and try plugging it into the different USB port and check if this works.
If this does not help, try the next fix.
Fix 4: Run the Windows Troubleshooter for Keyboard
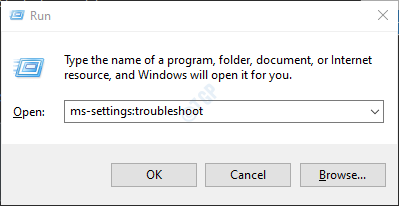
Step 1: Open the Run Dialog in your System, holding the Shortcut keys Windows+r
Step 2: In the appearing window, type the command ms-settings:troubleshoot and just click on OK

Step 3: In the Settings–> Update & Security –> Troubleshoot window that appears, Click on Additional troubleshooters

Step 4: In the Additional Troubleshooters window that opens, Under the Find and fix other problems section, Choose Keyboard

Step 5: When you click on Keyboard, you can see the Run the troubleshooter button, press on it.

Step 6: Windows will run the Troubleshooter and notify if there are any issues. Follow the instructions and resolve the issues.
Step 7: Restart the System
Check if this fixes the issue. If not, try the next one.
Fix 5: Repair the corrupted files with SFC
Sometimes, when the System Files are corrupted, there are chances to see this type of error. To repair the corrupted System Files do the following
Step 1: Pressing the shortcut buttons Windows+r from the keyboard together open the Run window.
Step 2: Type cmd and press Ctrl+Shift+Enter to open the Command Prompt with Administrator privileges

Step 5: In the UAC prompt that opens, just click on Yes
Step 4: In the command prompt window that opens, just type the below commands one after the other. Please make sure to hit Enter key after each command
DISM.exe /Online /Cleanup-image /Scanhealth
DISM.exe /Online /Cleanup-image /Restorehealth
DISM.exe /online /cleanup-image /startcomponentcleanup
sfc /scannow
NOTE: This scan takes several minutes to complete.
Fix 6: Ensure Human Interface Device Service is enabled
If the Human Interface Device Service is not enabled, none of the shortcut keys will work. So it is important to ensure that this service is enabled. To do so,
Step 1: Press the buttons Windows+r from your keyboard at the same time. This opens the Run Dialog in your System.
Step 2: In the Run dialog, type services.msc and Press OK

Step 3: In the Services window that opens, Scroll-down and locate Human Interface Device Service. Under the Status Column, check if it is Running.

Step 4: In case the service is not in a Running state, Right-click on the Human Interface Device Service and choose Start as shown below.

Now, check if the shortcut starts working. If not try the next fix.
Fix 7: Update the Keyboard Driver in Device Manager
Step 1: Open the Run Window with the keys Win Key+r
Step 2: Enter devmgmt.msc, and press OK

Step 3: In the Device Manager window, Double-click on Keyboards to see the list of keyboards available in the system

Step 4: Right-click on the keyboard in which the shortcut is not working and choose Update driver

Step 5: In the Update Drivers window, click on Search automatically for drivers

Step 6: You will be notified if the driver is not up to date. Follow the instructions and update your drivers.
Check if this fixes the issue. If not try the next one.
Fix 8: Uninstall and Reinstall the Keyboard Driver in Device Manager
Step 1: Follow Steps 1,2,3 from Fix 6.
Step 2: Right-click on the required keyboard and choose Uninstall device from the context menu

Step 3: From the Uninstall Device window, click on Uninstall

Step 4: Restart your system. Windows will automatically try to reinstall the driver.
Step 5: If you do not see the keyboard driver listed, Right-click on Keyboards and choose Scan for Hardware changes

Step 6: Now, the keyboard driver would be re-appear.
With this, check if the shortcut starts working again. If not try the next fix.
Fix 9: Try Resetting Keyboard Settings
Step 1: Open the Run Dialog with Windows key+r
Step 2: Enter control /name Microsoft.Language and hit Enter

Step 3: In the Settings –> Time & Language –> Language window that opens, Under the Preferred languages, there will be many languages listed as shown below

Step 4: By default, the keyboard settings will be according to the first language listed. In this case, it is English(United States). To reset the existing keyboard settings, just move any other language listed(In this case, English(India)) below to the top of the list by clicking on the upward arrow key

Step 5: Now that the keyboard settings have been reset, get the required language to the top of the list again using the arrow keys.
If this fix does not help, try the next fix.
Fix 10: Rollback to the previous version of Keyboard Driver
If the shortcut stopped working when the keyboard driver was updated, you can try rolling back to the previous version of the driver. To so do,
Step 1: Open Device Manager and locate the required driver. Follow Steps 1,2,3 from Fix 6.
Step 2: Right-click on the required driver and choose Properties

Step 3: In the properties window, go to the Driver tab
Step 4: Click on the Roll Back Driver button and follow the instructions.

Check if this fix works. If it doesn’t help, check the next fix.
Fix 11: Remove the Windows Update causing the Issue
At times, some new updates might have caused the issue. To check if that is the case, one can simply opt to remove the changes made by the latest update.
Step 1: Open the Run Dialog(hold Win Key+r) and type ms-settings:windowsupdate and hit Enter.

Step 2: Scroll down and click on View Update history

Step 3: In the appearing window, Check if there were any updates to the Keyboard under the Update history section.
Step 4: Click on Uninstall updates

Step 5: In the Window that opens, a list of updates that are installed in the system will be shown.
Step 6: Right-click on the required update and choose Uninstall.

Check if this solves the issue. If not try the next fix.
Fix 12: Restore the System to a previous Restore Point
If you have created a restore point before the issue existed in the system, you can simply restore the system to that restore point.
Step 1: Open the Run Window. To do so, hold Win Key +R
Step 2: Type rstrui.exe and hit Enter

Step 3: In the System Restore window, Choose an appropriate restore point and follow the instructions to restore your system.

Step 4: Note that this would take several hours to finish the system restore.
Check if this works, if not try the next fix.
Fix 13: Reset BIOS to defaults
If none of the above Fixes works, try this fix.
Step 1: Open the UEFI BIOS settings using the link How to Open UEFI BIOS settings in Windows 10
Step 2: In the appearing window, click on File Menu –> Default Setup –> Restore Factory Settings as Default
The menu options are wrt to an HP laptop. This might change slightly in the different laptop makes.
If the issue does not resolve even now, it is better to check if there any issues with the keyboard hardware.
That’s All. Thank you for Reading.
We hope this article has been informative and helped you fix the issue with the Win Key+Spacebar shortcut. Kindly comment and let us know if you run into any issues.