Skype is one of those apps on the Microsoft Store app that has earned its popularity among Windows users for all the right reasons. From online chats to free video calling over the network, Skype has been known for its smooth communication experience since years. However, it comes with its own set of problems that can be annoying at times and that’s the automatic updates in Skype.
The Skype desktop app can update anytime and usually takes several minutes to download and install. What’s frustrating is, it can start updating just when you have an important scheduled call, ending you up in a mess. You are greeted with an update message and then it starts updating without any prior notification. Worst is, it gets stuck. However, the app does give you an option on some systems before it’s updated.
The good thing is, the automatic update in Skype for Windows 10 & Windows 11 can be turned off. Let’s see how.
Method 1: Disable Automatic Updates for Skype App Using Microsoft Store
Case 1 – If you are a Windows 10 User
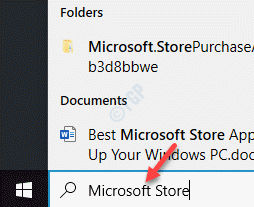
Step 1: Navigate to the Start menu and in the Windows search bar, type Microsoft Store.

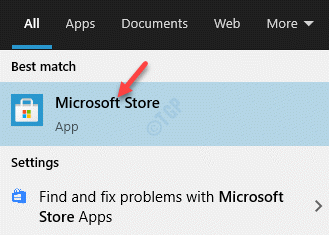
Step 2: Now, left-click on the result to launch the Microsoft Store app.

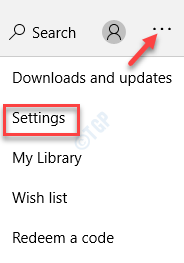
Step 3: In the Microsoft Store app, go to the upper right side of the window and click on the three dots.
Select Settings from the menu.

Step 4: In the Settings window, under the App updates section, turn off the Update apps automatically option.

This will turn off the automatic updates for Skype as well as other apps installed from the Store.
Case 2 – If you are a Windows 11 User
1- Open Microsoft Store
2 – Now, click on your user profile icon in Microsoft store, located at top right.
3 – Now, click on App settings.

4 – Now, Turn off App Updates.

Method 2: Disable Automatic Updates for Skype Using Command Prompt and Temp Folder
Step 1: Right-click on Start menu and select Run to open the Run command window.

Step 2: In the Run command window, type cmd and press the Ctrl + Shift + Enter keys together on your keyboard to launch the Command Prompt window in elevated mode.

Step 3: In the Command Prompt (admin) window, run the below command and hit Enter:
sc delete SkypeUpdate

Once you see the success message, exit Command Prompt.
Step 4: Press the Win + R hotkey on your keyboard to open the Run command box.
Step 5: In the Run command search field, type %temp% and press OK to open the temp folder in the File Explorer.

Step 6: Now, look for SkypeSetup.exe in the File Explorer window, in the temp folder, select it and hit Delete.
This will delete the file once and for all from your system.
Now, exit the File Explorer.
How to Block Skype from Checking Version Updates Via Registry Editor
This method should be followed after the above solutions to block Skype from checking version updates.
Step 1: Press the Win + X keys together on your keyboard and select Run.

Step 2: In the Run command window that opens, write regedit and press OK to open the Registry Editor window.

Step 3: In the Registry Editor window, navigate to the below path:
HKEY_LOCAL_MACHINE\SOFTWARE\Policies
Now, right-click on the Policies folder, select New and then Key.

Step 4: Rename the new key as Skype.

Step 5: This time, right-click on the Skype key, select New and then Key.

Step 6: Rename the new key as Phone.

Step 7: Now, go to the right side of the window, right-click on an empty area, select New and then select DWORD (32-bit) Value.

Step 8: Rename this new DWORD Value to DisableVersionCheck and double-click on it.

Step 9: In the Edit DWORD (32-bit) Value dialogue box that opens, go to the Value data field and set it to 1.
Press OK to save the changes and exit.

Now, simply restart your PC for the changes to be effective.
You have now successfully disabled the automatic updates for Skype in your Windows PC permanently.