When an application is using the Camera, at times you might have come across an error message that says:
Something went wrong, try restarting your device. If you need it, here’s the error code: 0xA00F4292
If you are wondering how to get rid of this annoying error from your system, read along. In this article, we will be discussing the different ways to resolve this issue.
Fix 1: Allow Access via Privacy Settings
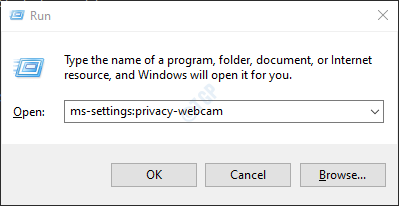
Step 1: Open the Run Window. To do so, hold the keys Windows+R at the same time.
Step 2: In the Run dialog that opens, type ms-settings:privacy-webcam, and Press on the OK button

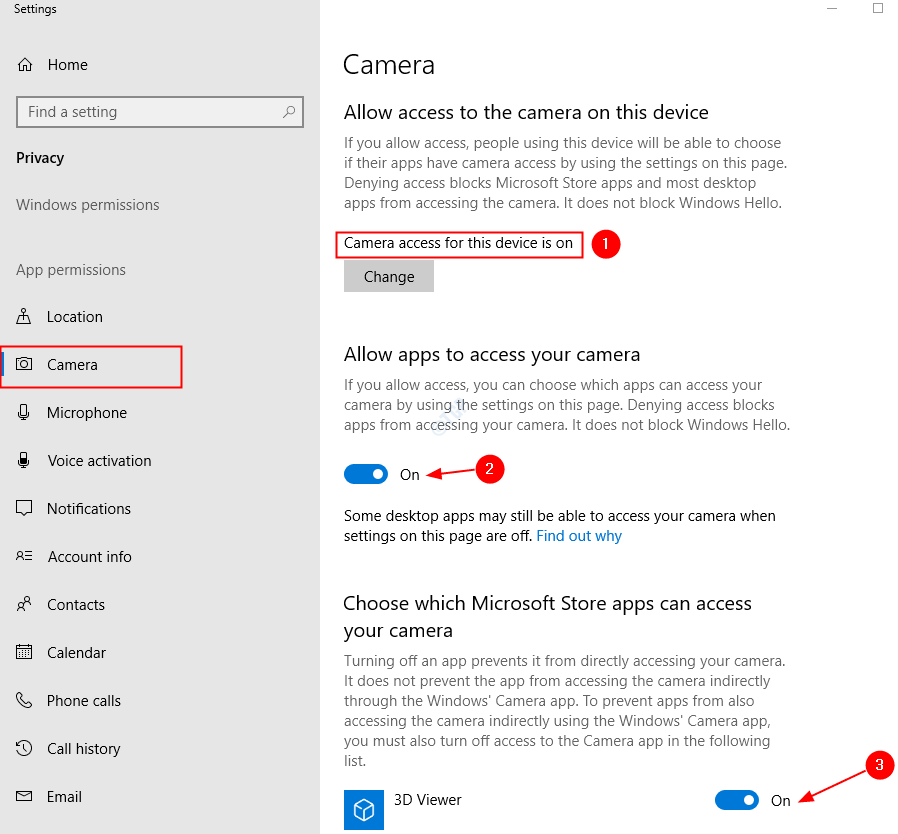
Step 3: In the Settings –> Privacy –> Camera window that opens, Make sure the Camera is ON in the section Allow access to the camera on this device.
If not, Click on the Change button and toggle the button to Turn ON the Camera.
Step 4: Under the Allow apps to access your camera section, Turn the button ON
Step 5: In Choose which Microsoft Store apps can access your camera, make sure the camera is turned on for the required applications

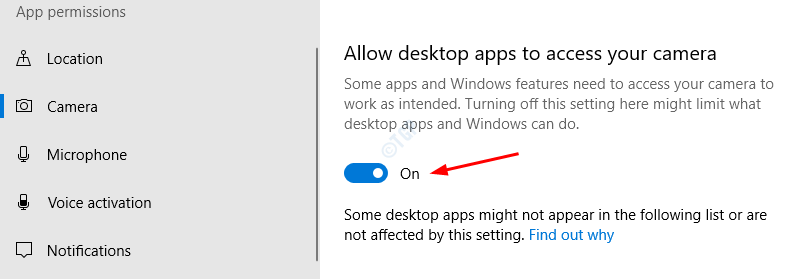
Step 6: Also, make sure the camera is turned ON under the section Allow desktop apps to access your camera.

For Windows 11 Users
Make sure Camera Access is turned ON.
Also, Let apps access your camera should be turned ON.

Now check if the camera is working properly. If not, try the next fix.
Fix 2: Using Registry Editor
Step 1: Open the Run window by pressing the buttons Windows+r from your keyboard simultaneously
Step 2: Type regedit and press OK

NOTE: Registry editing can have an adverse effect on the system even with the slightest mistake. It is advised to take the backup of the registry before proceeding. To take a backup, In the Registry Editor–> Go to File –> Export –> Save your Backup file.
Step 3: In the Editor window, go to the following location,
HKEY_LOCAL_MACHINE\SOFTWARE\Microsoft\Windows Media Foundation\Platform

Step 4: Create a New DWORD 32-bit Value. Right-click anywhere on the right-hand side.
Step 5: From the Context Menu, choose New and then select DWORD (32-bit) Value

Step 6: Name the newly created DWORD as Enable Frame Server Mode.

Step 7: Double-click on Enable Frame Server Mode so as to modify its value. In the Edit window, set the value 0 and press Enter

Step 8: Restart the system and check if the camera is working fine. If not, repeat the above steps. Then double-click on Enable Frame Server Mode.
In the Edit DWORD window, set the value 1 and press Enter

Step 9: Again Restart the system and check if the camera is working without any error. If not, try the next set of fixes.
Fix 3: Press the button/switch for the camera
Some webcams come with an external switch. To make sure it is working, we have to turn it ON.
Most of the Recent HP laptops come with a camera key on leyboard. Please make sure to turn it ON. Look carefully on your keyboard and see if there are any camrea
Fix 4: Allow the Camera through the Windows Defender Firewall
Step 1: Open the Run window with the keys Windows + R
Step 2: Type control firewall.cpl, and hit Enter

Step 3: From the left-hand side menu, click on Allow an app or feature through Windows Defender Firewall

Step 4: In the Allowed Apps window, locate the Camera and make sure it is Checked. Also, make sure it is checked under Private and Public columns.

Now, check if the Camera Starts working. If you see that the Camera is already ticked. Then follow the steps below
Step 5: In the Allowed apps window, click on Change Settings. You must be logged in as an Administrator to do this change
Step 6: Click on Allow another app button at the bottom-right corner as shown below

Step 7: Add an app window opens, click on Browse

Step 8: Navigate to the location C:\Windows\System32
Step 9: In the search bar, type camera and hit Enter
Step 10: Click on CameraSettingsUIHost.exe and Press the Open button

Step 11: In Add an app window, click on the Add button as shown below

Step 12: In the appearing window, Make sure Camera Settings UI Host is checked. Also, make sure that the Private and Public columns are also ticked. Finally, click on the OK button.

With these changes in place, check if the camera works properly. If not, try the next fix
Fix 5: Allow the Camera through the Antivirus program
If there are any other antivirus programs in the system, allow the camera through that Antivirus Program and check if it works.
Fix 6: Close all the programs running the camera in the background
Step 1: Press CTRL + SHIFT + Esc keys together to open Task manager.
Step 2: From the task manager window, identify the apps that are running the camera in the background, right-click on the app, and select End task from the menu

Now check if the issue has resolved and the camera is working. If not, try the next fix.
Fix 7: Delete the Camera Roll Folder
Many users have reported that deleting the Camera Roll folder worked for them. To do so,
Step 1: Hold the keys Windows+E at the same time to open the Explorer window
Step 2: Click on Pictures
Step 3: Click on the Camera Roll Folder and delete that folder using Ctrl+D from your keyboard.

Step 4: The Delete confirmation Dialog pops up, click on Yes

Step 5: Restart your System
With this fix, check if the camera is working. If not try the next fix.
Fix 8: Using Device Manager update the Camera Driver
Step 1: Open the Run Window with the keys Windows+r
Step 2: Enter devmgmt.msc, and press OK

Step 3: From the device manager window, Double click on Cameras to expand the selection. Under Camera, right-click on the camera name. For Example, HP Truevision HD in this case.

Step 4: In the Update Drivers window, click on Search automatically for drivers

Step 5: If any updated version of the driver is found, you will be notified and you can update the driver.
Once, the driver is up to date, check if the camera is working correctly. If not try the next fix.
Fix 9: Run the Windows Troubleshooter for Hardware and Devices
If there are any issues related to Power System within the Operating system, running the Troubleshooter for Power might help. The steps to be followed are listed below:
Step 1: Open the Run Dialog in your System, holding the Shortcut keys Windows+r
Step 2: In the appearing window, type the command msdt.exe -id DeviceDiagnostic and just click on OK

Step 3: In the Hardware and Devices window, click on the Next button to run the troubleshooter.

Once the problems are detected, the system notifies if any actions are to be taken. Do the needful and check if the camera works. If it does not, there is nothing to worry about. Please try the other fixes listed below.
Fix 10: Reset the Camera Application
Step 1: Open the Run Dialog. Press the keys Windows+r simultaneously
Step 2: In the Run Dialog, enter ms-settings:appsfeatures, and Press Enter

Step 3: In the appearing window, locate the Camera app and click on it.

Step 4: Choose Advanced options as shown below

Step 5: In the window that appears, scroll down to locate the Reset section. Click on the Reset button

Now, try opening the camera and check if the issue has resolved. If not, try the next fix.
For Windows 11 Users
Step 1: Open the Run Dialog. Press the keys Windows+r simultaneously
Step 2: In the Run Dialog, enter ms-settings:appsfeatures, and Press Enter

Step 3: Search camera in search box, Click on 3 vertical dots in right of the search result.
Step 4: Now, Click on Advanced options.

Step 5: Bow, Click on reset to reset camera

Fix 11: Delete and Reinstall the Camera Application
Step 1: Hold the keys Windows+r and open the Run dialog
Step 2: Type powershell and press the keys Ctrl+Shift+Enter to open the Command Prompt window with the admin rights.

Step 3: In the UAC prompt that shows up, click on Yes
Step 4: In order to Uninstall the application run the below command and hit Enter
Get-AppxPackage Microsoft.WindowsCamera | Remove-AppxPackage

Step 5: Now, we have to re-install the application back to the system. To do so run the below command. Please make sure to press Enter key after the command.
Get-AppxPackage -allusers Microsoft.WindowsCamera | Foreach {Add-AppxPackage -DisableDevelopmentMode -Register "$($_.InstallLocation)\AppXManifest.xml"}

Now check if the Camera is working. If not, try the next fix listed below.
Fix 12: Uninstall and Reinstall the Camera Driver from Device Manager
Step 1: Open Device Manager(Refer Steps 1, 2 from Fix 9)
Step 2: In the Device Manager window, click on the arrow mark next to Camera in order to expand the selection.
Step 3: Right-Click on the Name of your camera. In this case, HP Truevision HD. Choose Uninstall Device from the Context menu.

Step 4: In the Uninstall device window, click on the Uninstall button.

Step 5: Restart the system. Windows will attempt to reinstall the drivers.
Step 6: In the device Manager wind0w, if you cannot see the camera drivers listed, right-click on Cameras and choose Scan for hardware changes

Step 7: You can notice that the drivers are reinstalled.
Check if the Camera is working as expected. If not, try the next fix.
Fix 13: Manually install the Camera Drivers
In some cases, it is noticed that installing the drivers directly from the manufacturer’s page has helped. To do so,
Step 1: Go to the manufacturer’s page. In this case, it is HP Truevision. So we go here
Step 2: Download the required Driver
Step 3: Run the .exe file that is downloaded to the system by double-clicking on it.
Check if this fixes the issue, If not try the next fix.
Fix 14: Uninstall and Reinstall the Display Driver from Device Manager
Many users have seen that the issue resolves when the display driver is deleted and reinstalled. To do so,
Step 1: Open Device Manager(Refer Steps 1, 2 from Fix 9)
Step 2: In the Device Manager window, click on the arrow mark next to Display Adapter in order to expand the selection.
Step 3: Right-Click on the Display Adapter. Choose Uninstall Device from the Context menu.
NOTE: This step has to be repeated for all the display drivers listed

Step 4: Close the Device Manager window and re-open it.
STep 5: In the device Manager wind0w, right-click on Display Adapter and choose Scan for hardware changes

Step 5: You can see that the Drivers are re-installed.Check if this fixes the issue.
Step 6: If the issue still exists, Update the Display Drivers.
Right-click on the Display driver and click on Update Driver

Step 7: In the appearing window, Choose Search automatically for drivers

Step 8: If the drivers are not up to date, you will be notified and you can update the drivers.
Check if this resolves the issues. If not, just try the next fix
Fix 15: Run Troubleshoot Compatibility
Step 1: In the search bar next to the Start button Type Camera
Step 2: In the Pop-Up window, you can see the Driver software associated with the Camera in the system. In this case, for HP TrueVision Camera it is Cyberlink Youcam.
Step 3: Right-click on it and choose Open File Location.

Step 4: In the windows that openup, right-click on the Shortcut icon and select Open File Location from the Context Menu

Step 5: In the location that opens, right-click on the Application file(.exe) and Choose Troubleshoot Compatibility

Step 6: In the Program Troubleshoot Compatibility window, click on Try recommended settings.

Step 7: In the window, the problems are detected and fixed.
Now, check if the camera is working properly. If not, try the next one.
Fix 16: Repair Windows image
Step 1: Open Run Dialog. Use the shortcut Window+r
Step 2: In the Dialog, type cmd and press Ctrl+Shift+Enter

Step 3: In the command prompt window that opens, Enter the following commands. Please don’t forget to hit Enter after each command.
Dism /Online /Cleanup-Image /ScanHealth

Dism /Online /Cleanup-Image /RestoreHealth

sfc /SCANNOW
Step 4: Restart your system and check if the Camera works fine.
If not, try the next fix.
Fix 17: Reset the Windows
Step 1: Hold Windows+R and open the Run Dialog
Step 2: Type ms-settings:recovery and hit Enter

Step 3: In the Settings –> Update & Security –> Recovery window that opens, Under the Reset this PC section, click on Get Started button.

Step 4: In the Reset this PC window that opens, click on Keep my Files.

Step 5: Follow the instructions as shown in the window and do the needful. Once, the PC is Reset, Check if the Camera starts working. If not try the next fix.
Fix 18: Update your Windows
Having your Windows Operating System up-to-date alone can fix almost all of your windows related issues. Please check if there are any new windows updates related to the camera and if found, install them to try and fix your issue.
Step 1: Open the Run Dialog and type ms-settings:windowsupdate and hit Enter.

Step 2: In the window that opens, click on Check for updates.
Step 3: Windows will now check for any new updates. If any new updates are found, those will be downloaded and installed.
Step 4: Click on the Restart now button for the changes to take over. Check if your problem is resolved or not once the system restarts.
If this fix does not fix your problem. Try the next fix.
Fix 19: Revert Windows to Previous Update Version
At times, some new updates might have caused the issue. To check if that is the case, one can simply opt to remove the changes made by the latest update.
Step 1: Open Settings–> Update and Security –> Window Update window .(Refer Step 1, from Fix 20)
Step 2: Scroll-down and click on View Update history

Step 3: In the appearing window, Check if there were any updates to the Camera app under the Update history section.
Step 4: Click on Uninstall updates

Step 5: In the Window that opens, a list of updates that are installed in the system will be shown.
Step 6: Right-click on the required update and choose Uninstall.

Check if the camera works fine. If not try the next fix.
Fix 20: Try Power Reset/Hard Reset
If none of the above fixes worked, force the system to detect the camera in the system by Hard reset. To do follow the below steps very carefully.
- Shut Down your system
- Remove all the peripherals and the charger connected to the system
- Close the flip of your laptop and turn the laptop to locate the battery
- Remove the battery from its compartment
- Press the Power button on your laptop for 15 secs.
- Insert the battery back in its compartment
- Plug the charger back to the system. None of the peripherals must be plugged.
- Power On the system.
- In case you see the start-up menu while turning the system ON, click on the Start Windows Normally option
- Add all the peripherals required
Now, check if the Camera is detected in the Device Manager. If yes, check if it works as expected.
If none of the above fixes worked, there might be an issue with the hardware.
That’s All. We hope this post has been informative and has helped you solve the issue. Kindly comment and let us know which of the above fixes helped in your case. Thank you for Reading.