Are you frequently receiving an error prompt saying ‘The system cannot find the file specified’ for the Startup.vbs script? This startup.vbs file, if not located under the C:\Windows folder can be considered to be malware or any other threat. But, don’t worry. Just follow these easy fixes to solve the problem on your computer.
Fix 1 – Put Startup.vbs in system 32 folder
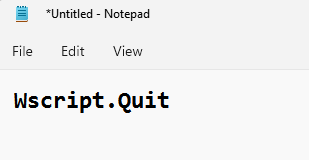
1 – Open Notepad
2 -Now, type Wscript.Quit in it.

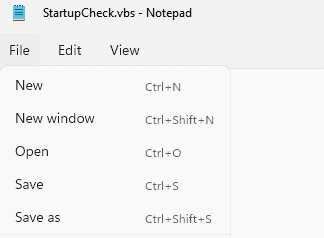
3 – Click on File and click on Save as to save the file.

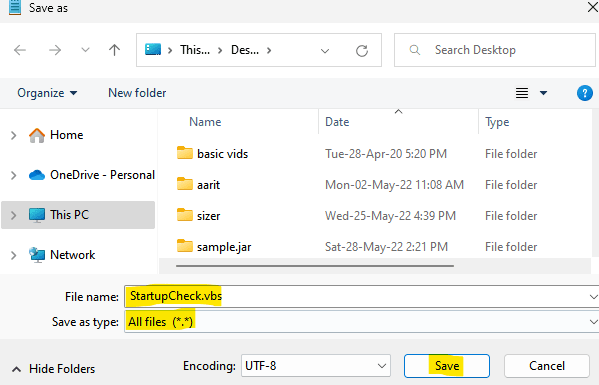
4- Now, name this file StartupCheck.vbs
Also, in Save as type option , select All files from dropdown

5 – Now, go to C:Windows\System32 location

6 – Paste this file here. Click yes if any prompt appears
7 – Restart your computer.
Your problem will be solved
Fix 2 – Run a full scan on your system
If this issue is happening because of malware, try running an antivirus scan.
1. Type “Windows Security” in the search box at the left-bottom corner.
2. Click on the “Windows Security“.

3. In Windows Security, click on the “Virus & threat protection“.

4. Next, tap on the “Scan options“.

5. Then, click on the radio button beside the “Full scan“.
6. Next, tap on the “Scan now” to scan the files.

NOTE –
You can run these scans also.
a. Quick scan – Quickly scans for malicious softwares, malware, spy kits, etc. Takes less than 5 minutes to run a quick scan.
b. Customized scan – You can customize some specific folders chosen by the user to scan.
Fix – 3 Alter the default value of VBS
Change the registry settings on your computer.
1. At first, right-click on the Windows key and click on “Run“.
2. Then, write “regedit” and click on “OK“.

Important– Before changing the registry, we request to make a backup of the existing registry on your computer.
After opening the Registry Editor, click on “File“. Then click on “Export” to make a new backup on your computer.

3. When the Registry Editor opens up, on the left-hand pane. expand the
Computer\HKEY_CLASSES_ROOT\.vbs
4. On the right-hand pane, double-tap on the “(Default)” key.

5. Set the value to “VBSfile“.
6. Then, click on “OK” to save the setting.

After that, close the registry editor. Check if this works out.
Fix 4 – Delete the entries after userinit.exe
You can remove the keys under the ‘userinit’ value.
1. Type “regedit” in the search box beside the Windows icon.
2. Then, just tap on the “Registry Editor“.

3. After opening the Registry Editor, go to this location –
Computer\HKEY_LOCAL_MACHINE\SOFTWARE\Microsoft\Windows NT\CurrentVersion\Winlogon
4. On the right-hand side, you will notice the “Userinit” value.
5. Now, select the keys under the “Userinit” value and right-click on it, and click on “Delete“.

This process may remove the ‘wscript.exe’ and ‘NewVirusRemoval.obs’ keys from the Registry Editor.
After doing this, close the Registry Editor window and reboot the system once.
Fix 5 – Boot into the safe mode and remove the startup.vbs
You have to boot into the safe mode and remove the startup.vbs from your computer.
Step 1 – Restart the system in safe mode
1. Open the Settings window.
2. After that you need to click on “Update and Security“.

3. Then, click on “Recovery” on the left-hand side.
4. Next, under the “Advanced Startup” section, click on “Restart Now“.

5. Once your pc reboots, just click on “Troubleshoot” settings.

6. After that, choose the “Advanced options” menu to access it.

7. Simply, click on the “Startup Settings“.

8. Finally to restart your device in the correct manner, click on “Restart“.

9. Here you will detect various possibilities of startup types.
10. Then, press F4 from your keyboard to select the option that says “Enable Safe Mode“.

Soon, your computer will boot into safe mode. The desktop will be black with ‘Safe Mode’ written at all of the four corners of the screen.
Step 2 – Find and delete the key associated with the startup.vbs
Now, you have to find and remove the startup.vbs key from the Registry Editor.
1. At first, right-click on the Windows key and click on “Run“.
2. Then, write “regedit” and click on “OK“.

3. In the Registry Editor window, click on “Edit” in the menu bar.
4. Then, click on “Find“.

5. In the ‘Find what:’ box, write “startup.vbs” in the box.
6. Click on “Find Next“.

Once the search result appears, you will see the ‘Userinit‘ key.
7. Then, double-click on the value to edit it.

8. In the Edit String window, you will notice several paths separated by commas as the value of the key.
9. Select the address that contains the ‘startup.vbs‘ and delete it from the ‘Value data:’ box.
10. Further, click on “OK” to save this change on your computer.
[
In our case, the value data of the particular key is –
C:\Windows\system32\userinit.exe, C:\Windows\startup.vbs
We just need to select the address associated with the ‘startup.vbs’. So, we have selected the “C:\Windows\startup.vbs” and deleted it from the value.
Remember the location of the ‘startup.vbs’ as you have to manually remove it from your computer later.
]

Once you are done, press the “F3” key from the keyboard to find the next key associated with the ‘startup.vbs’ file.
Remove the file the same way again. Repeat these steps until there are no further keys associated with the ‘startup. vbs’.
Once you are done, close the Registry Editor window.
Step 3 – Delete the startup.vbs file
Now you have to delete the startup.vbs file from your computer.
1. Open the File Explorer on your computer.
2. Then, go to the location of the “startup.vbs” that you have noted before.
[
In our case, it is –
C:\Windows
]
3. Now, look for the “startup.vbs” file.
4. Right-click on the particular file and click on “Delete” to remove the file from your computer.

After deleting the startup.vbs file, close the File Explorer.
Don’t forget to restart your computer after doing all these. Check if this solves the problem.
Fix 6 – Alter the registry with CMD
If the previous fixes didn’t work out, try altering the registry keys with CMD keys.
1. Press the Windows key+Q keys together and type “cmd“.
2. Then, right-click on the “Command Prompt” and click on “Run as administrator” to access the terminal.

3. In the Command Prompt terminal, copy-paste these three codes one by one and then hit Enter.
reg add "HKLMSoftwareMicrosoftWindows NTCurrentVersionWinlogon" /v "Shell" /t REG_SZ /d "explorer.exe" /f
reg add "HKLMSoftwareMicrosoftWindows NTCurrentVersionWinlogon" /v "Userinit" /t REG_SZ /d "C:WindowsSystem32userinit.exe," /f
reg add "HKLMSoftwareWow6432NodeMicrosoftWindows NTCurrentVersionWinlogon" /v "Shell" /t REG_SZ /d "explorer.exe" /f

After that, close the Command Prompt window.
Fix 7 – Use AutoRuns to identify and delete
You can use AutoRuns to identify the “startup.vbs” process on the system and remove it from the system.
1. At first, go to this website.
2. Here, just go down and click on the “Download Autoruns and Autorunsc” to download the AutoRuns tool.

After downloading the package, close the browser.
3. Now, extract the downloaded “Autoruns” package.

4. After extracting the file, go to the location where you have just extracted the file.
5. Now, right-click on “Autoruns64” (if you are using a 64-bit Windows) and then click on “Run as administrator“.

Note-
If you running a 32-bit system, right-click on “Autoruns” and after that, click on “Run as administrator“.

6. Just tap on the “Agree” agree with the license agreement.
7. Once the Autoruns screen appears, look for “Filter:”
8. Then write “wscript” in the box to see the list of processes utilizing the dll.

8. Once you have seen the processes, right-click on the process which is using running the script file, and then click on “Delete” to delete it.

Once you have deleted the process from your computer, close the Autoruns window.
Restart your computer.
Fix 8 – Run the SFC scan
If the first two scans didn’t work, try running some additional SFC scans.
1. Click on the search box and start to write “cmd“.
2. Further, right-click on the “Command Prompt” and tap on the “Run as administrators“.

3. After that, write this command in the terminal and then hit Enter.
sfc /scannow

Once the SFC checks commence, it will take 4-5 minutes to completely scan the system files.
Reboot your machine once.
Fix 9 – Return to a restore point
You can restore your computer to a previous restore point.
1 At first, right-click on the Windows key and click on “Run“.
2. Write “rstrui” in the box. Then, click on the “OK“.

3. When the System Restore window appears, click on “Next“.

4. Just tick the “Show more restore points” box.
This will show additional restore points on your system.

5. Here choose the restore point by date before this Windows Update was installed.
6. Click on “Next“.

7. Simply click on “Finish” to finish up the process.
As soon as you click on the ‘Finish’ option, the restoring process will commence.

Your system will restart and initiate the restoration process. Check if this solves the problem.