Windows Media Player is a Microsoft application available to users in the Windows OS to play media files. It also supports a Burn feature that allows users to copy audio, video, and pictures from their personal computers onto a blank CD or DVD. But, there have been many users encountering an error message Windows Media Player cannot burn some of the files when they try to use the Media Player’s burn feature to burn audio or video files.
Generally, this error can occur due to the issue with files that are being burned or a corrupted installation of the Windows Media Player. Have a look at the solutions we have listed below to help you resolve this error. These are based on suggestions of users who faced this issue and were able to successfully overcome it.
Fix 1 – Change the Media Player’s Privacy Settings
1. Launch Windows Media Player.
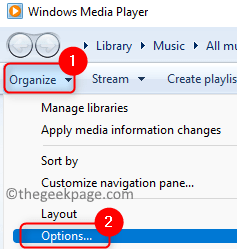
2. Click on Organize and choose Options… in the dropdown menu.
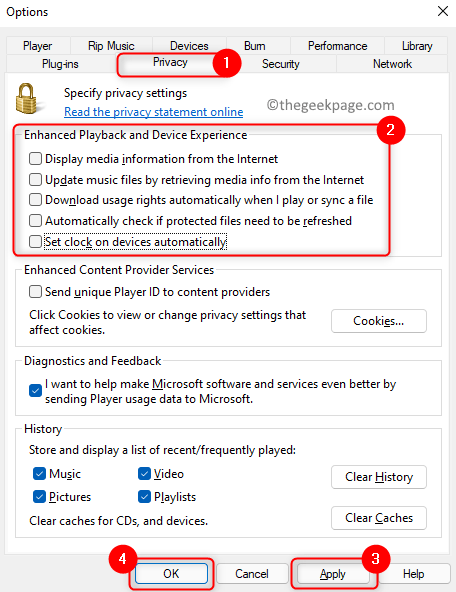
3. Go to the Privacy tab.
4. Uncheck all the options in the Enhanced Playback and Device Experience section.
5. Click on Apply and then on OK to confirm the setting changes.
6. Relaunch the Media Player and check if you are able to burn your files without any error.
Fix 2 – Uncheck Volume Leveling
1. Open Media Player.
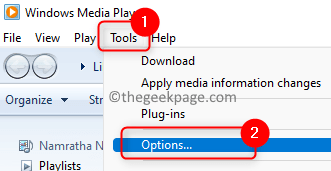
2. Click on the Tools menu and select Options…
Note: If the menu bar is hidden, then press Ctrl + M to view it and then click on Tools.
3. In the Options window, go to the Burn tab.
4. You will see an option Apply volume leveling across tracks in the Audio CDs section. Uncheck the box associated with it.
5. Click on Apply and then on OK.
6. Check if the problem is resolved while performing a burn operation.
Fix 3 – Delete Invalid Files from Burn List
1. Launch Windows Media Player.
2. Go to the Burn tab at the right of the player’s window.
3. Here you can drag and drop the files that need to be burned.
4. Once you have added all the required files, click on Start burn.
5. Now if you see the error message, then click on OK.
6. You will see unsupported files indicated using a red circle with a white X mark in the burn list.
7. Here, right-click on these unsupported files and choose Remove from list one at a time until all such files are removed.
8. Now click on Start burn to check if the issue is fixed.
Fix 4 – Uncheck the Attribute Read-Only for Files
1. Go to the folder that has the media files which will be used for burning onto a CD or DVD.
2. Press Ctrl + A to select all the files in this location.
3. Right-click on them and choose Properties.
4. Uncheck the box next to Read-only in the Attributes section.
5. Click on Apply and then on OK to save the settings.
6. Close and reopen the Windows Media Player. Add these files to burn and check whether the burn operation works without raising the error.
Fix 5 – Delete Unnecessary Characters in the Filename
At times, file names with unnecessary characters like dots, special characters (accented characters or characters not native to English) or repeated characters have been an issue for some of the users.
1. Open the folder where the files are present.
2. Look for files that have unnecessary characters in their name.
3. Select this file and click on the Rename icon at the top.
4. Remove any special characters or dots and then hit Enter to save this new name.
5. Again, right-click on this file and select Properties.
6. Go to the Details tab in the Properties window.
7. Look for any unnecessary characters in the Title, Album name, artist, etc.
8. Remove if there are any.
9. Click on Apply and then on OK.
10. Repeat the above Steps 3 – 9 for all the files with unnecessary characters in their name.
11. Now go back to you Windows Media Player and check if the burning operation can be performed without any error.
That’s it!
You must now be able to burn files onto a CD or DVD without any error message in Windows Media Player. Comment and let us know whether the fixes mentioned in the article have helped you .


