Accessing files on a Windows machine is quite a breeze – just double-tap the file/folder and it will open up. But, sometimes you may see this error message on the screen “Can’t open this item. It might have been moved, renamed, or deleted.” Usually, this error message pops up when you try to remove something while you lack sufficient permissions. Just go through these steps to remove the file without any issues.
Fix 1 – Use the Registry Editor
You can delete a particular value using the Registry Editor.
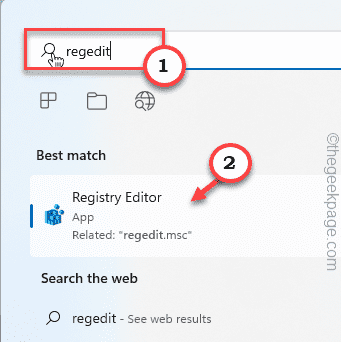
1. Just press the Windows key and type “registry” in the search box.
2. Now, you can click on the “Registry Editor” in the search results.
Warning – You are going to remove a particular value in the Registry Editor. It usually doesn’t lead you to any issues, test if this works. So, before you do anything else, you should create a new registry backup.
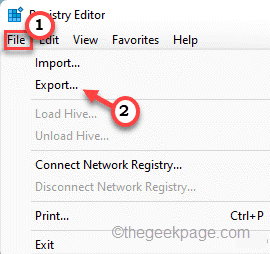
a. Once you have opened the Registry Editor screen up, tap on “File” from the menu bar.
b. Then tap “Export” to make a new registry backup.

Just store this backup in a discrete location.
3. On the right-hand side, go here –
Computer\HKEY_CURRENT_USER\Software\Microsoft\Windows\CurrentVersion\Explorer\FileExts
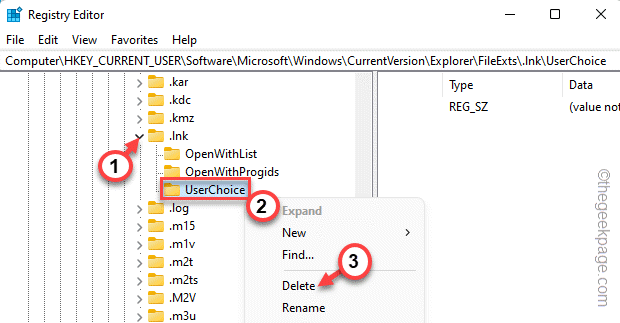
4. On the right-hand pane, you can find the “.lnk” key. Select and expand the key.
5. You will see three separate folders there. Locate the “UserChoice” folder.
6. If you can find such a folder, right-tap the “UserChoice” key and tap “Delete” to remove it from your registry.
7. You will see a confirmation prompt. Tap “Yes” to confirm the deletion process.
After that, close the Registry Editor window. Once you have removed the value, restart the system.
Once you have rebooted your computer, try to access the file once more. Test if this works.
Fix 2 – Make another user account
You can easily create a new user account and try to fix the problem.
1. Press the Win key+I keys together. Now, click on “Accounts“.
2. After that, scroll down and tap “Family & other users” settings.

3. You will many ways to add a new account. Go to the ‘Other users’ section.
4. After this, tap “Add account” to add a new account on your computer.
5. On the next page, just tap on the “I don’t have this person’s sign-in information” option.
6. Now, select this “Add a user without a Microsoft account” option.
7. Now, fill up the information on this page as you want, and then, tap “Next” to proceed to the final step.
Close the Settings window. Then, press the Alt+Shift+Del keys together.
8. Later, tap on “Sign out” to sign out from the system.
9. Coming back to the lock screen, tap on the user account that you have created just now.
10. Input the password and log in using this account.
Once you have logged in, you can easily access the file.
Fix 3 – Run malware elimination tool
If you think the system is showing signs of suspicious behavior, run a malware elimination tool (like Malwarebytes). Even if the malware detector isn’t opening up, you can run the app in compatibility mode and test if it works out.
1. Open the File Explorer and navigate to the exe file, but don’t open it.
2. Now, right-tap the file and click “Properties“.
3. After that, go to the “Compatibility” tab.
5. Here, check the option “Run this program in compatiblity mode“.
6. After that, set it to “Windows 8” from the drop-down box.
7. Finally, tap “Apply” and “OK” to apply these changes and save it.
After this, try to access the app once again. This time it should open up without any further issues.
Fix 4 – Run some file scans
You can run SFC and DISM scans to check for file integrity issues and fix them.
1. Just, press the Win key+R key combination to open the Run terminal.
2. Then, type “cmd‘ in the Run panel and press Ctrl+Shift+Enter keys together to access the terminal with administrative rights.

3. Now, just paste this line and hit the Enter key on your keyboard to initiate an SFC scan.
sfc /scannow
Windows will verify the system files and you can track the progression directly on the terminal.
4. Once you have finished running the SFC scan, you can run the DISM tool check with just a single code.
Just, right down this line in the terminal and hit Enter.
DISM.exe /Online /Cleanup-image /Restorehealth
Wait for Windows to finish the DISM check as well.
Once you are done, close the terminal page and restart the system. Check if this works out for you.

