Recently, many users have reported encountering Windows Installer error code 2755 when trying to install any application on their computers. The error message displayed to the user is as below:
The installer has encountered an unexpected error installing this package. This may indicate a problem with this package. The error code is 2755.
Basically, this means that the installation couldn’t complete. Once this error is seen, you won’t be able to install the program/application as this message keeps reappearing every time you try to do so. A problem with the Windows installer folder not being available and various other permissions that are corrupted may be the reason for facing this error.
If you are one such user confronting this error, then you have landed in the right post. In this article, you will find some troubleshooting methods that can be followed to clear the Installer error code 2755 and in turn be able to install the required applications on your system.
Fix 1 – Create an Installer Folder in Windows Directory
1. Press Windows + E to open the File Explorer.
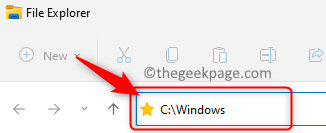
2. In the navigation bar, type the path given below
C:\Windows
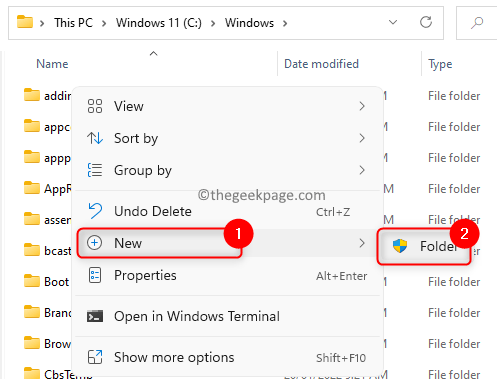
3. Inside the Windows folder, right-click on the empty space and choose New –> Folder to create a new folder in this directory.
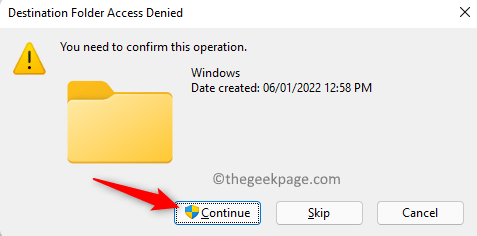
4. Click on Continue if prompted for a confirmation to continue with the folder creation.
5. In the User Account Control prompt, click on Yes to allow to make changes to the device.
6. Name this new folder as Installer and hit Enter to save the name.
Note: Installer is a protected folder so will not be visible in the folder list once created. To view protected hidden folders in File Explorer, follow the steps below:
- Click on the three horizontal dots at the top left and select Options.
- In the Folder Options window, go to the View tab.
- In the Advanced settings section, under Files and Folders, you need to uncheck the option Hide protected operating system files (Recommended).
- Click on Yes in the window with a warning message.
- Now you will be able to see the Installer folder. Once you are done checking the hidden folder, make sure you uncheck the above option as such folders contain files that are needed to start and run Windows.
7. Restart your computer and check if you are able to install the application without any issues.
Fix 2 – Turn Off Encryption in the Applications Setup File
1. Go to the location of the setup file for the application you were trying to install.
2. Right-click on this file and choose Properties.
3. In the General tab, click on the Advanced button in the Attributes section at the bottom.
4. In the Advanced Attributes window, uncheck the option Encrypt contents to secure data in the Compress or Encrypt attributes section.
5. Click on OK to close the Attributes window.
6. At last click on Apply and then on OK in the main Properties window of the setup file.
7. Restart your PC. Try installing the software after startup and check if the error is resolved.
Fix 3 – Add SYSTEM as User for the Setup File
1. Right-click on the problematic applications setup file and select Properties.
2. Select the Security tab.
3. Click on the Edit… button below the Group or user names section.
4. In the Permissions window, tap the Add… button.
5. Type SYSTEM (in uppercase) in the textbox below Enter the object names to select in the Select Users or Groups box.
6. Click on the Check names button.
7. Then, click on OK.
8. Back in the Permissions window, make sure to check the box associated with Full Control in the Allow column once the SYSTEM user is added.
9. Click on Apply and then OK to save the changes.
10. Restart your computer. After startup, try installing the application and check if the error is fixed.
Fix 4 – Start the Windows Installer Service
1. Open the Run dialog using the Windows and R key combination on your keyboard.
2. Type services.msc and hit Enter to open the Services window.
3. Locate Windows Installer in the list of services.
4. Select the Windows Installer service and double-click on it to open its Properties.
5. In the Properties window, if the Service status is Stopped, then click on the Start button to start the service.
6. Save the changes by clicking on OK.
7. Restart your system and check if the error code 2755 is resolved or not.
Thanks for reading.
You must now be able to install your application/program without the Windows Installer error code 2755. We hope this article has been informative enough to fix this error code on your PC. Comment and let us know the fix that helped you overcome this issue.


