Many Windows users face issues related to corrupted Windows system files such as system freezes, slow system function, and security issues. Due to this, they are not able to open the system files or run a particular application and usually encounter an error 0x80070043. The error message is read as follows,
Windows cannot access
Check the spelling of the name.Otherwise, there might be a problem with your network. To try to identify and resolve network problems,Click Diagnoise.
Error Code : 0x80070043
The network name cannot be found.
This error can be caused by various circumstances. Some of the possible reasons can be :
- Conditional error in Temp folder
- Damaged system files and system corruption
- SMB file transfer is not allowed.
- Third-party interference issues
- Significant Operating System Corruption
In this article, we have carefully presented a collection of fixes that will help you resolve the error 0x80070043.
Fix 1: Set the Network and Internet Settings
This fix can be used when you cannot access a particular file or directory. To do so firstly,
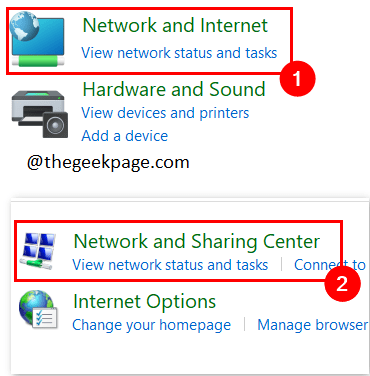
1. Open Control Panel by typing in the search box.
2. Click on Network and Internet > Network and Sharing Center.
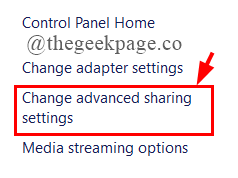
3. Click on Change Advanced Sharing Settings.
4. Under the Private Selection, click on the radio button against Turn on Network Discovery and Turn on file and private sharing.
5. Similarly, under guest or public selection, do the same thing as above.
6. Now, under All Networks, click the radio button near the first option as shown in the figure.
7. Under the File Sharing Connections, see that it is set as shown in the figure.
8. Under Password, click the radio button as shown in the figure.
9. Once everything is set, click on Save Changes.
10. Restart your system and see if the error is resolved.
Fix 2: Change the Folder Properties.
To resolve this error we sometimes need to set the Folder Properties that you wish to open. To do so,
1. Right-click on the folder or file you have a problem with, and select Properties.
2. Under the Security tab, click on Edit.
3. Click on Add.
4. Type Everyone.
5. Now, select Everyone and check out the boxes under Allow and click Apply.
6. Under Sharing tab, Click on Share.
7. Now, select Everyone and under Permission Choose Read/ Write. Click on Share.
NOTE: You will be asked for Sharing Access to the public, click Yes.
8. Finally click on Done and Restart your System.
Fix 3: Clear the temporary folder in Safe Mode
If the issue occurs due to a conditional error, you need to delete the temporary files with the extensions .tmp or .temp in a safe mode. To do so:
1. Press Win + I to open Settings, Click on system > Recovery.
2. Click on Restart Now.
3. The system will go into Automatic repair mode.
4. Click on Advanced Options.
5. Click Troubleshoot.
6. In the Advanced options window, click Startup Settings.
7. Press F5 to boot in Enable Safe Mode with Networking.
8. Now, you need to log in with your password.
9. Once, the system boots, press Win+R to open the Run Dialog box and type %temp%
10. Select all the files, right-click and delete them.
11. Restart your system and see if the error is fixed.
Fix 4: Run SFC and DISM Scans
The system files in your computer may be corrupted, and end up showing the error 0x80070043. We need to run the DISM and SFC Scans to resolve this. Follow the below steps:
1. In the run window type cmd and press Cltr+Shift+Enter to open an Elevated Command Prompt.
sfc /scannow
3. Once the scan is finished, close the Command Prompt and restart your computer.
4. Again open the elevated command prompt similar to Step 1.
5. Now, type the command given below and hit Enter.
Dism /Online /Cleanup-Image /RestoreHealth
NOTE: Connect your system to a stable internet connection, as this uses the Windows Update component to download and install equivalents for the corrupted system files.
6. Once done, type exit and close Command Prompt.
7. Restart your system and see if the error is resolved.
Fix 5: Use System Restore Utility
If you have recently modified your system, these changes may have interfered with your system OS and caused the error 0x80070043. Follow the below steps to fix the problem.
NOTE: Any changes you make before the Restore function is applied, will be deleted. This includes all the installed applications, games, apps, and other software.
1. Open Control Panel by typing in the search box.
2. Search for Recovery in the Control Panel.
3. Click on Open System Restore.
4. In the opened window, click on Next.
5. Now, select the restore point and click on Next.
6. Once the correct restore point is selected, click on Finish.
7. After the process is initiated, the system will restart and the previous state is mounted. Finally, see if the error is resolved.
Fix 6: Perform a repair/clean install
If all the above fixes did not help you in fixing the issue, the last try can be performing a clean install or a repair install of your operating system which will reset all the Windows components including the booting data.
Clean Install
1. Make sure your system is compatible to install Windows 11. You can check it using the PC Health Check app. Download it from here.
2. Back up the files and apps you have on your Pc to either One Drive or an External hard disk. This is done because a clean install will erase all the files and programs.
3. You may require the product key of Windows 11. In most cases, it will take the already installed Windows Product key.
4. Download Create Windows 11 Installation Media from here. Install it.
NOTE: This is used to perform a clean install.
5. Restart your PC. Once the PC is restarting, press the F2 key to get all the boot options and follow the setup flow and Install Windows 11.
Repair Install
1. Type Reset This PC in the search box and hit Enter.
2. Click on Reset PC.
3. You can choose the option based on your need.
4. Click the Second Option.
5. Finally click on Reset.
Fix 7: Activate LAN Boot Policy
This fix is used mostly in Windows 10 as Windows 11 home does not have the local group policy editor. If you are someone who uses Windows 11 Pro, Enterprise, and Education editions you can use this fix
1. Open the Run window, and type gpedit.msc, and hit Enter.
2.Now, select Local Computer Policy > Computer Configuration > Administrative Templates.
3. Click on System > Logon.
4. Inside the Logon Folder, right-click on Always wait for the network at computer startup and logon, click on Edit.
5. Now, click on Enabled.
6. Restart your system to see if the error is gone.
That’s all.
Hope this article has been informative.
Comment and let us know which fix helped you.
Thank you for Reading.


