Windows has already started to push cumulative updates and patches for the new Windows 11 machines. But some Windows 11 users have already reported a Windows Update Error Code 0x80073701 in the Windows Update screen. Usually, this problem is associated with the KB5005191 update for Windows 11. If you are facing this issue, you have to manually fix the issue. Follow these easy solutions to install the update normally again.
Fix 1 – Troubleshoot the Windows Update
You have to troubleshoot the Windows Update on your computer.
1. At first, open the Settings.
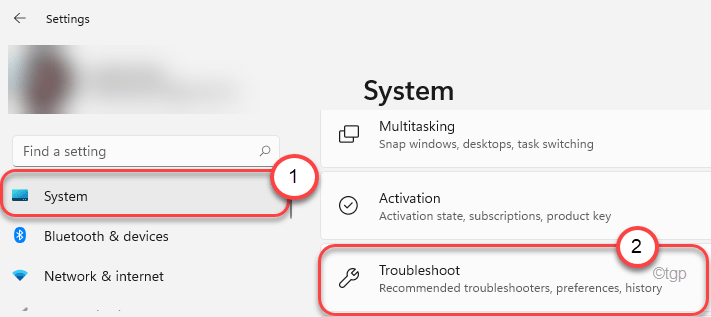
2. Then, tap on “Windows Update” from the left-hand side.
3. Next, on the right-hand side, tap on “Troubleshoot” to open it.

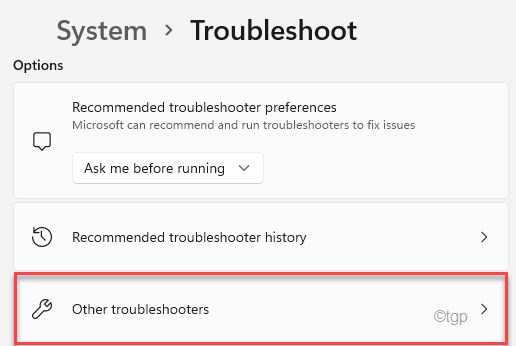
4. This will open up the Troubleshooter settings window.
5. On the same window, tap on the “Other troubleshooters“.

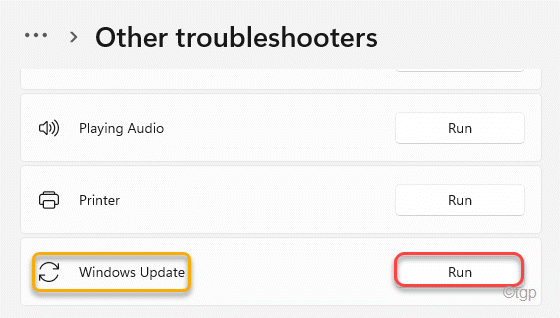
6. On the right-hand side, find the “Windows Update” troubleshooter.
7. Then, click on “Run” to run the troubleshooter on your system.

Now, follow the on-screen instructions to let Windows check where the problem is and recommend some fixes.
8. Now, tap on “Apply this fix“.

This will apply the fix in the Windows Update process and fix the problem for you.
You may have to restart your computer to check whether this has worked for you not.
Fix 2 – Remove the contents from Software Distribution
The SoftwareDistribution folder can get corrupted and cause this issue for you.
1. At first, you need to type “cmd” from the search box.
2. Then, right-click on “Command Prompt” and then click on “Run as administrator“.

3. You have to stop some windows update processes. Simply, paste this codes one by one in the terminal and hit Enter to stop these services.
net stop wuauserv
net stop cryptSvc
net stop bits
net stop msiserver

Then, minimize the Command Prompt terminal.
4. Press Windows key+R to launch Run.
5. Then, copy-paste this address in the Run window and hit Enter.
C:\Windows\SoftwareDistribution\

6. Once you reach the SoftwareDistribution folder, double click on the “DataStore” folder to access it.

7. In the DataStore folder, press Ctrl+A keys together.
8. Then, tap the “Delete” key from your keyboard.

Once you have cleared the SoftwareDistribution folder, maximize the Command Prompt window.
10. All is left to start those stalled services. To do that, paste these lines one-by-one in the terminal and hit Enter to execute these commands.
net start wuauserv
net start cryptSvc
net start bits
net start msiserver

Close the Command Prompt window. Then, restart your computer. After restarting the system, try to update the system once more.
Fix 3 – Install the update with ISO
You can download and update your system with Windows 11 ISO. But, you will need a Microsoft account registered in the Microsoft Insiders Program.
1. At first, go to the Windows 11 Insider Preview Downloads page.
2 . Now, scroll all the way down to the “Select Edition” section.
3. Then, choose the exact version of Windows you are using from the list and tap on “Confirm“.

4. Now, choose your language and tap on “Confirm“.

Now, the iso file of the specified version of Windows will be downloaded.
5. After downloading the ISO file, double click on it to access it.
6. Then, choose to install all the missing updates on your system. Restart your computer once the process is complete.
Fix 4 – Run a DISM check
Deployment Image Servicing and Management or DISM scan can solv the problem.
1. At first, press the Windows key and write “cmd“.
2. Then, right-click on the “Command Prompt” and then tap on “Run as administrator“.

3. Then, paste this command and hit Enter to run a DISM scan on your system image file.
dism /online /cleanup-image /startcomponentcleanup

Now, DISM scan will cleanup the Windows 11 image and fix the problem.
Allow a few minutes to let DISM check works. After executing the command, restart your computer. Then, try to install the update once again.