Windows Hello provides a secure but easier way to access your Windows 10 computer. Windows Hello security includes Hello face (facial recognition), Hello fingerprint, and an option for a four-digit PIN. But some Windows 10 users are complaining about an error message they are seeing in Event Viewer. The error message is “Windows Hello for Business provisioning will not be launched“. Now, to solve this issue you simply need to disable the Windows Hello for business policy.
Fix 1- Disable Windows Hello face for business policy
Follow these easy steps to disable Windows Hello face for business policy on your Windows 10 computer.
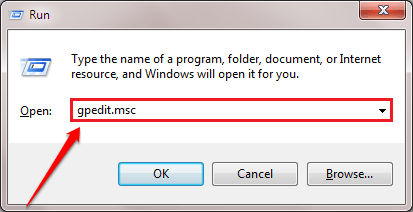
1. Press Windows key+R to initiate a Run terminal.
2. In the Run window, type “gpedit.msc” and then hit Enter.

Local Group Policy Editor will be opened.
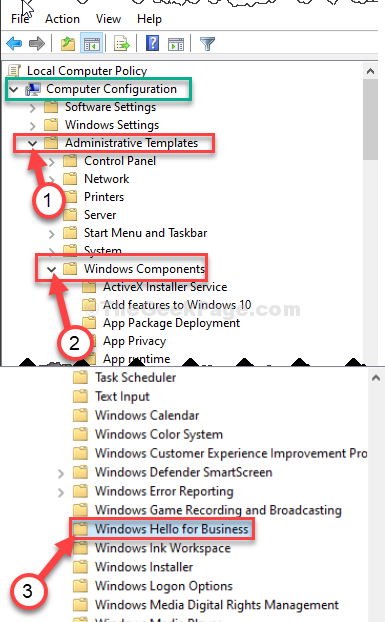
3. In the Local Group Policy Editor window, on the left-hand side, expand following headers-
Computer Configuration > Administrative Templates > Windows Components > Windows Hello for business

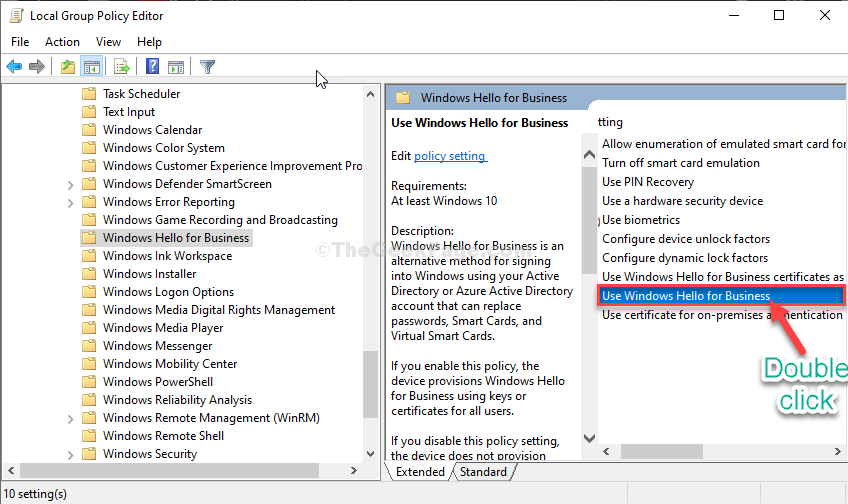
4. Now, on the right-hand side, double click on the “Use Windows Hello for Business” policy to modify it.

5. Now, set the policy as “Disabled“.
6. Similarly, click on “Apply” and then on “OK” to save the changes on your computer.

That’s it! From now on you will not see the “Windows Hello for Business provisioning will not be launched” error message in Event Viewer Log.
Fix 2 – Edit PassportForWork Policy in Registry
1 – Open Run box by pressing Windows and R key from your keyboard
2 – Write regedit in it and Click OK

3 – Now, Go to the location as written below via the address bar of registry
HKEY_LOCAL_MACHINE\SOFTWARE\Policies\Microsoft
4 – In the right side, just right click and choose > new Dword (32 bit) value and rename it to PassportForWork.
5 – Double click on it and set the value data to 0.

6 – Restart computer
Fix 3 – Disable Log Provider for Windows Hello
1 – Open Run box by pressing Windows and R key from your keyboard
2 – Write regedit in it and Click OK

3 – Now, Go to the location as written below via the address bar of registry
HKEY_LOCAL_MACHINE\SYSTEM\CurrentControlSet\Control\WMI\Autologger\EventLog-Application\{23b8d46b-67dd-40a3-b636-d43e50552c6d}
4 – In the right side, double click on Enabled and set the value data to 0.

5 – Click OK and Reboot PC