When you are using the Scan state command to create a provisioning package in your system, there are chances that you encounter the Provisioning failure error. The error is usually accompanied by two different error codes 0x800710d2 or 0x80070057. The complete error is as shown below
Installation of a provisioning package failed. Please work with the package author to diagnose the problem
Reported error code: 0x80070057.
OR
Installation of a provisioning package failed. Please work with the package author to diagnose the problem
Reported error code: 0x800710d2.
Although the error codes are different, the fixes for the issue are the same.
Fix 1: Run Error Checking on local disk
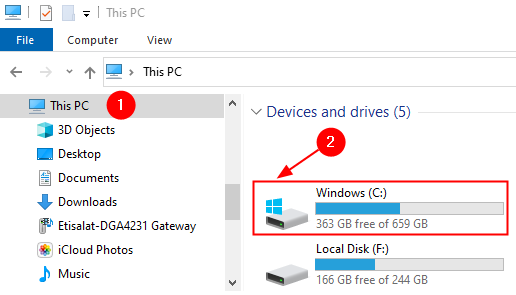
Step 1: Open the Windows Explorer pressing the keys Windows and E at the same time.
Step 2: From the left side menu, choose This PC
Step 3: Under the Devices and drives section, right-click on the drive that has Windows OS installed on it. A Windows symbol will be present on the drive refer to the below screenshot for more detail

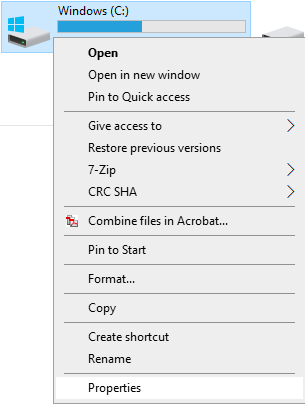
Step 4: Right-click on that drive and choose Properties

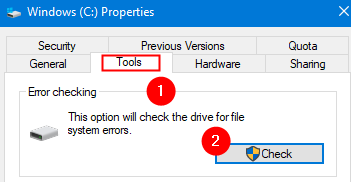
Step 5: Go to the Tools tab
Step 6: Click on the Check button

Step 7: In the Error Checking window that pops up, click on the Scan drive option

Step 8: Once the scan finishes, try and check if the error fixed the issue.
Fix 2: Running an SFC Scan
Step 1: Open Run Dialog holding Windows logo key and R together.
Step 2: Enter cmd and press the keys Ctrl+Shift+Enter to open the Command Prompt with Admin Rights

Step 3: In the User Access control window that shows up asking for permissions, click on Yes.
Step 4: In the command prompt window that opens, just type the below command and hit Enter
sfc /scannow

Please note that the scan takes some time to finish. Kindly wait till the scan finishes.
Step 5: After the scan completes, the corrupted files will be repaired.
Step 6: Restart the system
That’ All
We hope this has been informative. Kindly comment and let us know if you were able to fix the issue. Also, please let us know the fix that helped in your case.