Windows 10 Update throws up the error code- 0xC1900101 mainly due to the corrupted SoftwareDistribution folder. In case, when troubleshooting the issues with Windows Update if you encounter the same error code, follow these easy fixes to fix the update issue on your computer.
Fix-1 Automate services from CMD-
There are some services that are necessary for the Windows Update process to perform smoothly.
1. Press Windows key+R to launch Run.
2. Then, type “cmd” in Run window and press Ctrl+Shift+Enter together.

Command Prompt window will be opened with Administrative rights.
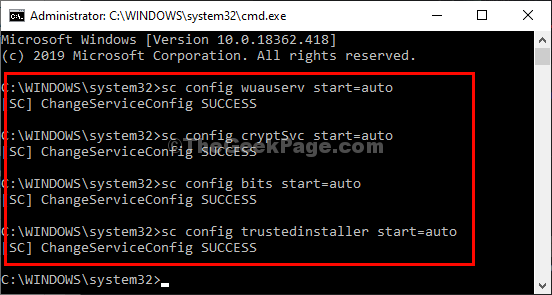
3. To auto-start some services, you need to copy–paste these commands one by one in Command Prompt window, and press Enter after each command.
sc config wuauserv start=auto
sc config cryptSvc start=auto
sc config bits start=auto
sc config trustedinstaller start=auto

After executing these commands on your computer, restart your device.
After rebooting, check Windows Update status.
Fix-2 Troubleshoot Update issue-
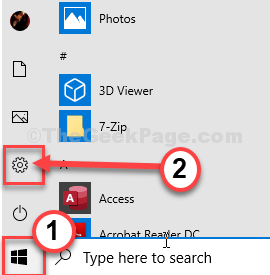
1. At first, you need to click on the Windows icon on the left-hand side of the window.
2. Then, click on the gear-shaped icon to access the Settings.

3. Then you need to access the “Update & Security” settings.

4. After that, click on the “Troubleshoot” panel.
5. To see more troubleshooter settings, click on the “Additional troubleshooter“.

6. Then, on the right pane, click on “Windows Update“.
7. After that click on “Run the Troubleshooter” to start a troubleshooting process.

8. Then, click on “Next” in the troubleshooter window.

8. To apply the fix, click on “Next“.

Once the troubleshooting process is over, close the troubleshooter window.
Reboot your computer.
Fix-4 Empty Download folder in Safe Mode-
If nothing is working out for you, you can try emptying the Download folder manually.
But first, you need to boot your computer in Safe Mode–
1. Press Windows Icon+I to open the Settings window.
2. Now, click on “Update and Security“.

3. Now, on the left pane, click on “Recovery“,
4. Then, under “Advanced Startup” section, click on “Restart Now“.

5. In Choose an option window, click on “Troubleshoot“.

6. What you need to do now is to select the option “Advanced options“.

7. To modify the startup options, click on the “Startup Settings“.

8. Then, click on “Restart“.

9. Here you will see several options of startup types.
10. Then, press 4 to “Enable Safe Mode“.

In Safe Mode, the background of your desktop will be black.
10. Press Windows key+R to launch Run.
11. To access the Download folder, paste this location, and hit Enter.
C:\Windows\SoftwareDistribution\Download

12. Simply, remove everything from this SoftwareDistribution folder.

Close File Explorer window.
Reboot your computer. It will be booted normally.
Check if this works.