You see a new Windows update and you try to install it, but it fails with an error 0x8007012f. The Windows Update error 0x8007012f on your Windows 10 PC can show up whenever you try to install any kind of Windows update (including apps, system, and feature updates). You may see an error like, “There were some problems installing updates, but we’ll try again later. If you keep seeing this and want to search the web or contact support for information, this may help: (0x8007012F)“. However, the good news is, we have a few possible solutions for this that may help you fix this error. Let’s see how.
Method 1: By Deleting Contents SoftwareDistribution and catroot2
You would need to boot your PC into safe mode to be able to delete the the contents in the SoftwareDistribution folder.
Step 1: Right-click on Start menu and select Run to open the Run command.

Step 2: Type msconfig in the Run command and hit Enter.

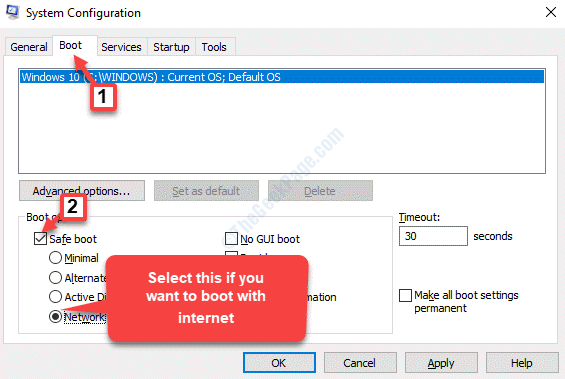
Step 3: In the System Configuration window, click on the Boot tab.
Check the box next to Safe boot.
*Note – If you need to use the internet while in Safe Mode, select the radio button next to Network.
Press Apply and then OK to save the changes

Now, every time you turn on your PC, it will boot into Safe Mode. You can also undo the changes later on.
Step 4: Now, right-click on Start menu and select File Explorer.

Step 5: Copy and paste the below path in the File Explorer address bar and hit Enter:
C:\Windows\SoftwareDistribution
Now, press Ctrl + A keys together on your keyboard to select all the folder contents and hit Delete.

Step 6: Now, you would need to reset the catroot2 folder.
For this, go to Start and type Command Prompt in the Windows search bar.

Step 7: Right-click on the result and select Run as administrator to open Command Prompt in elevated mode.

Step 8: Now, type the below commands one by one in the Command Prompt (admin) window and hit Enter after each command:
net stop cryptsvc


md %systemroot%\system32\catroot2.old


xcopy %systemroot%\system32\catroot2 %systemroot%\system32\catroot2.old /s
Step 9: You can now delete all the contents in the catroot2 folder.
Now, type the below command in the Command Prompt (admin) window and hit Enter:

Reboot your PC, start Windows Update again and the catroot2 folder should be reset.
Method 2: By Clearing Pending.xml File
Step 1: Press Win + R hotkey on your keyboard to open the Run command.
Step 2: In the Run command search box, type cmd and press Ctrl + Shift + Enter keys together to open the Command Prompt in admin mode .

Step 3: In the Command Prompt (admin) window, run the below command and hit Enter:
Ren c:\windows\winsxs\pending.xml pending.old
This will rename the pending.xml file to pending.old.
Method 3: By Clearing the BITS Queue
Step 1: For this, go to Start and type cmd in the Windows search bar.

Step 2: Now, right-click on the result (Command Prompt) and select Run as administrator to open Command Prompt with Admin rights.

Step 3: In the Command Prompt (admin) window, write the below command and hit Enter:
bitsadmin.exe /reset /allusers

Method 4: By Running BITS Troubleshooter
BITS (Background Intelligence Transfer Service) facilitates download, transfer, or uploading of files to and fro a client and a server. It then offers the progress report of the transfers. But, before you proceed using the BITS troubleshooter, make sure that you re-start the Background Intelligence Transfer Service. Let’s see how:
Step 1: Right-click on Start menu and click on Run to open the Run command.

Step 2: In the Run command search field, type services.msc and hit Enter to open the Service manager window.

Step 3: In the Services window, go to the right side and under thee Names column, look for Background Intelligence Transfer Service.
If it is Stopped, right-click on it and select Start.

Step 4: If it’s Started, then right-click on the service and select Restart.

Step 5: Now, right-click on the service and select Properties.

Step 6: In the Properties window, under the General tab, go to the Startup type field and set it to Manual.
Press Apply and then OK to save the changes and exit.

Now, proceed with the BITS trouble shooting.
Step 1: Click on the below link to download the Background Intelligence Transfer Service Troubleshooter.
Step 2: Now, launch the troubleshooter and click on Advanced at the bottom.

Step 3: Now, uncheck the box next to Apply repairs automatically and click on Next.

Step 4: It will start detecting problems. Once it completes the scan, it will display a list of possible causes for the issue.
Click on Next to proceed with the fix.

Now, reboot your PC and the Windows Update error 0x8007012f should be gone.
Method 5: By Running the Windows Update Troubleshooter
Step 1: Press Win + I keys together on your keyboard to open the Settings window.
Step 2: In the Settings window, click on Update & Security.

Step 3: In the next window, select the Troubleshoot option on the left side of the pane.

Step 4: Now, go to the right side of the window, scroll down and click on Additional troubleshooters.

Step 5: In the next window, under the Get up and running section, click on Windows Update.
Then click on Run the troubleshooter button below it.

Now, let the troubleshooter run and detect the issues. If any issues found, it will fix them automatically.