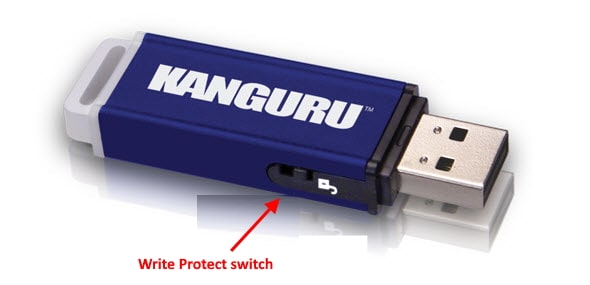
You may come across “Diskpart failed to clear disk attributes” error when trying to transfer files to your USB pen drive or SD card. The error means that the disk is write-protected and that you cannot write any data on it. There can be many reasons why Diskpart fails to work, for instance, you could not run Diskpart as administrator, device got RAW, device got locked due to virus, and so on. Fortunately, we have a few solutions for this issue. But, before you proceed with the fixes, make sure that the physical write-protection switch on the USB pen drive is not turned on. If it is, make sure to switch it off. Now, connect the USB pen drive and proceed with the below methods.
Method 1 – Check whether the USB has any Write protection switch or button on it
Some USB devices have a sliding switch to protect writing off data. Please check whether it exists and turn it off and then try again.

Method 2: By Reformatting the USB From RAW to Something Else
If the USN pen drive you are using is with RAW format, you can get read-only error and it can be fixed using DiskPart. This can happen due to incorrect partition format. Therefore, you would need to reformat the drive. Let’s see how.
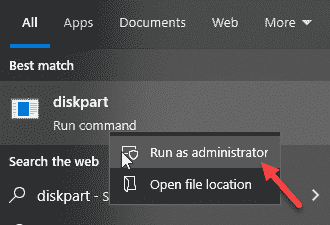
Step 1: Search DISKPART in windows search box
Step 2: Do a right click on diskpart and click on run as administrator

Step 3: Press OK in the UAC prompt to run DiskPart as administrator.
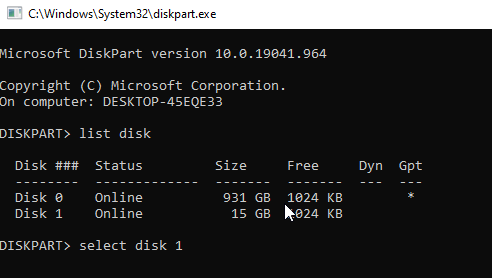
Step 4: Run the below commands one after another and hit Enter each time:
list disk

select disk n
(change n with your disk number is the RAW drive)

Step 5: Now, run the commands given below one by one
Clean

create partition primary

format fs=ntfs quick
*Note – You can also type attributes disk to view the status of the selected disk.
The drive will now be reformatted and identified by Windows.
You can now try running the disk attributes clear command or simply write data to directory.
Method 3: By Checking the Drive Space Usage and File Attributes
Firstly, you should make sure if there’s enough space and disable the read-only attribute of files because the write-protection error may arise due to space shortage or the read-only attributes of the file. Let’s see how.
Step 1: Right-click on Start menu and select File Explorer.

Step 2: In the File Explorer window, go to the file/folder location that you want to transfer to the external hard drive.
Right-click on the file/folder and select Properties.

Step 3: In the Properties window, under the General tab, navigate to the Attributes option at the bottom and uncheck the box next to Read-only.
Press Apply and then OK to save the changes and exit.

Now, run the DiskPart command again and the problem should be solved.
Method 4: By Removing Write Protection Via Registry Editor
If the USB hard drive is locked or shows the “disk is write-protected” error, then you can remove the mode and unlock your pen drive using the Registry Editor.
But, before you make any changes to the Registry Editor, make sure that you create backup of the Registry data. This is to ensure, if you lose any data in the process, you can recover that data.
Step 1: Press Win + R shortcut keys on your keyboard to open the Run command box.
Step 2: Now, write regedit in the search box and hit Enter.

Step 3: This will open the Registry Editor window.
Now, navigate to the below path in the Registry Editor:
HKEY_LOCAL_MACHINE\SYSTEM\CurrentControlSet\Control
Now, under the Control folder, look for StorageDevicePolicies. If the key is missing, you would need to create the new key.
Right-click on Control > New > Key.

Step 4: Rename the key as StorageDevicePolicies.

Step 5: Select StorageDevicePolicies and then go to the right side of the pane and right-click on an empty space. Select New and then DWORD (32-bit) Value from the right-click menu.

Step 6: Rename the DWORD Value as WriteProtect.

Step 7: Double-click on WriteProtect to open the Edit Value dialogue box.
Now, go to the Value data field and set it to 0.
Press OK to save the changes and exit.

Close the Registry Editor window and restart your PC. You can now try transferring the data to the pen drive and the read-only attribute should be gone now.
Method 5: By Checking Hard Drive for Errors
For disks with bad sectors, chances are that the disk clear read-only of the DiskPart attributes don’t work. To check and repair the bad sectors, follow either of the below solutions.
Solution 1: Using the Error Checking Tool
Step 1: Press the Win + E keys together on your keyboard to open the File Explorer.
Step 2: In the File Explorer window, click on This PC shortcut on the left and then on the right side of the pane, right-click on the write-protected drive (in our case it’s the C drive) and select Properties.

Step 3: In the Properties window, go to the Tools tab and under Error checking, press the Check button.

Step 4: Next, press Scan drive option to check and repair the bad sectors.

Now, run the DiskPart command and check if the problem is solved.
Solution 2: By Running the CHKDSK Command
Step 1: Press the Win + X hotkey on your keyboard and select Run to open the Run command.

Step 2: In the Run command search box, type cmd and press Ctrl + Shift + Enter keys together on your keyboard to open the Command Prompt in elevated mode.

Step 3: In the Command Prompt (admin) window, run the below command and hit Enter:
chkdsk F:/f
*Note – Here, F is the drive letter, so you can replace it with your drive letter.

Let the process complete. It will check and repair the bad sectors automatically. You can now run the DiskPart command and transfer file to the USB drive.
If none of the above method works, you can check for hardware problems on the storage device, because there are chances that may be the reason. At times, the flash drive may also be close to end of its life and hence the DiskPart fails to clear attributes. Check if the storage device is within the warranty period. If yes, then contact the manufacturer to get a repair done.If not, then either pay for the repair or get it replaced.