Just like any other drivers on your computer, the WiFi drivers need to have proper digital certificates. But, if your system has a WiFi driver without a proper digital certificate, you won’t be able to access the internet using that. Generally, misconfigured date and time settings, along with incorrect network settings may cause this issue on your system.
Fix 1 – Enable the Hyper-V feature
Some users have claimed that enabling the Hyper-V or Hypervisor feature has solved the problem.
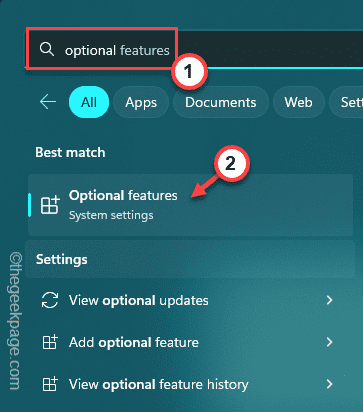
1. At first, press the Win key to open the search box. Type “optional features” in the box.
2. Then, click on “Optional features“.
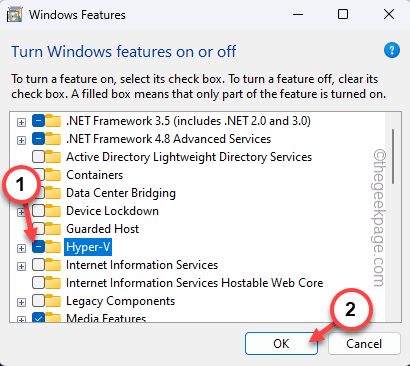
3. Next, check the “Hyper-V” feature.
4. After this, tap “OK” to save the feature.
Wait Windows applied the Hyper-V feature on your computer.
When this whole process is complete, a prompt will appear to restart the system so that Windows can apply the changes.
Tap “Restart now” to restart the system.
Fix 2 – Reset the network
If nothing has solved the problem, try resetting the network to fix the problem.
1. You can reset the network from Settings. So, open Settings.
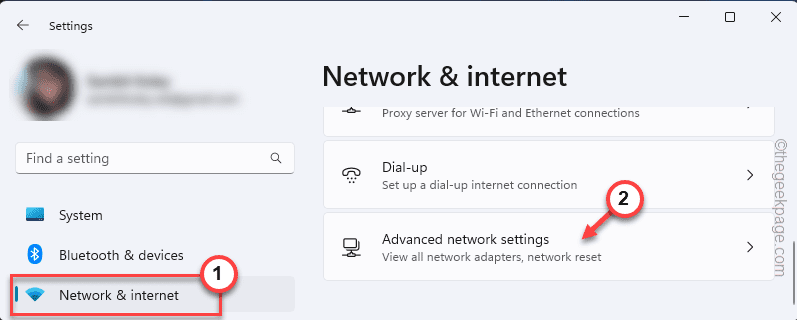
2. On the left pane, tap the “Network & internet” setting to open that.
3. Then, on the right pane, tap “Advanced network settings” to access that.
4. Now, scroll down to the “Network reset” settings and open that.
5. In the Network reset page, tap the “Reset now” option.
6. When you see the Are you want to reset your network settings? prompt, tap “Yes“.
Close the Settings. Now, reconfigure the network and it will reconnect the network again.
Fix 3 – Adjust the correct Time & date
Check whether you are using the correct time and date settings. The wrong date and time settings may cause this issue.
1. Open Settings. You can easily do it by pressing the Windows key+I keys together.
2. Then, on the left pane, tap the “Time & Language” settings.
3. Now, on the right pane, click “Date & time“.
4. Here in this area of Settings, you can find the date and time settings.
5. You are going to toggle the date and time manually. So, toggle the Set time automatically to “Off” mode.
6. Next, in the “Set the date and time manually” option, tap “Change“.
7. In the Change date and time page, set the Date and Time manually according to your local setting.
8. Then, tap “Change” to change the date and time.
Now, close the Settings page.
Fix 4 – Modify the registry
While trying to connect to the 802.1x environment and failing continuously, follow these steps.
1. Just, press the Windows key and the R keys together.
2. There, write “regedit“. Finally, click “OK” to open the Registry Editor.
WARNING – You should always create a registry backup before you modify the registry. Mistakes such as a single wrong value change can cause the system to irreversible failure. You can create a registry backup this way –
a. At first, click on “File” from the menu bar.
b. On the context menu, tap “Export” to create a new registry backup.
Name this backup and store it in a secure location.
3. Now, reach this place, following the left-hand pane –
HKEY_LOCAL_MACHINE\SYSTEM\CurrentControlSet\services\RasMan\PPP\EAP
4. You have to create a new DWORD value here.
5. So, go to the right-hand pane. There, right-click and tap “New>” and tap “DWORD (32-bit) Value” to create the value.
6. Name this value as “TlsVersion“.
7. Then, double-tap it to change the value.
8. Now, you may set the value, following this chart –
For TLS 1.0 – 0xC0
For TLS 1.1 – 0x300
For TLS 1.2 – 0xC00
9. Once you have modified the value, click “OK” to save the change.
After this, close the Registry Editor screen. This won’t take effect until you restart the system. Once the system boots up, try reconnecting to the network and testing.
Fix 5 – Set the authentication settings
You can enable the 802.1X authentication protocol for your connected system.
1. Open the Settings window.
2. Then, click on the “Network & internet” settings.
3. On the right-hand side, you will see the particular connection you are using, i.e Ethernet or WiFi.
4. Now, tap “Properties” to open the subsequent properties.
5. Now, in the Authentication settings, tap “Edit” to modify it.
6. Next, toggle the “Enable IEEE 802.1X authentication” to “Off“.
7. Then, tap “Save” to save the settings.
Check if this setting is turned off, and check whether the network is working or not.
Fix 6 – Modify the Windows Time service
Windows Time service is important for the driver authentication and time system in Windows 11/10.
1. Using the Windows search box, search for “services“.
2. Then, tap “Services” to open that.
3. In the Services window, look for the “Windows Time” service.
4. Then, double-tap it to open the Properties.
5. You can set the ‘Startup type:’ to “Automatic” using the drop-down menu.
6. Then, tap “Apply“. After applying the change, tap “OK” to save it.
It is mandatory you restart the system after this. Windows Time service will start while the system restarts.
Now, test whether you can connect to the internet.
Fix 7 – Update the network driver
Try to update the network drive from the Device Manager.
1. Type “device” in the search box.
2. You will see that “Device Manager” has appeared in the search results. Now, tap it once to open that utility.
3. In the Device Manager page, expand the “Network adapters“.
4. In the expanded list of drivers, notice which network adapter you are using.
5. Then, right-click the driver and tap “Update driver“.
6. In How do you want to search for drivers? prompt page, tap “Search automatically for drivers“.
When the driver is updated, close the update prompt and exit Device Manager.
If you can’t update it from here, you can do it from the manufacturer’s website.
Otherwise, these device driver updates are released via the Windows Update channel.
Settings > Windows Update
Your problem should be solved.


