If your computer is showing up ‘WHEA_UNCONTROLLABLE_ERROR‘ error code with a fatal BSOD issue, there are some hardware failures on your computer. WHEA stands for Windows Hardware Error Architecture operates between several softwares and hardware components. It may fail if it faces driver conflicts, damaged or corrupted hardware, or misconfigured overclocking. If you are facing this issue, just enact these fixes to identify the root cause of the problem and solve it accordingly.
Fix 1 – Inspect the hardware components for failure
In most cases, faulty or corrupted hardware is the reason for this error.
1. Completely switch off the computer and unplug the power cable from the cabinet.
2. Then, open the casing and check all the components on the motherboards. Check these components –
a. Check whether RAM is attached to the slots correctly. Detach and attach them again.
b. Further, check the fans and any other additional cooling systems. Try to identify anything out of the ordinary in the components.
c. Clear the dust of all the components using a blower.
3. If there is some component that appears to be physically corrupted you have to replace it.
4. Otherwise, if everything is just fine, just put the casing back again.
5. Connect the power cable to your computer and boot it up.
Check whether this stops the WHEA_Uncontrollable error message on your computer.
Fix 2 – Run a check disk operation
If there are some issues with the hard drive, you can run a disk scan to identify and fix the issue.
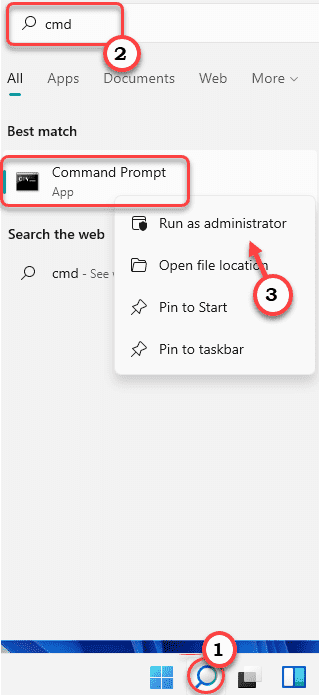
1. Press the Windows key and type “cmd“.
2. Then, right-click on the “Command Prompt” and tap on “Run as administrator” to open the Command Prompt as an administrator.

3. Just copy-paste this disk-checking command and press the Enter key to run the disk checking operation.
chkdsk /r

If it prompts for further permission to start the disk checking operation upon the restart of your system, press the “Y” and hit Enter.
Check if this helps you resolve the BSOD issue.
Fix 3 – Repair the MBR
You can repair the Master Boot Record which may have caused this issue.
You have to boot into Windows Recovery Environment to fix the Master Boot Record. You can do it this way –
Step 1
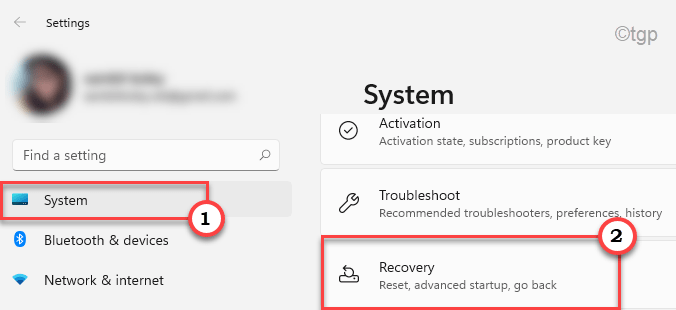
1. Press the Windows key+I keys together to open up the Settings screen.
2. Then, tap on “System” on the left-hand side.
3. Next, click on “Recovery” on the right-hand side.

4. Here, scroll down to the “Advanced startup” option.
5. Further, tap on the “Restart now” to restart your computer in Windows Recovery Environment.

Step 2
1. Open the Automatic Repair window following the instructions mentioned before.
2. Then, click on “Advanced options“.

5. After that, just tap on the “Troubleshoot” settings.

6. Then, you have to tap on the “Advanced options” to open advanced options.

7. Now, click on the “Command Prompt” to open up the terminal.

8. Just select your administrative account and put in your account password.
10. Then, tap on the “Continue” option to open up the terminal.

11. Once the terminal appears on your screen, copy-paste these commands and then hit Enter to fix the Master Boot Record in the process.
bootrec /fixmbr
bootrec /fixboot

12. Now, you can safely rebuild the boot configuration directory. Paste this particular command in the terminal and hit Enter.
bootrec /rebuildbcd

Once the rebuilding operation is over, close the terminal.
13. Finally, tap on “Continue” to boot your computer normally.

This way, check if this solves your problem.
Fix 4 – Use the System Restore
You can use the system restore to restore the system to the state before this error code came up.
Steps to boot your computer to Windows Recovery Environment –
a. At first, you have to shut down your computer.
b. Simply press the power button to boot up your system.
c. Then, when your system boots up, press-hold the power button again to force shutdown your system as soon as you have seen the manufacturer’s logo.
d. Continue this for 2-3 more times and it will automatically reach the startup repair screen.
When your computer boots up, you will be in Recovery Environment mode.
1. In the Automatic Repair screen, click on the “Advanced options“.

2. Next, tap on the “Troubleshoot“.

3. Further, click on the “Advanced options” to again proceed further.

4. Now, click on the “System Restore”.

5. In the System Restore window, you can tap on the “Recommended restore:” option.
6. Otherwise you can also choose the “Choose a different restore point” option.

5. Now, check the “Show more restore points” box.
This will show additional restore points on your screen.

6. Now, carefully chose the restore point when the error was not happening.
7. After that, click on “Next” to proceed.

7. Finally, tap on “Finish” to finish up the process.

Now, Windows will restore your machine back to te