row 240
With the new version of Windows rolling out, many users want to try and get the feel of Windows 11 and its features. However, it can be slightly risky to install the beta release of Windows 11 on your system as that can have bugs. Instead of replacing the stable version of Windows in your system with Windows 11, you can simply install Windows 11 on a Virtual Machine. Once, you are happy with its features and comfortable with the UI, you can plan on upgrading to Windows 11 on your system.
This article will guide you on how to Install Windows 11 on a VMWare Workstation Player
Steps to be followed to Install Windows 11 on VMware WorkStation Player
Step 1: Visit the VMware Download Page
Step 2: Scroll down to locate Try Workstation 16.0 Player for Windows and click on DOWNLOAD NOW. Note that this software is free for non-commercial use.
Step 3: Download the Windows 11 ISO file. Refer to the article How to download Windows 11 ISO from the official Microsoft website for more details.
Step 4: Open the VMware Workstation Player by double-clicking on it.
Step 5: Click on Create a New Virtual Machine
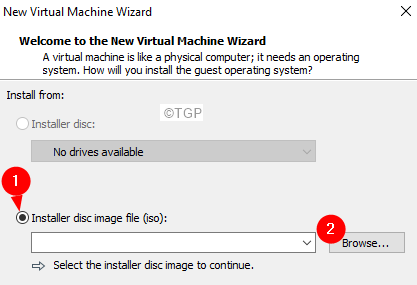
Step 6: In the New Virtual Machine Wizard window that opens,check the Installer disc image file(iso) option
Step 7: Click on the Browse button
Step 8: Locate and click on the Downloaded Windows 11 ISO File and the press Open
Step 9: Click on the Next button
Step 10: In the appearing window, by default, Microsoft Windows will be checked, verify the version of the base operating system(Windows Version that is installed on your system) , and press Next
Step 11: Give an appropriate name for the VM and click on Next
Step 12: In the Specify Disk Capacity window, specify at least 64 GB
Step 13: Check the Store virtual disk as a single file
Step 14: Click on the Next button
Step 15: In the Ready to create Virtual Machine window, click on Customize Hardware button as shown below
Step 16: Click on Memory from the left-hand side.
Step 17: From the Right-hand side, make sure you allocate at least 4 GB of RAM
Step 18: Finally, click on the Finish button.
Step 19: Now, you will notice the newly created VM listed as shown below.
Step 20: Double-click on it play the Virtual Machine
At this stage, if you see any error stating the “This host supports Intel VT-x, but Intel VT-x is disabled”. It means that Virtualization is not enabled on your machine. In order to enable Virtualization, Enter BIOS mode and enable Virtualization. The instructions to enable BIOS mode and to enable virtualization differ from vendor to vendor. So visit your vendor’s website and check for the details.
Step 21: You should be able to see windows Boot Options, click on Boot Normally
Step 22: You will see the message press any key to continue. Click on any key
Step 23: Now, you will see the following window, choose the language you prefer, and click on Next
Step 24: Click on Install Now
Step 25: In Activate Windows window, click on I don’t have a product key
Step 26: From the appearing window, choose the Windows 11 edition of your choice and click on Next
Step 27: You will see a license agreement, tick on I accept the Microsoft Software License Terms, and click on Next
Step 28: Click on Custom: Windows Only(advanced)
Step 29: In the appearing window, Choose the drive and click on Next
Step 30: You will see that windows starts installing. Please be patient and sit back as this would take some time.
Step 31: Follow the wizard to complete the setup process.
Step 32: Setup your account for Windows 11 following the instructions.
Step 33: Once, that is done, log in to Windows 11
Step 34: From the ribbon at the bottom double-click on the search option as shown below
Step 35: Click on the Settings icon as shown below
Step 36: Click on the Windows Update. Click on the Windows Insider Program
Step 37: Click on Get Started
Step 40: In the Link an account to join the program window, click on the Link Account button.
Step 41: Select the Microsoft account that you want to link and click on Continue
Step 42: Select a channel, based on your preference and click on Continue
Step 43: Click on Continue to agree to the terms and conditions from Microsoft.
Step 44: Finally, Click on Restart Now to get started.
That’s All Guys!
We hope this article has been informative.
Kindly comment and let us know if you are facing any issues and we will be glad to assist you.
Thank you for Reading.


