As we know, the default browser in Windows 10 is Microsoft Edge. From the Edge Canary version, Microsoft has introduced a new feature to support Secure DNS in its browser. First of all, let us understand what is DNS and its significance.
DNS stands for Domain Name System. In the world of the internet, every system(computer, sever, phone, etc.) is identified by a unique address called IP address. A system that we are working on has an IP address. Also, the webserver that hosts the website has an IP address. For example, the website www.example.com may have an IP address 91.92.66.99. If you want to open www.example.com from your browser, you open a browser and type this domain name in the address bar, and hit enter. As the systems understand only the language of numbers, they need this hostname that is in text and numbers to be converted to an IP address. DNS is basically a server that holds the IP address mapping corresponding to the domain name. For example, when you enter www.example.com and hit Enter, in the background a request is sent from the browser to the DNS server to convert this user-friendly hostname with alphabets and numbers to a machine-friendly IP address.
Now that we know about DNS, let us try to understand about Secure DNS. As mentioned earlier, a request is sent from the browser asking the DNS server the IP address associated with the domain name. In technical terms, it is referred to as domain lookup. Now, this request is not secure. Meaning, the request is sent over the HTTP protocol and can be easily snooped upon by the attacker in the network. The DNS service provided by most of the ISPs is not secure these days. With Secure DNS, the DNS lookup request is sent over HTTPS channel. Here the request would be encrypted and secure making it difficult to snoop into it. Secure DNS is also referred to as DNS-over-HTTPS or DoH. Examples of few providers of Secure DNS are Cloudflare, Quad9, CleanBrowsing, and DNS.SB, etc.
Now, that we understood what is secure DNS and how it works, let us see how to use this service in Microsoft Edge. Please note that if your current ISP is already using a secure DNS service, then there will be no need to make any changes. If not, Edge provides two options to make the changes. In this article, let us see in detail, how to change or set up a secure DNS provider in Microsoft Edge.
Steps To Be Followed:
Step 1: Open the Microsoft Edge browser
Step 2: In the top right corner of the window,
- Click on the Menu( …)
- Choose Settings

Step 3: In the Settings window that appears,
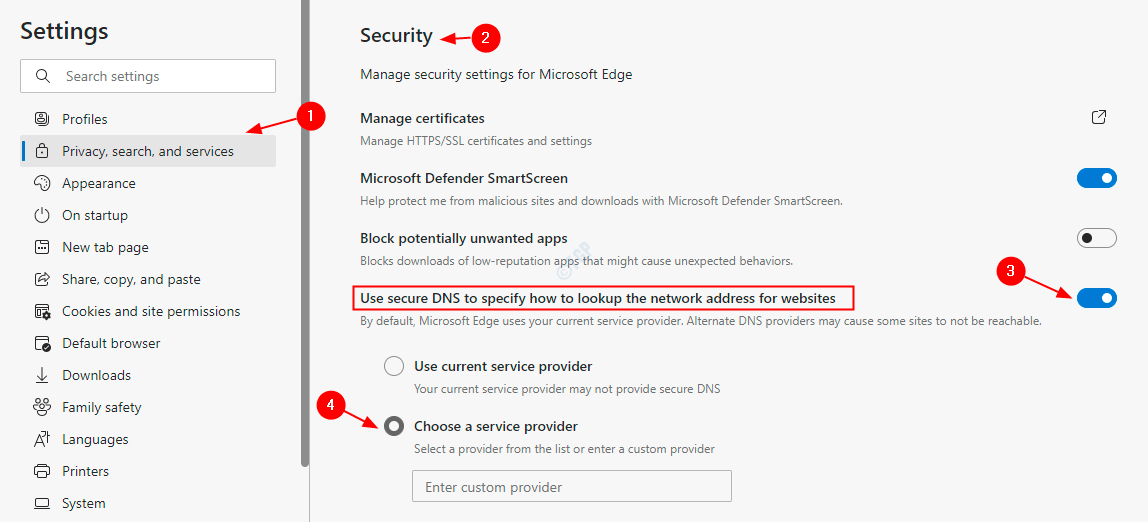
- Choose Privacy, search, and services from the left-hand side menu
- In the right-hand side menu, scroll down and to the Security section
- Toggle the button to turn ON(the button will now be displayed in blue color) the Use secure DNS to specify how to lookup the network address for websites.
- Click on Choose a service provider

NOTE:
- By default, Edge uses a DNS server provided by your current ISP
- When the DNS servers are changed, some sites may become unreachable
Step 4: Edge provides you an option to choose from four popular secure DNS servers. From the drop-down menu, choose the secure DNS server that you want.
Step 5: If you want to use your custom secure DNS server instead, Click on Enter custom provider text section .

Step 6: select your preferred DNS from the list.

This simple and you can set your desired secure DNS server in Edge.
That’s All. We hope this has been informative. Thank you for reading. Kindly comment and let us know if run into any issues.