File Explorer is a comprehensive file manager tool that serves billions of peoples since the release of Windows 95. Normally it works quite well except for a few hiccups here and there. But what if you see a blank message borrowing a yellow exclamation mark while trying to access the File Explorer? Don’t worry. This problem sometimes occurs due to a registry issue. Just follow these easy fixes to solve the problem.
Fix 1 – Adjust registry values
You have to empty a registry key in a particular header file.
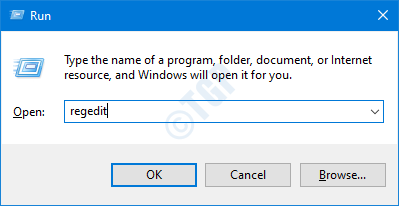
1. First of all, press the Windows key+R keys together.
2. After that, type “regedit” and click on “OK” to access the Registry Editor screen.

NOTE –
Once you have opened the Registry Editor, click on “File“. Then click on “Export” to make a new backup on your computer.

If anything goes out of hand while altering the registry, you can easily retrieve the registry back to normal.
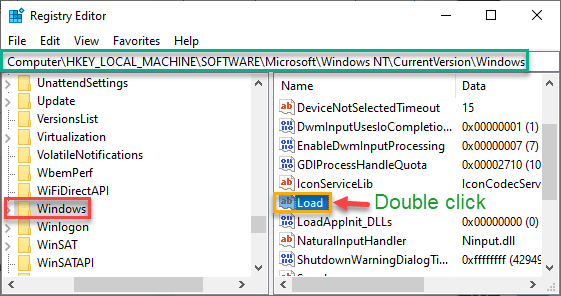
3. Once the Registry Editor opens up, proceed to this location on the Registry Editor screen –
Computer\HKEY_LOCAL_MACHINE\SOFTWARE\Microsoft\Windows NT\CurrentVersion\Windows
4. On the right-hand side, double click on the “Load” multi-string to alter it*.

5. Make sure that the ‘Value data:’ box is completely empty.
6. After that, click on “OK“.

Once you have done this, close the Registry Editor window. Just restart your computer once and open the File Explorer once more.
Hopefully, this should solve the issue on your system.
NOTE–
There is a chance that you can’t alter the value of ‘Load value’ due to ownership issues of the conflicted key.
1. Right-click on the “Windows” key on the left-hand side and click on “Permissions“.

2. In the Permissions for Windows screen, click on “Add“.

3. In the Select User or Group window, click on “Advanced” to add your user name.

4. Here, you need to click on “Find Now” to see all the available groups.
5. Then, from the ‘Search results‘ find your user name and select it.
(For this computer the user name is “Sambit”.)
6. After that, click on “OK” to save it.

7. Coming back to the Select User or Group window, just click on “OK“.

8. Again in the Permissions for Windows window, click on “Advanced“.

9. When the Advanced Security of Settings for Windows window opens, you have to click on the “Add” option.

10. Then, click on “Select a principle” to add your account name in the permission entries.

11. In the Select User or Group window, click on “Advanced” to add your user name.

12. Just like before you have to click on “Find Now“.
13. In the ‘Search results‘ panel, scroll down and find out your user name and select it.
14. Click on “OK” to save it.

15. In the Select User or Group window, click on “OK” to select the user name.

16. Coming back to Permissions Entry for Windows window, check the option of “Full Control“.
17. Then, click on “OK” to save the changes.

18. You have to click on “Apply” and then on “OK” to save the changes on your computer.

19. Same way, again you have to click on “Apply” and then on “OK” to complete the process.

Once you have done these changes, again try the steps to alter the value of the ‘Load’ key again.
This will solve your problem.
Fix 2 – Run SFC scan
Running SFC scans should solve this issue on your computer.
1. At first, type “cmd” in the search box.
2. Then, right-click on the “Command Prompt” and click on “Run as administrators“.

3. Next, type this code and hit Enter to run the system file checking scans.
sfc /scannow

4. Once the check is done, type this command and hit Enter again to run a DISM check on the system files.
DISM.exe /Online /Cleanup-image /Restorehealth

After the scanning has finished, reboot your computer and give the explorer another try.
This should fix your problem with your explorer.