Have you ever wondered what this Automatic Maintenance schedule is? Well, to know more about it keep reading this article. In this article, let us discuss all there is to know about the Automatic Maintenance Schedule in a system. Also, let us discover different ways of starting and changing the Automatic Maintenance Schedule in Windows 10.
What is an Automatic Maintenance Schedule?
As the name Maintenance suggests, windows runs a maintenance task in the system so as to keep the OS(Operating System), Programs or applications running within it updated. It also, checks for the malware in the system and other security-related issues. It is recommended to turn on the automatic maintenance schedule always in a system. The schedule to run this maintenance task is decided by the operating system such that there is minimal impact on the person using it and the system performance. It also, ensures that this task happens only when the system is plugged into the power ensuring the energy is utilized efficiently.
This maintenance task is run automatically by the system when it notices that the system is idle and is connected to the AC power. This task runs for a maximum of 1 hour in a session. If a user starts working when the maintenance task is running, that task is simply suspended. This task will then be resumed in the next maintenance session. By default, the system runs this task at 2:00 AM provided the system is idle and connected to the AC power. (This might differ from system to system)However, one can change this schedule and also opt to allow scheduled maintenance to wake up the PC at the scheduled time.
It is important to note that there are certain tasks that are marked as critical, These tasks won’t be suspended when the user interrupts, these would still be running in the background till their completion. To avoid such a situation, one might want to schedule these maintenance tasks.
Different ways of Starting or Changing the Automatic Maintenance Schedule
Now that we have an overview of the Automatic Maintenance Schedule, let see the different methods that can be used to start or change this schedule in the system.
Method 1: From Control Panel
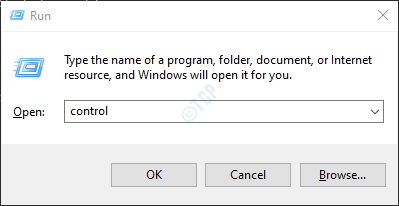
Step 1: Holding the keys Windows+r at the same time, open the run window.
Step 2: In the Run window, enter control and hit Enter

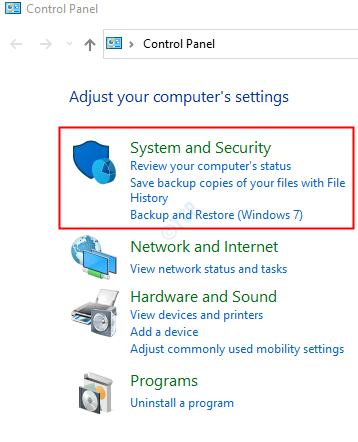
Step 3: In the Control Panel window that opens, click on System and Security

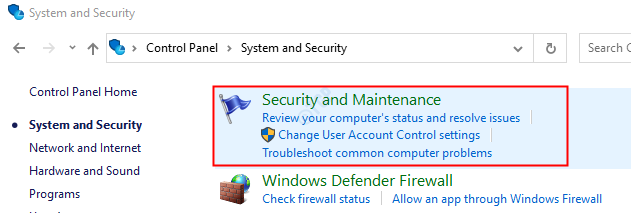
Step 4: In the appearing window, click on Security and Maintenance

Step 5: Click on Maintenance to look at the options available.

Step 6: In order to Start the Maintenance, Click on the Start maintenance option under the Automatic Maintenance
NOTE: You have to be signed in as the Administrator to do this.

Step 7: In order to Change the Maintenance Settings, click on the Change maintenance settings as shown below

Step 8: In the window that opens,
- Choose a time under the Run maintenance tasks daily at the drop-down
- Optionally, you can tick on Allow scheduled maintenance to wake up my computer at the scheduled time option. When this option is chosen, the PC would be wake up the PC run the maintenance task and put the system back to sleep.
- Click on OK

Method 2: From Registry Editor
Step 1: Open the run window. Hold the keys Windows+r from your keyboard at the same time.
Step 2: Enter regedit and press OK

Step 3: If you see a UAC popping up, just click on Yes
NOTE: Registry editing can be risky and can have an adverse effect on the system even with the slightest mistake. It is advised to take the backup of the registry settings before proceeding. To take a backup, In the Registry Editor window –> Go to File –> Export –> Save your Backup file.
Step 4: In the Editor window, copy-paste or navigate to the following location,
HKEY_LOCAL_MACHINE\SOFTWARE\Microsoft\Windows NT\CurrentVersion\Schedule\Maintenance

NOTE:
- If you do not see the Maintenance folder, create one using the below steps
- Right-click on the Schedule folder on the left-hand side
- Choose New
- Choose Key
- Name this subfolder/subkey as Maintenance

- If you do not see an Activation Boundary key on the right-hand side in the Maintenance folder, create one using the below steps
- Make sure you are in the Maintenance subfolder/subkey
- Right-click anywhere on the right-hand side
- Choose New
- Choose String Value
- Name this newly created key as Activation Boundary

Step 5: In order to change the time at which the maintenance tasks should run, double click on the Activation Boundary key. In the Edit Value window that opens specify the value that you want as shown below.

NOTE:
The time is to be specified in the below format specifically. Else the changes won’t take an effect.
YYYY-MM-DDTHH:MM:SS
Here,
YYYY –> Year. Eg: 2010,2001
MM –> Month. Eg: 01,02,12
DD –> Date. Eg: 01,21,14,26
T –> Keyword to represent time. Keep it as it is
HH –> Hour in 24 hr format
MM –> Minute
SS –> Seconds
- The date part, i.e YYYYMMDD must have any valid date mentioned. As the tasks are scheduled on a daily basis, this value won’t make any difference.
- The HH part must have the right value of time specified in 24hr format. For Example,
- To schedule a task at 1:00 AM, the value should be 2010-01-01T01:00:00
- To schedule a task at 1:00 PM, the value should be 2010-01-01T13:00:00
- To schedule a task at 5:00 PM, the value should be 2010-01-01T17:00:00
Step 6: In order to Allow scheduled maintenance to wake up the computer at the scheduled time, double click on WakeUp DWORD within the Maintenance folder. In the Edit

Step 7: In the Edit DWORD window that opens, set the value and press OK
- Set the value to 1 to Allow scheduled maintenance to wake up the computer at the scheduled time
- Set the value to 0 Not to Allow scheduled maintenance to wake up the computer at the scheduled time

That’s it and an Automatic Maintenance schedule will be created to run the tasks at the specified time.
If you don’t see the changes taking effect, consider restarting your system and then check for the changes.
That’s All. We hope this post has been informative. Thank you for Reading