One common mistake that we all make while sending emails is mentioning about an attachment and never remembering to attach it before hitting the Send button. Of course, it’s a disaster oops moment we all want to avoid; but Send button once hit is hit, and it cannot be undone. Or is that really so? This is exactly where the importance of delaying the sending of emails by 1 or 2 minutes comes into the picture from. That is, after you hit the Send button, the message goes to the Outbox folder and leaves the Outbox folder only after the specified number of minutes that you have set.
Or let’s take another scenario. You are on work from home schedule and you worked on your project all day and all night long and do not want to wake up at the normal office hours the day after, just to hit the Send button for a mail that you have drafted already. Wouldn’t it be great if you can schedule the mail to be automatically sent early morning the next day? Of course, we know that it would save a lot of headaches.
Be it delaying all the mails that leave your mailbox by a specified number of minutes, or be it scheduling a particular mail to be sent at a particular time; the ability to properly time sending your emails is definitely something worth learning and we are here to get you there today! So what are you waiting for, let’s dive straight into the article, shall we?
Section 1: How to Delay Sending all Emails in Outlook by a Specified Number of Minutes
In this section, let’s explore how you can set a certain number of minutes as a delay for all the emails leaving your mailbox. That is, once you hit the Send button, the mail will leave your mailbox only after the specified number of minutes that you set.
Section 1.1: How to Delay Sending All Emails
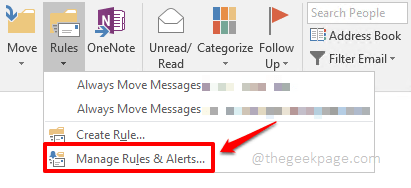
Step 1: Launch Outlook application and hit the HOME tab from the top ribbon. Under the HOME options, find and click on the dropdown button that says Rules.
Step 2: From the list of options that get expanded out from the Rules dropdown button, click on the one that says Manage Rules & Alerts.
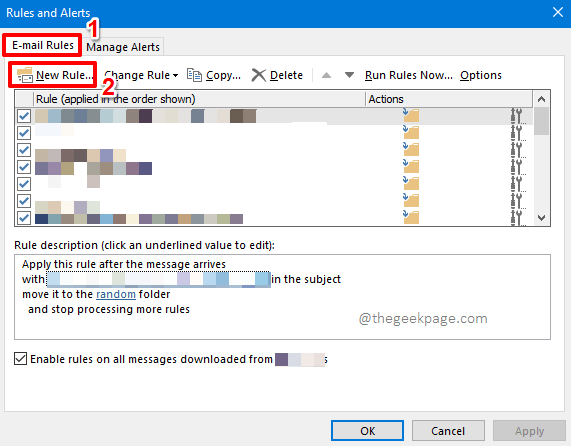
Step 3: On the Rules and Alerts window, make sure you are at the E-mail Rules tab first.
As next, hit the New Rule button.
Step 4: On the Rules Wizard window, under the section Start from a blank rule, click on the option that says Apply rule on messages I send.
Then hit the Next button.
Step 5: On the screen that follows, simply hit the Next button.
Step 6: You will now get a message saying This Rule will be applied to every message you send. Is this correct?, for which you have to hit the Yes button.
Step 7: From the section Step 1: Select action(s) in the next window, tick the checkbox corresponding to the option defer delivery by a number of minutes.
Now under the next section Step 2: Edit the rule description (click an underlined value), click on the link that says a number of, to edit it.
Step 8: In the Deferred Delivery window, you can set the number of minutes by which the mails should be delayed under the field Defer delivery by.
Once you are done, hit the OK button or the Enter key.
Step 9: You will be back at the Rules Wizard window now and you will be able to see that the minutes you set is now added in the Edit the rule description field.
Hit the Next button if you are ready to proceed.
Step 10: If there are any exceptions that you want to set, for example, if you do not want this rule to be applied if the mail is being sent to a particular person(s), then you can make those exceptions at this stage.
If there are no exceptions to be specified, you can hit the Next button.
Step 11: On the next screen, you can give a name to your rule under the field Step 1: Specify a name for this rule.
Also under the section Step 2: Setup rule options, tick the checkbox corresponding to the option Turn on this rule.
Once you are all done, hit the Finish button at the bottom.
Step 12: You will now get the following warning window. Simply hit the OK button.
Step 13: You will now be back at the Rules and Alerts window. Simply hit the Apply button and then the OK button. That’s it. Your delay rule is now successfully added.
Section 1.2: How to Edit the Delayed Email from the Outbox Folder
Let’s see the delay rule in action in the steps below.
Step 1: Firstly, let’s draft a mail and send it. For that, click on the HOME tab at the top and then click on the New Email button.
Step 2: Now, draft your mail and then hit the Send button.
Step 3: Even though you hit the Send button, because you have the delay rule in place, your email goes straight to the Outbox folder instead of the Sent Items folder.
Click on the Outbox folder on the left navigation pane to view the mail in your Outbox. Double click on the mail if you would like to make some edits. You can make any edits as you prefer and hit the Send button again. The mail will be sent only after the delay minutes specified by you.
Section 1.3: How to Revert Delay in Sending Mails
In case you change your mind and would like to send emails straight away without any waiting, then you can delete the delay rule that you created.
Step 1: Once again, click on the HOME tab from the top ribbon and then click on the Rules dropdown button. From the list of options, click on the one that says Manage Rules & Alerts.
Step 2: Now you will be taken to the Rules and Alerts window. Make sure you are at the E-mail Rules tab at the top.
Now, check the checkbox corresponding to the delay rule you created. And then hit the Delete button at the top to delete the rule.
Once you are all done, hit the Apply button and then the OK button.
Section 2: How to Schedule Sending an Email in Outlook
In this section, let’s find out how to send an email at a scheduled time. This section explores ways to schedule an email on both the Outlook application and on the Outlook web version.
Section 2.1: Outlook Web Version
2.1.1: How to Schedule Sending an Email
Step 1: Launch Outlook web version in any browser and then click on the New message button at the top.
Step 2: Draft your mail and hit the dropdown arrow associated with the Send button at the bottom. DO NOT hit the Send button, click only on the dropdown. If you hit the Send button, the mail will be sent at that very instant.
From the Send options, click on the Send later option.
Step 3: Now, you can either choose a preset mail sending time or you can click on the Custom time button as shown in the screenshot below.
Step 4: Set the scheduled time for the mail to be sent, using the Calendar picker and Date picker.
Once you are all set, hit the Send button. That’s it. The mail will be sent only at the time you set.
2.1.2: How to Edit the Scheduled Mail from Drafts Folder
If you would like to make edits to a scheduled mail, then on the left pane of the navigation bar, click on the Drafts folder.
You will be able to see your scheduled mail under the Drafts folder. Double click on it to edit it. You can make your edits and then change the scheduled time again by clicking on the Send dropdown button if you need. That’s it.
Section 2.2: Outlook Application
There are 2 different ways using which you can schedule a mail in the Outlook desktop application. Let’s explore both and also find out how you can edit a scheduled email.
2.2.1: Through New Mail – Message Options
Step 1: Click on the HOME tab at the top ribbon.
Under HOME options, click on New Email.
Step 2: Click on the Message tab from the tabs ribbon and click on the Message Options icon associated with the group Tags. This will open the Properties window.
Step 3: On the Properties window, under the section Delivery options, tick the checkbox corresponding to the option Do not deliver before. Now against this option, you can set the scheduled date and the scheduled time.
Hit the Close button once you are all done.
Step 4: You can hit the Send button once you are back at the New Mail window. Your mail will be sent only at the time scheduled by you. You can now relax!
2.2.2: Through New Mail Delay Delivery Options
This method is very similar to the first method, though it follows a different path to reach the time scheduling window.
Step 1: Hit the HOME tab from the top ribbon.
As next, hit the New Email button just like in the previous method.
Step 2: On the New Email window, click on the Options tab first, from the top ribbon.
Then click on the Delay Delivery button as shown in the screenshot below.
Step 3: This will open the same window as in the previous method. But in here, the Do not deliver before checkbox will be automatically ticked under the section Delivery options.
You can schedule the date and the time as per your preference.
Once you are all done, hit the Close button to go back to the new email window.
Step 4: You can draft your email and hit the Send button now. The mail will be sent at the scheduled time.
2.2.3: How to Edit the Scheduled Email from the Outbox Folder
If you would like to edit the scheduled mail, then click on the Outbox folder from the left navigation window.
You can now see your scheduled mail on the center pane. Double click on the mail to make your edits. That’s it!
Hope you have won over your long-fought battle with Outlook today! Please do tell us in the comments section whether you could successfully delay or schedule your emails on Outlook following the steps in our article.
Stay tuned for more mind-boggling tricks, tips, how-tos, and hacks! Happy Geeking!


