You’re in a hurry and you are trying to log into your machine to reply to one important email. That’s when you get that wonderful screen that says Working on updates, Don’t turn off your computer. Well, I can very well say that nothing else can be more bothersome if you are in a hurry. Though Windows does provide you with an option to temporarily pause Windows updates for some time, it doesn’t really give you a way on how you can permanently stop Windows from downloading and installing updates on your machine.
But is it really so? Is there really no way for you to bypass this system setting? Well, definitely yes! In this article, through one very simple method, we explain in detail how you can permanently disable automatic Windows updates in your Windows 11.
Note: Please note that this method works perfectly if you use a WiFi connection for Internet access. If you use different networks for Internet, you have to repeat steps 3 to 5 for all those networks for the method to work.
Steps to Disable Automatic Windows Updates Permanently
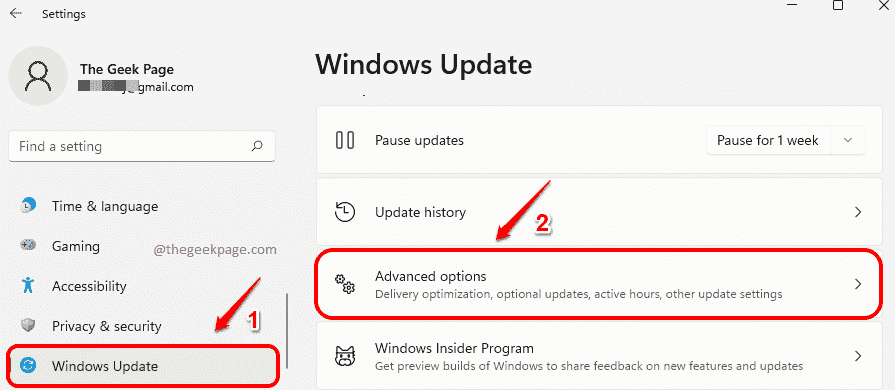
Step 1: Press the keys Win and I together to launch the Settings application.
Once it launches, click on the tab named Windows Update in the left window pane and in the right window pane, click on the tab Advanced options.
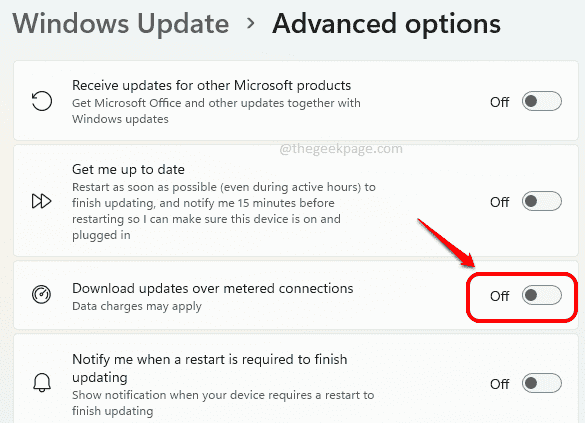
Step 2: In the Advanced options window, turn the toggle button Off for the option Download updates over metered connections.
This step would prevent Windows updates from getting downloaded if you are connected to a metered connection.
In the next step, we need to set our generally used WiFi network connection as a metered connection, so that Windows updates wouldn’t be downloaded over that network.
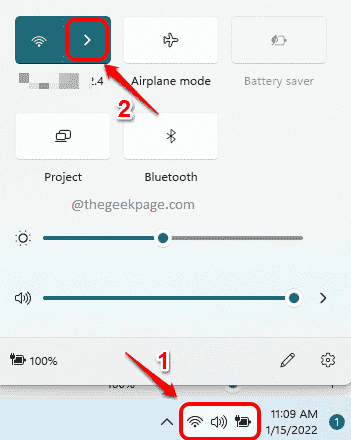
Step 3: Click on the Quick Actions Panel icon comprising of WiFi icon, Speaker icon and Battery icon. Once the quick actions panel expands out, click on the right arrow icon associated with the WiFi icon.
Step 4: Now find the WiFi network to which your system is connected to and click on the Properties icon associated with it to open the WiFi properties window.
Step 5: Now in the WiFi properties window, scroll down and turn On the toggle button corresponding to the option Metered connection.
Please note that even though Windows updates will be permanently disabled through this method, if the toggle button is turned On, then applications might stop working the way they currently work, to reduce the usage of data.
Note: If you want to revert these settings, repeat the same steps, but on Step 5, turn the toggle button Off for Metered connection in your WiFi properties.
That’s it. From now on, you get to choose when Windows should download updates. If you would like to force download the updates and install them at any point, you can go to the Windows Update page in Step 1 and manually check for updates. Forcing you to restart your system to install the downloaded updates at the oddest of the hours should no longer bother you anymore.
Hope you found the article useful.


