Our computer screen emits blue light, just like the one that the Sun emits. This light isn’t that harmful. But at nights when the other lights are a little warmer, and when you stare at your computer screen that emits the brighter blue light for longer hours, you end up straining your eyes.
Of course, you might know all these and you might already know about the Night light feature that windows has, which helps block the emission of blue light and instead use warmer colours that are pleasant to your eyes. You might already be turning this feature on every single time when you feel like your eyes are burning too. But did you know that you can set a schedule, according to which the night light feature will be automatically enabled and disabled? Read on, if you didn’t already know!
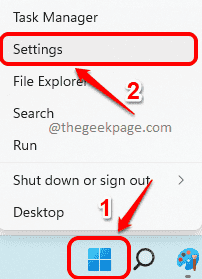
Step 1: To launch the Settings application, either press the keys WIN + I together or right click on the Windows Start Menu icon and click on the Settings option.
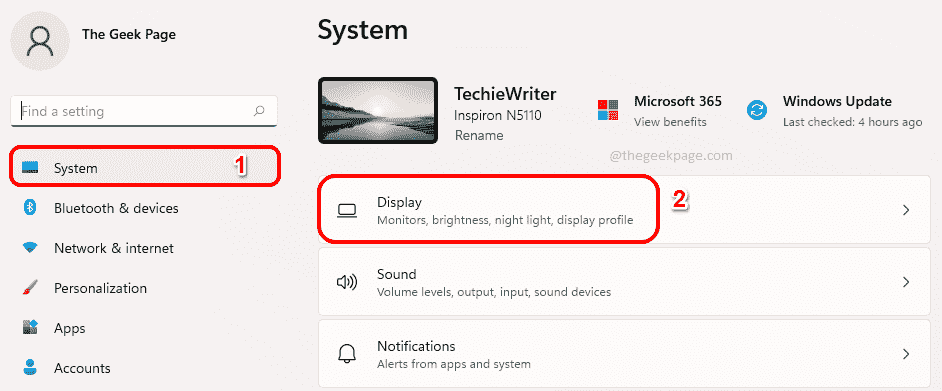
Step 2: On the left side of the Settings window, click on the System tile and on the right side, click on the Display tile.
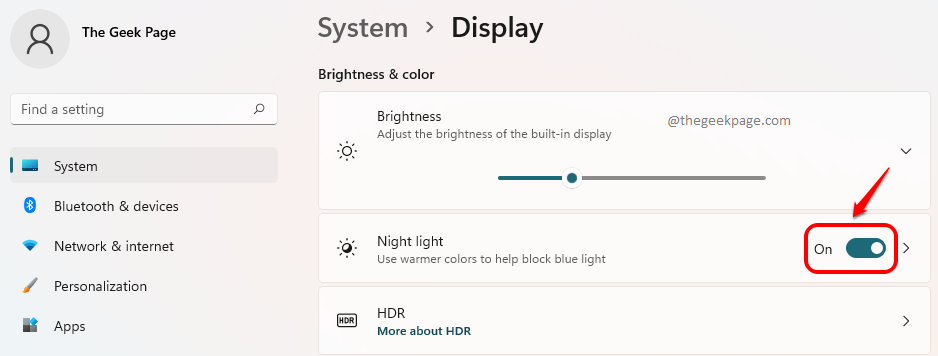
Step 3: Under the Display settings Turn On the toggle button associated with the Night light option to enable this feature.
Step 4: Now that the Night light feature is turned on, click on the Night light tile to view and edit its advanced settings.
Step 5: You can adjust the slider corresponding to the Strength option to increase or decrease the intensity of warmer colours.
For example, if you want blue lights to be completely blocked, you should drag the slider to the extreme right.
Step 6: Now, to set a schedule to turn on and turn off the night light feature, turn the toggle button to the ON state for the option Schedule night light.
If you want the night light feature to be enabled during the standard nighttime, then click on the radio button corresponding to the option Sunset to sunrise (6:39 PM – 6:03 AM).
Step 7: If you do not want to use the standard night hours, but would like to use custom hours for enabling night light, then click on the radio button corresponding to the Set hours option.
Here, by default, the Turn on time would be 09:00 PM and the Turn off time would be 07:00 AM. Either you can go with this timing or you can click on both the Turn on time and the Turn off time to customize it, as detailed in the next step.
Step 8: Once you click on the Turn on time or on the Turn off time, you would be able to choose the timing, using the dropdown menus associated. Just make sure to click on the Tick button once you are done setting the time. That’s it.
Now you can sit back and relax. Your night light schedule is well in place and would take charge according to your set preference.
Hope you found the article useful.


