When you install Outlook and link a mail account to it, by default a PST file gets created on a specific default location for the account that got added. All the data related to your mail account like calendar information, contacts, messages, etc get stored in this file. It’s totally fine to have the file to be in its default location as well. But sometimes, you might want to know where exactly this file is present in your machine to maybe copy it to some other location. Or you might want to move the default location of this file so that in the future, Outlook saves data to this file in your preferred location.
Whatever be your requirement, having a clear-cut idea about what OST/PST files are, where exactly they are located in your machine, and how you can move the default location of these files to a location of your choice, etc. are crucial if you are a frequent MS Outlook user. After all, knowledge is power, indeed. Read on, to learn all about MS Outlook PST/OST files in the simplest words possible. Hope you enjoy reading the article!
Section 1: What are Outlook PST/OST Files
OST(Offline Storage Table) and PST(Personal Storage Table) are storage files used by Outlook to store data related to each mail account linked to your Outlook. OST files can be converted to PST format and PST files can be converted to OST format.
OST files are for offline storage of data. That is, even if you have no Internet connectivity, you can draft a mail and save it. All such information will be stored in the OST files on your local machine. When the connectivity is re-established, the syncing happens automatically. But when it comes to PST files, you will not have access to your mailbox if you are not online. PST files are compatible with almost all the mail servers, including the Exchange server, whereas OST files are compatible only with the Exchange server.
Section 2: Where are Outlook PST/OST Files Saved
Let’s now find out exactly where your OST/PST files are located in your machine in the coming steps.
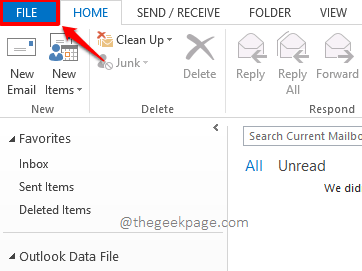
Step 1: Launch Outlook and click on the FILE tab from the top ribbon.
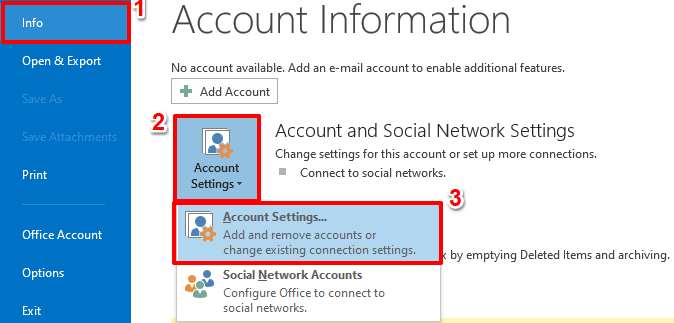
Step 2: On the left pane of the window that follows, click on the Info tab.
Now on the right side, click on the dropdown button named Account Settings. From the options that get expanded out, click on the one that says Account Settings.
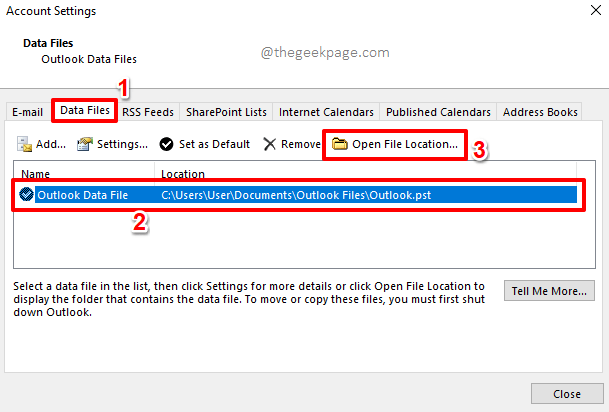
Step 3: On the Account Settings window, click on the Data Files tab at the top.
Under the Data Files tab, you will be able to view all the OST and PST files stored under different accounts. Click on the one that you want to find the location of.
Once you have selected the PST/OST file, click on the Open File Location button at the top.
Step 4: That’s it. You will instantly be taken to the location where Outlook has saved the PST/OST file that you selected.
In my case, the location is at C:\Users\User\Documents\Outlook Files.
That’s it. You now know where Outlook hides its PST/OST files. If you need to copy these files to some other location, you can do so without a second thought, now that you know where their hiding place is!
Section 3: How to Change the Default Location of Outlook PST/OST Files
To change the default location of PST/OST files, we need to make a small registry tweak. Registry editor is a very sensitive tool to play with and we would highly recommend you take a backup of your registry entries before you proceed with making any changes to your registry settings. You can find out how to take a back of your registry settings from our article How To Backup Registry editor settings in Windows 10 / 11. Once you have taken the backup, please proceed with the steps below.
Step 1: Press the keys WIN + R together to launch the Run window. When the Run window opens before you, type in regedit and hit the Enter key to open the Registry Editor.
Step 2: On the Registry Editor navigation bar, copy and paste the following location and then hit the Enter key.
Computer\HKEY_CURRENT_USER\SOFTWARE\Microsoft\Office.0\Outlook
Note: The above location would work perfectly if you are using MS Office version 13. However, if you are using other versions of Outlook, you need to copy and paste their respective locations. Different Outlook versions and their registry locations are as follows.
Outlook 2007: HKEY_CURRENT_USER\Software\Microsoft\Office.0\Outlook\

Outlook 2010: HKEY_CURRENT_USER\Software\Microsoft\Office.0\Outlook\

Outlook 2013: HKEY_CURRENT_USER\Software\Microsoft\Office.0\Outlook\

Outlook 2016: HKEY_CURRENT_USER\Software\Microsoft\Office.0\Outlook\
Once you have figured out the correct version of your Outlook and have navigated to its correct path, make sure you are at the Outlook folder on the left pane of the window.
On the right side of the window, right click on an empty space, click on the New option and then click on the option that says Expandable String Value.
Step 3: Click on the newly created expandable string value and then press the F2 key. This will let you rename the new value.
Name the new expandable string value as ForceOSTPath.
Step 4: Similarly, right click on an empty space in the same location once again and then press the New option. As next, click on the Expandable String Value option once again.
Step 5: Select the newly created value and press the F2 key to rename it. This time give the name as ForceOSTPath.
Step 6: As next, double click on the ForcePSTPath expandable string value, and then under its Value data field, copy and paste the new location where you want the PST/OST file to be saved at.
Once done, hit the Enter key or the OK button.
Step 7: Similarly, double click on the ForceOSTPath expandable string value and then give the location just like in the above step under the field Value data.
It is recommended to give both the locations the same as you will have all your OST/PST files in one single location.
That’s it. Your registry editing part is done. You can close the registry editor and move on to the final steps that are detailed below.
If you simply change the PST/OST file paths in the registry editor, the existing files will not be moved to the new location. You will have to do that manually. Don’t worry though, this is a simple process.
Step 8: Navigate to the old location of the PST file. This is the location that you found out in Section 2, Step 4.
As next, open a new window and navigate to the new location that you gave in Section 3, Steps 6 and 7.
Once you have both the locations open, you can simply drag and drop the PST/OST file to the new location. Or you can cut the PST/OST file from the old location and paste it at the new location.
Step 9: You should now be able to see the PST/OST file at your new location as shown in the screenshot below.
Step 10: If you launch your Outlook now, you can see that the PST file got modified, indicating that Outlook is now referring to the new location for the PST file. Enjoy!
Important Note: When you launch Outlook after changing the PST and OST file locations in the registry editor and moving the files manually, Outlook might give you an error saying that it cannot find the PST file. This is because you changed its location in the registry settings and then moved the file manually to a new location. This is totally fine. From the error window, you will have the option to browse for the new PST file and then select it. Once the PST file is located correctly, Outlook would launch without an issue.
Also Read: The Path Specified for the File Outlook.pst is not valid in Microsoft Outlook
Please let us know in the comments section if you have any concerns regarding any of the steps. We are always happy to help.
Stay tuned for more amazing tricks, tips, how-tos, and hacks.


