In Windows, volume mixer is used to adjust the speaker sounds, and system sounds for each device and application. But sometimes users face the issue where if any modifications are done in the volume mixer settings it does not get saved. This issue is mostly due to corrupt files, outdated drivers, needing any setting changes, etc. In this article, we have a few solutions to solve the volume mixer not saving any settings issue. Apply them and get rid of the problem. Let us start!
Basic Checks
Before applying any below solutions, do a basic check of your device and see if the issue is solved.
Firstly if you are using headphones or a headset then check if the volume button is not damaged. If it is damaged replace the headphones and then check if the issue is solved.
Secondly, restart your system and then follow the below steps
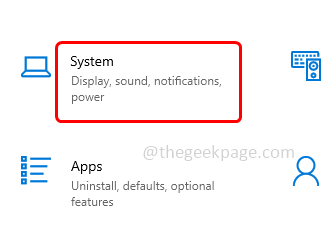
Step 1 – Open the windows settings using Windows + I keys together
Step 2 – Click on system
Step 3 – On the left, click on sound
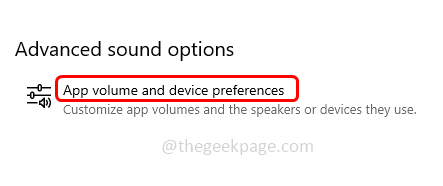
Step 4 – At the right side, scroll down and then click on app volume and device preferences under advanced sound options
Alternatively you can also type sound mixer options in the windows search bar and hit enter
Step 5 – Find system sounds and move the slider towards right side and adjust the volume for the apps. Then check if the issue is solved.
If the above basic methods did not resolve the problem then follow the below solutions.
Method 1 – Enable Allow Applications To Take Exclusive Control Of The Device
Step 1 – Open the run prompt using Windows + R keys together
Step 2 – Type sndvol in the run prompt and hit enter. This will open the volume mixer window
Step 3 – In the device section, click on speakers
Step 4 – Go to the advanced tab
Step 5 – In the exclusive mode section, enable both the options allow applications to take exclusive control of this device and give exclusive mode applications priority by clicking on the checkbox beside them (a tick mark should be present in the checkbox)
Step 6 – To save the changes click on apply and ok. Now check if the settings is being saved or not.
Method 2 – Run The Windows Audio Troubleshooter
Step 1 – Open the windows settings using Windows + I keys
Step 2 – Click on Update & security
Step 3 – On the left, click on troubleshoot
Step 4 – Select additional troubleshooters at the right side
Step 5 – Select the playing audio option and then click on run the troubleshooter button
Step 6 – It will detect and fix if there are any issues. Once the process is completed check if the issue is solved.
Method 3 – Update The Audio Driver
Step 1 – Open the run prompt using Windows + R keys together
Step 2 – Then type devmgmt.msc in the run prompt and hit enter. This will open the device manager window
Step 3 – Scroll down and expand Sound, video, and game controllers by clicking on the arrow mark beside it
Step 4 – Right click on the name of your audio device and then click on update driver
Step 5 – Click on Search automatically for drivers. If there are any latest drivers then it will be installed
Step 6 – Restart the system and check if the issue is solved.
Method 4 – Roll Back The Audio Driver
Step 1 – Open the run prompt using Windows + R keys together
Step 2 – Then type devmgmt.msc in the run prompt and hit enter. This will open the device manager window
Step 3 – Scroll down and expand Sound, video, and game controllers by clicking on the arrow mark beside it
Step 4 – Right click on the name of your audio device and then click on properties
Step 5 – Go to the driver tab
Step 6 – Click on the roll back driver button if it is highlighted. If it is not highlighted then you do not have any previous driver to roll back
Step 7 – Restart the computer and check if the problem is resolved.
Method 5 – Uninstall The Audio Driver
Step 1 – Open the run prompt using Windows + R keys together
Step 2 – Then type devmgmt.msc in the run prompt and hit enter. This will open the device manager window
Step 3 – Scroll down and expand Sound, video, and game controllers by clicking on the arrow mark beside it
Step 4 – Right click on the name of your audio device and then click on uninstall device
Step 5 – In the confirmation pop up click on uninstall button
Step 6 – Restart the computer and the driver will be automatically installed. Then check if the issue is solved.
Method 6 – Restart The Windows Explorer Process
Step 1 – Right click on the taskbar and click on task manager
Step 2 – In the task manager window, right click on the windows explorer under processes tab
Step 3 – From the appeared list, click on restart
Step 4 – Now modify the settings in the volume mixer as per your need and then check if it is saving the settings and the issue is solved
Method 7 – Repair The Corrupted System Files
Step 1 – Open the command prompt as an administrator. To do this, type cmd in the windows search then hold Ctrl + Shift keys together and hit enter
Step 2 – A user account control window will open, click on yes
Step 3 – Type the following command in the command prompt and then hit enter
sfc /scannow
Step 4 – It will take a few seconds to finish the process. Once done restart the computer and then check if the issue is been resolved.
That’s it! I hope the above provided information is helpful and easy to follow. Let us know which method worked work you. Thank you and happy reading!!


