Windows Insider users must always be ready to face new challenges and difficulties in their installed OS builds. Suddenly, your computer may show “Preparing Windows” and load some key items incorrectly. Users have also reported that Explorer.exe is not functioning properly. But, don’t worry. There are some immediate fixes that you can apply to fix the issue yourself.
Quick Fixes –
There are some quick fixes you should obviously try before you jump on to the main solutions –
1. Restart the system. Rebooting it should fix it if this is just a glitch.
2. Use another account. This can just be an issue with a local, standard account.
Fix 1 – Remove the affected value
You can remove the affected value using an elevated command prompt page.
Way 1 – Using the terminal
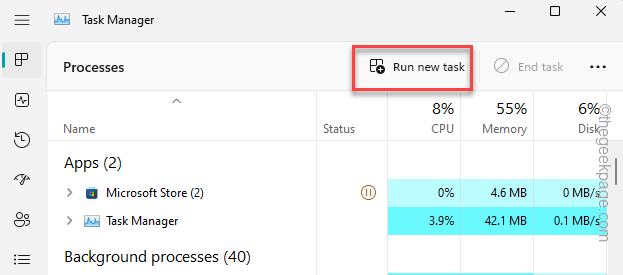
Step 1 – Open the Task Manager page. You can easily do that using the Ctrl, Shift, and Esc keys together.
Task Manager may appear in a concise manner. You can tap “More details” to show the complete list of tasks.
Step 2 – In the Task Manager window, click “Run new task“.
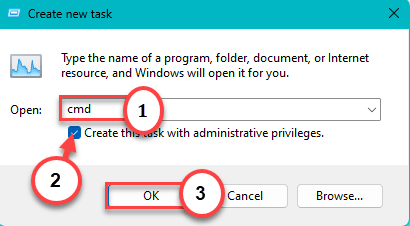
Step 3 – Then, input this –
cmd
Step 4 – Make sure that you have ticked this box –
Create this task with administrative privileges
Step 5 – Then, click “OK“.
Step 6 – After this, input this code into the terminal and hit Enter to delete the particular registry from your system.
reg delete HKCU\SOFTWARE\Microsoft\Windows\CurrentVersion\IrisService /f && shutdown -r -t 0
After removing the registry value, exit the terminal.
Registry edits don’t come into effect until you restart the system. So, restart your machine.
This should bring back everything to normal.
Way 2 – Using the Registry Editor
If you don’t want to use the terminal method, you can open the Registry Editor and delete the particular value from there.
Step 1 – Use the Win key to open a search bar. Then, type “regedit“.
Step 2 – Then, click “Registry Editor” to open that.

Step 3 – Now, get to this point –
HKEY_CURRENT_USER\SOFTWARE\Microsoft\Windows\CurrentVersion\IrisService
Step 4 – On the other hand of the page, look at whether you can see the “Shutdown” value. Then, right-click it and tap “Delete” to remove it.
Step 5 – You will notice a warning prompt has appeared. Tap “Yes” to remove it.
You have to close the Registry Editor window after this. Then, reboot the computer.
[
If you can’t delete the value in normal mode, you have to boot the system into Safe Mode and remove it from there.
Steps to boot the system into Safe Mode
Step 1 – Using the Win+I keys open Settings.
Step 2 – Then, open the “System” pane.
Step 3 – On the other hand of the page, track down “Recovery” section and open it.
Step 4 – Go further down until you found the Recovery options. In that, locate Advanced Startup settings.
Step 5 – Just tap “Restart now” to reboot the system.
Wait for a few moments till your system boots up in Advanced Startup mode.
Step 6 – Just click “Troubleshoot” on the Choose an option page.
Step 7 – On the following screen, click “Advanced options“.
Step 8 – Next, choose the “Startup settings” option.
Your computer will restart and show you all the available startup options. Now, click “Restart”.
Step 9 – If you look closely, you will notice “Enable Safe Mode” in the 4th option. So, press the F4 key from your keyboard to restart the Safe Mode.
Windows will boot into Safe Mode very quickly. Wait until that happens.
Once you are in the Safe Mode, try to delete the registry value from your computer.
]
Fix 3 – Update the computer
This has happened due to a bug in the recent Windows 11 Insider updates. So, install all the pending updates or get a new build.
Step 1 – Start to type “windows update” in the search box.
Step 2 – When you see the “Check for updates” option, click that.
This will place you to Windows Update page. See whether Windows is already downloading an vital update for your system.
Step 3 – If that isn’t the case, click “Check for updates“.
Usually, Windows Insider users have a higher update frequency than any normal users. So, there should always be an ‘next’ update preview you can download and install.
Step 4 – If you see any optional builds, you can tap “Download & install” to download and install the update package directly to the system.
Step 5 – When all the updates are downloaded and installed, you can just restart the system. Otherwise, on the same Settings page, click “Restart now” to reboot it.
When the system does complete the whole update process, you may see the “Preparing Windows” for the first startup, but everything else including Explorer would work just fine.
Fix 4 – Run system scans in Advanced Startup
There are some file checker that may fix corrupt files on your system to subdue this error, but you can only run those from Advanced Startup page.
Step 1 – Open Command Prompt in Recovery Mode
Step 1 – Open Settings and go to the “System” pane.
Step 2 – Head on to this “Recovery” point from the opposite side and open it.
Step 3 – Get to the Advanced Startup point by scrolling down, slowly. There, click “Restart now” to reboot the system.
Wait for a few moments till your system boots up in Advanced Startup mode.
Step 4 – Just tap “Troubleshoot” on the following page.
Step 5 – On the following screen, click “Advanced options“.
Step 6 – Just click “Command Prompt” to open that utility.
Wait Windows opens up the terminal interface.
Step 7 – As you have opened that, type this word. Then, hit Enter to open the boot configuration directory editor.
BCDEDIT
Step 8 – Then, write down this code (as you can’t copy-paste it) carefully and hit Enter.
sfc /scannow /offbootdir=C:\ /offwindir=C:\windows
[The “C:” drive represents the Windows installation drive.]
Step 9 – After this, use these DISM tools to start and analyze the file scan.
DISM /Online /Cleanup-Image /StartComponentCleanup
DISM /Online /Cleanup-Image /AnalyzeComponentStore
Step 10 – Wait until the first DISM tool completes the scan. Then, run this code.
DISM /Online /Cleanup-Image /RestoreHealth /source:F:\Sources\Install.wim:1 /LimitAccess
Exit Command Prompt.
Check if this fix the issue.
Fix 5 – Leave the Windows Insider Program
The last option in the list is your choice to leave the Windows Insider Program. Otherwise, you can also for the Beta track of Windows Update process.
You can find this setting in Windows Update.
Settings > Windows Update
There you will find the option to Leave the Windows Insider Program.
Your computer will restart and you should become a normal Windows user again.x


