Are you seeing a slack or glitch during video playback? Many users have reported an issue where the video they are playing lags or stutters during playback. A few have seen this problem with videos present on their computer while others encountered it during streaming them. Also, there were some instances where the issue was seen with videos played using a particular player.
Possible causes behind this video lag or stutter issue are :
- Outdated graphics drivers
- Windows not updated with the latest updates
- Playing video with an obsolete media player
- Video file corruption
- Improper System Configuration
- Incorrect Media player settings
- Malware Infection
In this article, based on the possible causes we have listed some troubleshooting strategies that can be used to overcome this video lag issue on your computer. Before moving ahead with the fixes, perform a system restart which will refresh the OS and delete any temporary data that is corrupted. Check whether the issue is fixed after a restart.
Fix for Videos Present in the Computer
Fix 1 – Update the Graphics Drivers
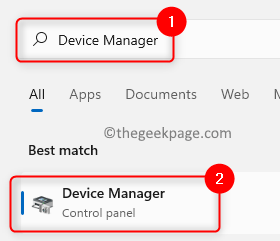
1. Hit the Windows key and type Device Manager in the search box.
2. Click on Device Manager in the search result to open it.
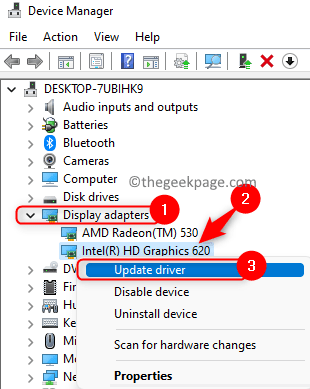
3. In the Device Manager, expand the Display adapters heading by double-clicking on it to see all the installed drivers.
4. Right-click on the specific graphics driver and choose Update driver.
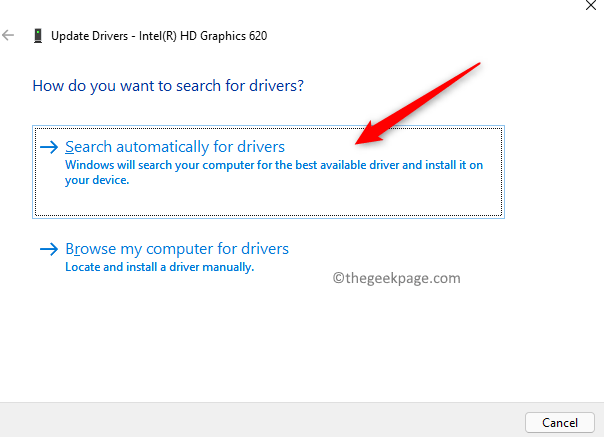
5. The Update Driver window opens up. Here select the option Search automatically for drivers.
6. Windows will now look for any updates for this driver and install it on your system.
Fix 2 – Alter Video Playback settings
1 – Open settings by pressing Windows key + I keys together.
2 – Now, Click Apps in left menu and then click on Video playback on the right.

3 – Now, turn off the Save network bandwidth by playing video at lower resolution option

4 – Now, under Battery options select Optimize for video quality

Fix 3 – Change to high performance plan
1. Press Windows + R to open the Run dialog.
2. Type powercfg.cpl and click on OK to open the Power Options window.
3. In the Power Options window, Select High performance plan.

Fix for Video Lag Issue with VLC Media Player
Fix 1 – Disable Hardware-Accelerated Decoding
1. Launch VLC Media Player from the Start Menu or Desktop Shortcut.
2. Click on the Tools menu and choose Preferences in the sub-menu.
3. Select the Input/Codecs tab in the Preferences window.
4. In the Codecs section, open the dropdown box next to Hardware-accelerated decoding and choose Disable.
5. Click on Save.
6. Try playing the video to check if the problem is solved.
Fix 2 – Lower the File Caching Value
1. Open VLC Media Player.
2. Press Ctrl + P to open the Preferences window.
3. At the bottom-left corner, check the box next to All below Show settings to see all the available settings.
4. Click on Input/Codecs in the left pane.
5. Now on the right side, locate the Advanced section.
6. Change the value for File caching (ms) to a value lower than the current one. Click on Save.
7. Check if the video plays without any lag.
Keep lowering the values until the issue is resolved. If none of the values work, then there are chances that the video format is incompatible.
Fix 3 – Change the Video to Compatible Format
1. Launch VLC.
2. Click on the Media menu and choose the option Convert/Save in the sub-menu.
3. To select a file whose format is to be changed, click on Add… button in the File Selection section.
4. Go to the location of the video, select the concerned video and click on Open.
5. Once the video has been added, click on Convert/Save button at the bottom.
6. In the Convert window you need to choose a destination location. Click on Browse and choose a location to save the converted video.
7. Give a name for the file in the location and click on Save.
8. Start the conversion by pressing the Start button in the Convert window.
9. Play the video after converting to the compatible format and check if the lag problem is fixed.
Fix 5 – Edit the Number of Processors
1. Just hold the Window and R key combination to open Run.
2. Type msconfig and hit Enter to open System Configuration.
3. Select the Boot tab.
4. Click on the Advanced Options… button.
5. In the BOOT Advanced Options window, check the box next to the Number of processors.
6. Use the dropdown below and then choose either option 1 or 2.
7. Click on OK to save the changes to BOOT Advanced options.
8. Click on OK in System Configuration to save and exit.
9. Restart your PC and check if your video plays without any errors.
Fix 6 – Modify Your Windows Wallpaper Settings
If your desktop background is set as a slideshow, there may be issues with the video every time the background picture changes.
1. Open Run (Windows + R).
2. Type ms-settings:personalization-background and hit Enter to change the Desktop Background Settings.
3. Click on the dropdown menu next to Personalize your background to change the type.
4. Change the Background type from Slideshow to either Picture or Solid color.
5. If the option Picture is selected, you can choose your picture using the Browse button and also choose a fit for the picture on your Desktop.
6. If you select Solid color, then choose a color or set a custom color.
7. Once these changes are done, check for any issues with the video.
Fix 7 – Lower the Video Resolution
1. Hit the Windows key and type Video Editor in the search box.
2. Launch Video Editor by clicking on it.
Note: Video Editor is built-in into the Windows Photos app.
3. Here click on New video project to start a new video project.
4. Give a name for the video and click on OK.
5. Click on the Add button in the top-left corner.
6. Choose the option From this PC.
7. Browse through your files and select the video file whose resolution needs to be lowered. Then click on Open.
8. This video will be in the Project Library. Drag and drop it into the Storyboard section at the bottom.
9. You don’t need to make any edits to the video, so click on Finish Video.
10. In the window that opens, use the drop-down menu below Video quality and select a lower resolution from the list.
11. Click on the button Export once the resolution is selected.
12. Choose the location to save the video and click on Export to save the lower resolution video.
13. Play the video and check if the problem is fixed.
Fix 8 – Change Graphics Card Preferences
If you are using two display/graphic card adapters (integrated and dedicated) then try disabling the integrated graphics adapter.
1. Launch Run using Windows and R key combination.
2. Type devmgmt.msc and click on OK to open the system’s Device Manager.
3. Double-click on Display adapters in the list to expand it.
4. Right-click on Intel HD Graphics in the list of display adapters and choose the option Disable device.
5. Reboot your computer and check if the issue still exists on your PC or not.
Fix for Video Stuttering Issue on Browser
Fix 1 – Enable/Disable Hardware Acceleration in Browser
For Google Chrome
1. Launch Chrome.
2. Type chrome://settings/system in the address bar to open Chrome’s Advanced System Settings.
3. Turn off the toggle next to the option Use hardware acceleration when available if it is enabled, else if it is disabled turn on the toggle.
4. Relaunch your browser and check if the problem is fixed.
For Firefox
1. Open Firefox and type about:preferences in the address bar and hit Enter.
2. By default, you will be in the General tab. Scroll down on the right side and locate the section Performance.
3. Now click on the checkbox next to Use recommended performance settings to see the other options.
4. Check or uncheck the box next to the option Use hardware acceleration when available to modify its status.
5. Relaunch Firefox to check if the playback issue is resolved.
For Microsoft Edge
1. Launch Microsoft Edge.
2. Type edge://settings/system and hit Enter to open the System and Performance Settings page.
3. Change the settings for the option Use hardware acceleration when available using the associated toggle.
4. Restart your Edge browser and check if the issue is solved.
Fix 2 – Update Widevine CDM Component in Chrome
WideVine Content Decryption Module component is a decryption module built into the browsers which help to stream high-quality audio and videos on the browser without any issues. Perform the steps mentioned below.
1. Launch Chrome.
2. Press the Ctrl + Shift + Delete key combination to delete the browsing history in Chrome.
3. Go to the Advanced tab. Change the Time Range to All time.
4. Check the box for the options to delete history related to the browsing, download, cached files, and cookies.
5. Click on Clear data to clear the cache.
6. Exit Chrome and make sure no other instance of Chrome is open.
7. Open Run (Windows + R).
8. Type C:/Program Files/Google/Chrome/Application and hit Enter.
9. You will see numbered folders which is the version of Chrome installed. Double-click on the latest version numbered folder.
10. Locate the folder named WidevineCdm here. Select it and press the Delete icon at the top to delete this folder.
11. Press Windows + R and type C:\Users\<username>\AppData\Local\Google\Chrome\User Data and hit Enter.
Note: Replace <username> in the command above with your username.
12. Look for WidevineCdm folder. Delete this folder by clicking on the Delete icon.
13. Open Chrome. Type chrome://components in the address bar.
14. Scroll down and search for Widevine Content Decryption Module.
15. Click on the button Check for update associated with it.
16. Relaunch Chrome once the update completes. Check if the video playback issue is fixed.
That’s it!!
Any video on your system or browser will now play without any glitches in the playback. Comment and let us know the fix that helped you resolve this problem.


