Can’t enjoy acing your way out of the Ascent after upgrading to the Widnows 11 on your computer? There are many users who can’t play Valorant on thier computers after upgrading the system to the latest iteration of Windows. This is because there are certain key differences that has become the basic as the OS has upgraded. We have enlighted these factors and discussed the possible resolutions for this issue in Valorant.
Fix 1 – TPM and Secure Boot is mandatory
The Trusted Platform Module (TPM 2.0) and Secure Boot is absolutely necessary while playing Valorant. So, you must check and enable those.
Stage 1 – Check the status of TPM, Secure Boot
Check the activation status of the TPM and Secure Boot on your device.
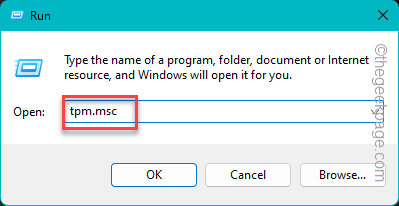
Step 1 – Acess a dialog box named Run using the Win+R keys.
Step 2 – To get acess to the TPM Management tool, type this and hit Enter.
tpm.msc
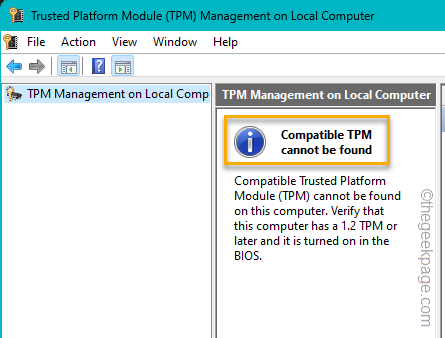
Step 3 – Check the status of the TPM there. If it is says “Disabled” or “Compatible TPM cannot be found“, you have to enable it from the BIOS.
You should check the current status of the Secure Boot as well.
Step 4 – To do that, open a Run box, paste this and hit Enter.
msinfo32
Step 5 – Select the “System Summary” and check the “Secure Boot State“.
Step 6 – If it depicts “Disabled” or “Unsupported“, you have to enable it manually.
Stage 2 – Enable the TPM, Secure Boot
Step 1 – To do this, you must restart your computer.
Step 2 – As the computer is starting up, check the booting screen to see which key binds with the BIOS settings.
Step 3 – Press and hold that key to boot into the BIOS mode.
Step 4 – Now, depending upon the OEM, you may find the “TPM” and “Secure Boot” options in different locations.
Step 5 – Enable both of these options on your computer.
Step 6 – Save these alterations in BIOS and quit that.
This will restart the system automatically. When it does restarts, you won’t face any difficulty playing Valorant anymore.
NOTE – Even if you have upgraded to the latest version of Windows on an unsupported hardware bypassing TPM and Secure Boot features, Riot Vanguard on Windows 11 reuires them enabled. So, there is nothing you can do to play Valorant unless you downgrade to the Windows 10.
Fix 2 – Use the Valorant in compatible mode
You should run the Valorant in compatibilty mode.
Step 1 – To do this, first, search for “Valorant“.
Step 2 – Next, right-click the search result “Valorant” in there and click “Open file location“.
Step 3 – It does only take you to location of the shorcut file. So, right-click the “Valorant” entry in there and click “Open file location“.
Step 4 – As this redirects you to the actual location of the Valorant files, right-click the “RiotClientServices” and click “Properties“.
Step 5 – Switch to the “Properties” tab, quickly.
Step 6 – As you get there, check the “Run this program in compatibility mode for:” and choose the “Windows 7” from the list.
Step 7 – Finally, to save all these changes, tap “Apply” and “OK“, one after the other.
Close everything and launch the Valorant as an administrator and test.
Fix 3 – Close all the Riot processses
If there are other Riot processes or threads are runnning, it can obstruct the game from launching.
Step 1 – Simply, right-click the Windows icon and click “Task Manager” from there.
Step 2 – Scroll through the entire list of processes and find anything related to “Riot games” or “Bootstrap package“.
Step 3 – If you see any of such process, right-click those and click “End task” to kill them.
Look for any existing version of Valorant running there and end it.
Make sure there are not any Valorant processes are runing there.
Now, you can enjoy Valorant easily.
Fix 5 – Launch the game from taskbar overflow
This is a nice but definite workaround for this problem.
Step 1 – Launch the Valorant.
Give the game a minute to boot up.
Step 2 – If that doesn’t happen, go ahead and tap the Taskbar corner overflow button.
Step 3 – Next, right-tap the small M logo (Riot mark) and click “Riot games“.
Step 4 – This will load up the laucher. Tap “Valorant” to open it in My Games section.
Step 5 – Now, tap “Play” to readily launch Valorant*.
This time the game will launch and you will be enjoying owning your opponents in Bind in no time!
[*NOTE – If you see the Play icon is greyish, that means another iteration of the game is already running.
1. Open the Task Manager.
2. Find the “Valorant.exe” process and kill that.
Now, you can use that Play button again.
]
Fix 6 – Uninstall and reinstall Valorant
If nothing works, just uninstall the Valorant and reinstall it.
Step 1 – Go to your system Settings by pressing the Win+I keys.
Step 2 – Next, click “Apps“.
Step 3 – After that, tap “Installed apps” on the other part.
Step 4 – Put “Valorant” in the search box.
Step 5 – Next, tap the three-dot button beside the search results and click “Uninstall“.
Now, the Riot Games uninstaller page will open up.
Follow the steps in there to uninstall the game package from your system.
Step 6 – Go to the Valorant Download page. Tap “Download” to get the setup file from there.
Step 7 – Run the “InstallValorant” program and complete the installaltion proces.
Wait until the downloading has finished and game is playable.
You can now enjoy Valorant in your Windows 11 setup.


