Just after the recent patch update from the Riot, Valorant users have complained about the following error message with the VAN 9003 on the top – “Initial Attestation failure: Secure Boot requirement not met“. Apart from this error message, VAN 9003 or VAN 9001 can appear on any new machine due to the absence of proper security features, like Secure Boot, TPM, etc. To tackle the VAN 9003 error, make sure that you meticulously follow these instructions.
Quick Fixes to try –
1. Close the VAN 9003 error message. Restart your system. Launch the game directly from the Valorant icon from the Start or Desktop page.
2. Launch the Riot Client. Go to the “Valorant” game there. Hit “Play” to play the game.
Fix 1 – Turn On the Secure Boot, TPM feature
Check whether the Secure Boot, TPM feature is enabled. Otherwise, you have to enable it.
STAGE 1 – Check the status of the Secure Boot
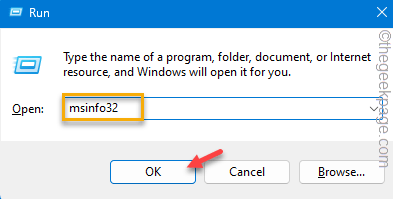
Step 1 – At first, holding the Windows and the R keys should bring up the small Run box.
Step 2 – To get into the System Information page, write this and hit Enter.
msinfo32
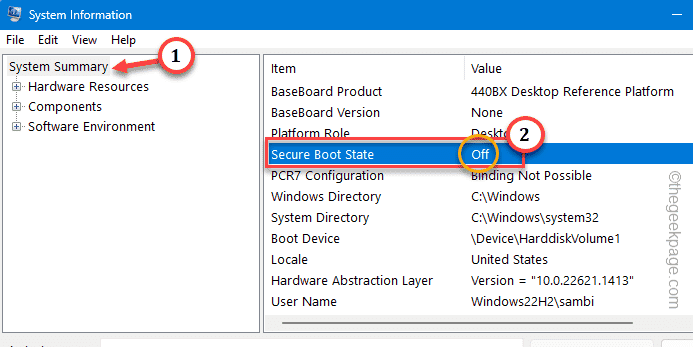
Step 3 – Now, select the “System Summary” on the left pane.
Step 4 – You will find so many options on the right-hand pane. Check the “Secure Boot State” there.
If it says disabled, you have to enable it following these steps.
STAGE 2 – Enable Secure Boot, TPM
Restart your system in Windows Recovery mode and enable the Secure Boot and TPM feature.
Step 1 – Just open the Settings page.
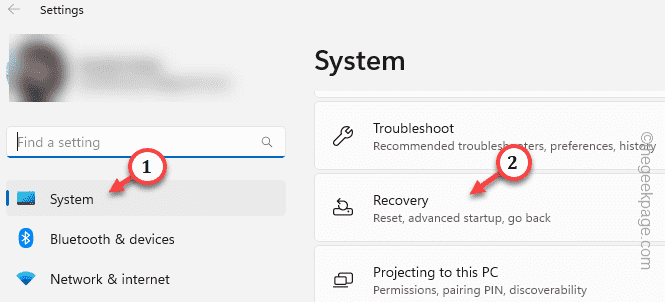
Step 2 – In there, open the “System” settings.
Step 3 – Tap the “Recovery” settings to explore it.
Step 4 – Get to the Advanced startup option on the following settings page.
Step 5 – Here, tap the “Restart now“.
Your system will restart automatically after this. Soon, you will reach the Windows Recovery page.
Step 6 – Once you are there, tap “Troubleshoot” to access it.
Step 7 – Next, just click “Advanced options” on the next screen.
You will find many options on the Advanced options page.
Step 8 – Next, tap “UEFI Firmware Settings“.
Step 9 – Now, tap “Restart” to restart the system and open the BIOS page.
This will open the BIOS page on your system.
Step 10 – Go to the “Advanced” tab and look for the Secure boot feature.
Step 11 – Make sure this feature is enabled.
Step 12 – Look for the “Trusted Platform Module” or TPM feature and enable it as well.
Save this change and exit from the BIOS page.
Your system will automatically will restart. Play Valorant once more. Check if this offers any help.
Fix 2 – Play Valorant in the compatibility mode
Try running Valorant in the compatibility mode.
Step 1 – Try to find the Valorant app icon on your desktop.
Step 2 – If you can find that, right-click “Valorant” and use the “Properties” option.
Step 3 – Simply, get down to the “Compatibility” tab.
Step 4 – In the Compatibility mode zone, tick mark the “Run this program in compatibility mode for:” box.
Step 5 – Valorant works quite well in older Windows also. So, fix the “Windows 8” using the drop-down list.
Step 6 – Save this modifications using the “Apply” and “OK” option.
Compatibility fixes like this should help you resolve the VAN 9001 and VAN 9003 error on your computer.
Fix 3 – Update the graphics driver
Though Valorant doesn’t ask for much, having the latest driver is always a plus. So, update the graphics card.
Step 1 – You can update the graphics card from the Device Manager. Just press & hold the Windows+X keys together.
Step 2 – Open the “Device Manager“.
Step 3 – After opening the Device Manager page, click the “Display drivers“.
Step 4 – Right-click the display adapter and tap “Update driver“.
Step 5 – Just click the “Search automatically for drivers” option.
Windows will automatically download the driver and install it.
Do you have a dedicated GPU on your system? Then, you can also use the NVIDIA GeForce Experience or AMD Adrenalin app to update the driver.
Fix 4 – Uninstall and reinstall Valorant
If nothin is working and you are still facing the VAN 9003 error, uninstall it and reinstall it again.
Step 1 – You have to search for “Valorant“.
Step 2 – Next, right-tap the app and hit the “Uninstall” option.
Just go on following the steps on the screen to uninstall the Valorant app from your computer.
Don’t forget to restart your computer so that the Riot Vanguard gets uninstalled correctly.
Step 3 – Go to the Valorant website.
Step 4 – Hit the “Play free” option to download the latest installer.
Run this installer. Sign in using your Riot ID and password. If it asks, reboot the system. You won’t face the VAN 9001 error again.


